.png)
The purpose of this module is to define the different notification templates following this logic, The ‘Notification Rule Management’ checks all system notifications against the rules' conditions that use ‘Notification Rule Field’. The system will send the relevant notification template if any notification meets the conditions.

1. Notification Template Management
The purpose of this feature is to manage notification templates in many ways such as emails and text messages and their related settings through the following functionalities:
1.1 View Notification Templates
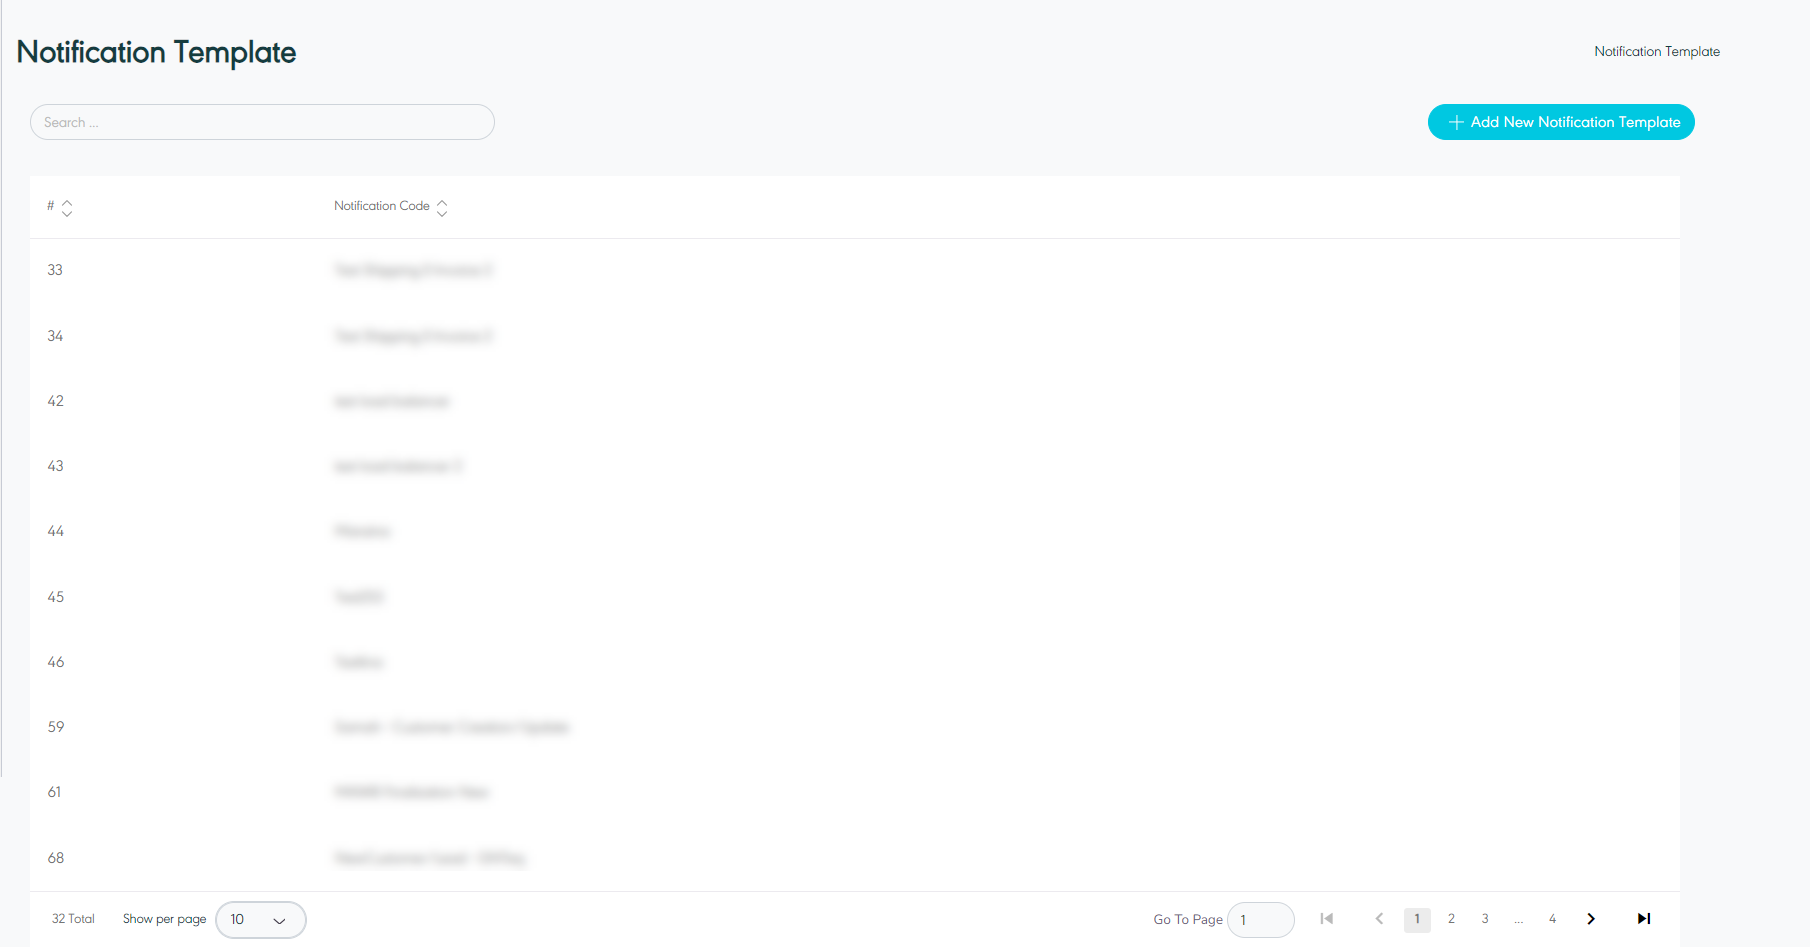
The user can view the defined templates in the system by navigating to the ‘Notification Template’ screen by choosing the Notification Module from the left navigation panel as follows:
-
Search: the user can search for the template by typing the code number pr notification code in the search filter field.
-
Add New Notification Template: the user can add new notification template by clicking on ‘Add New Notification Template’, referring to add new notification template section.
-
Show per page: the user can select the number of items to show on each page.
-
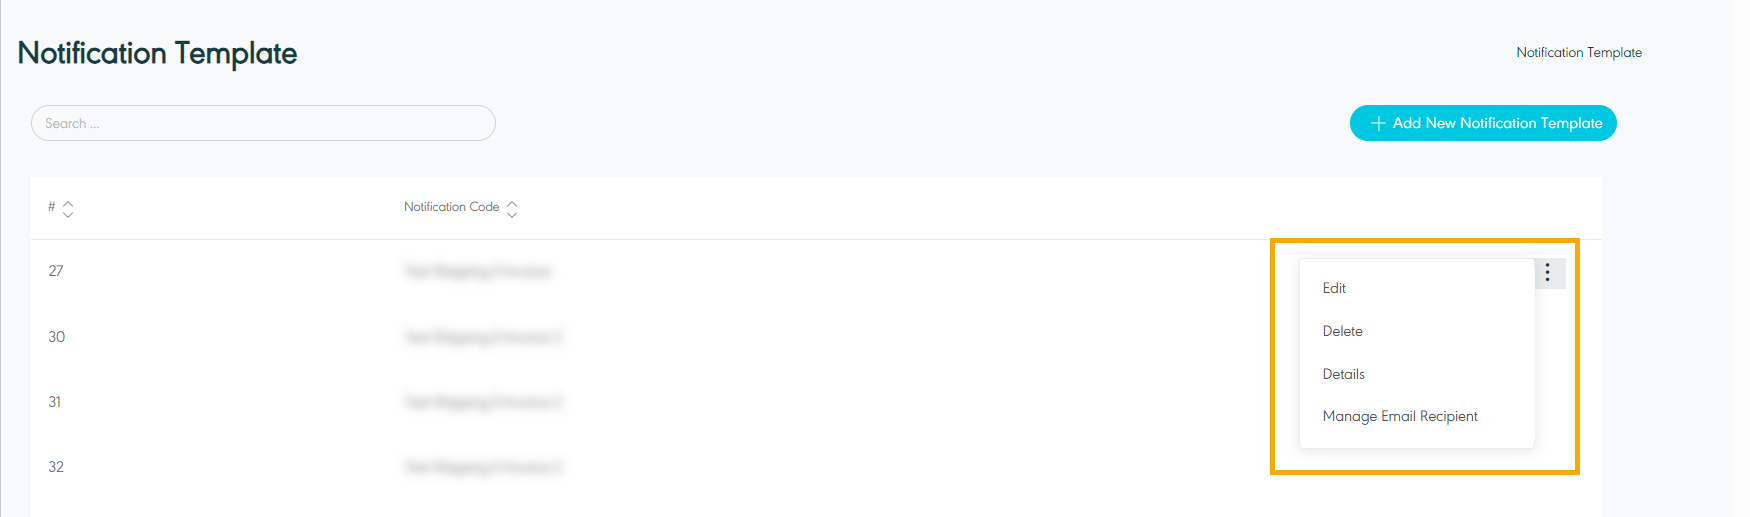
Actions: by clicking on this button the user can view specific template details by referring to View Notification Template Details, edit by referring to Edit Notification Template, manage email recipient by referring to Manage Email Recipient section, or delete by referring to Delete Notification Template, as follows:
1.2 View Notification Template Details
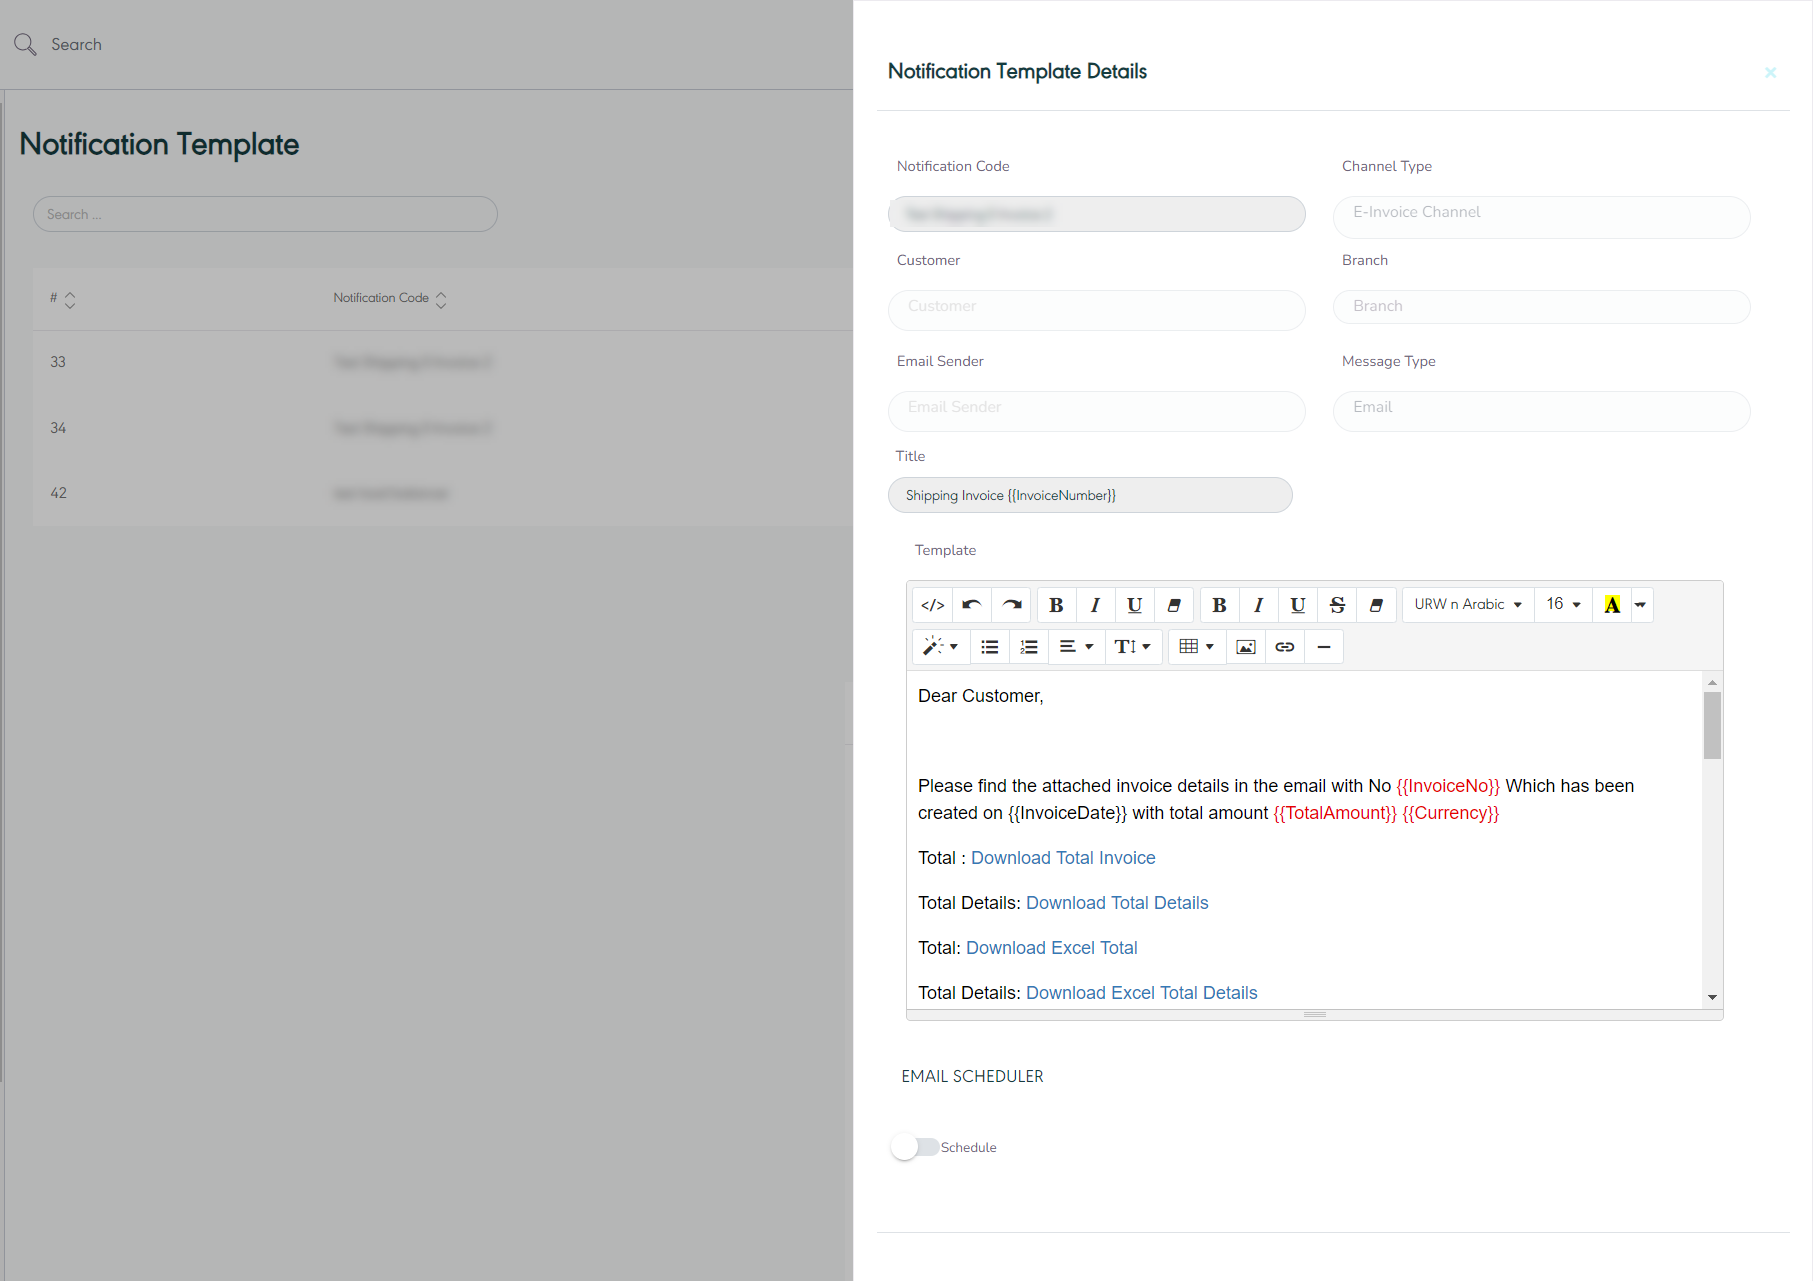
The user can view the notification template details by navigating to the ‘Notification Template’ screen via the Notification Module and clicking on Details from Actions as follows:
1.3 Add Notification Template
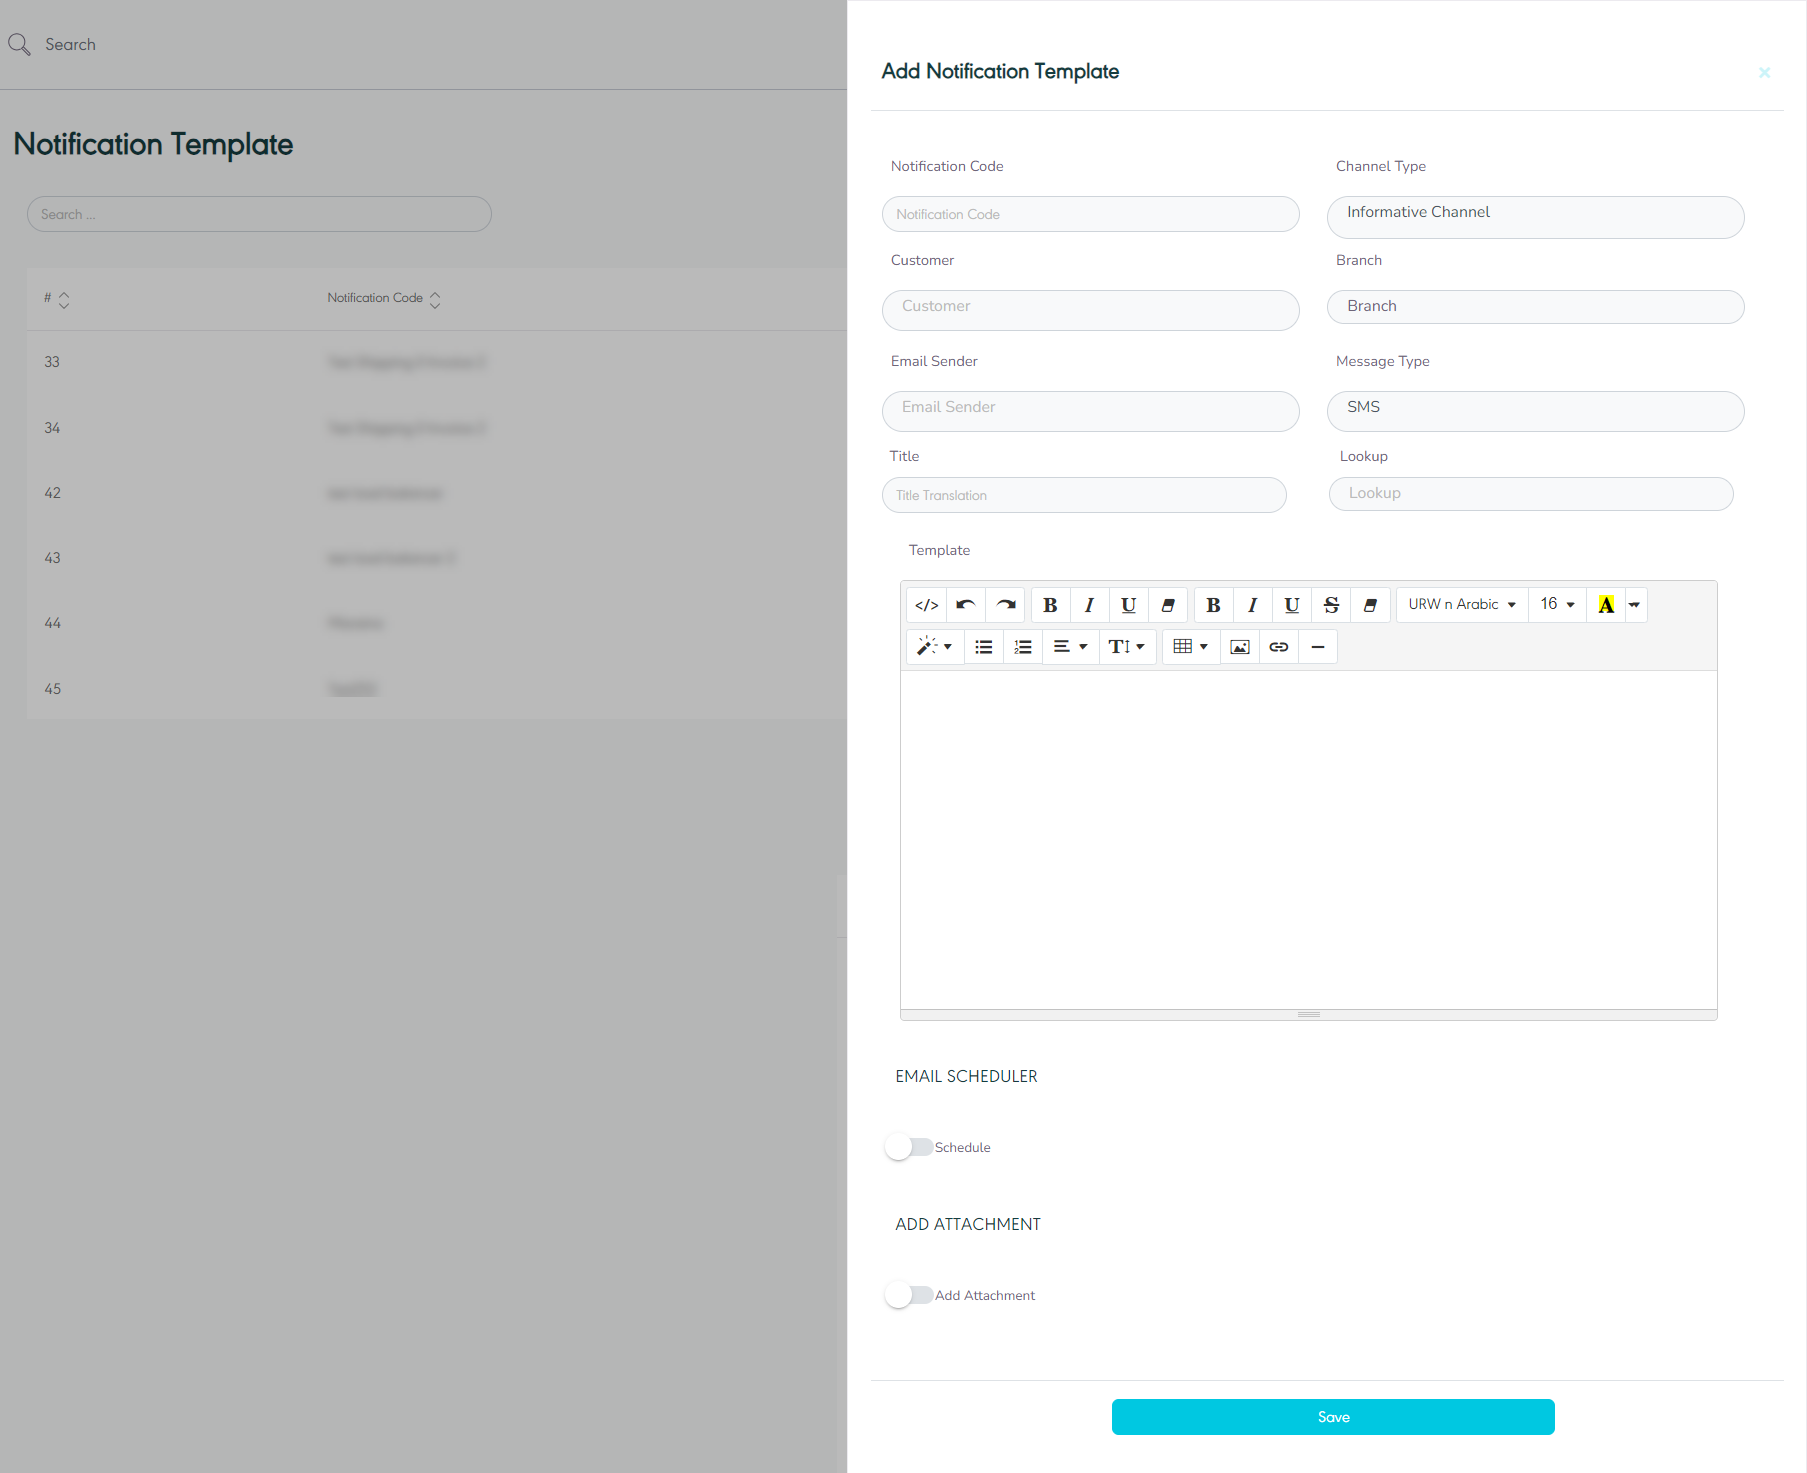
The user can add a new notification template by navigating to the ‘Notification Template’ screen via the Notification Module and clicking on Add Notification Template as follows:
-
Notification Code: this field represents the notification name.
-
Channel Type: this field represents the notification source.
-
Customer: this field represents the name of the customer that was previously defined in the system, if the notification will be sent to a specific customer.
-
Branch: this field represents the name of the branch related to the customer.
-
Email Sender: this field represent the person that sends out emails to recipients.
-
Massage Type: this field represents how to send notifications SMS or Email. Note: the SMS type is not activated for now.
-
Title: this field represents the address where the message will start.
-
Lookup: this list shows the variables that can be replaced with the relevant content, and it must be written inside {{ }}.
-
Email Scheduler: this field represents when to send the notification e.g.: Dailly, Weekly and Monthly. Note: once the email is sent according to the setup successfully, the system will not send anymore notifications.
-
Add Attachment: this field for attaching any static document.
By clicking on Save, the system adds new notification template information successfully.
1.4 Edit Notification Template
The user can edit an existing notification template by clicking on Edit from Actions and navigating to the ‘Notification Template’ screen via the Notification Module as follows:
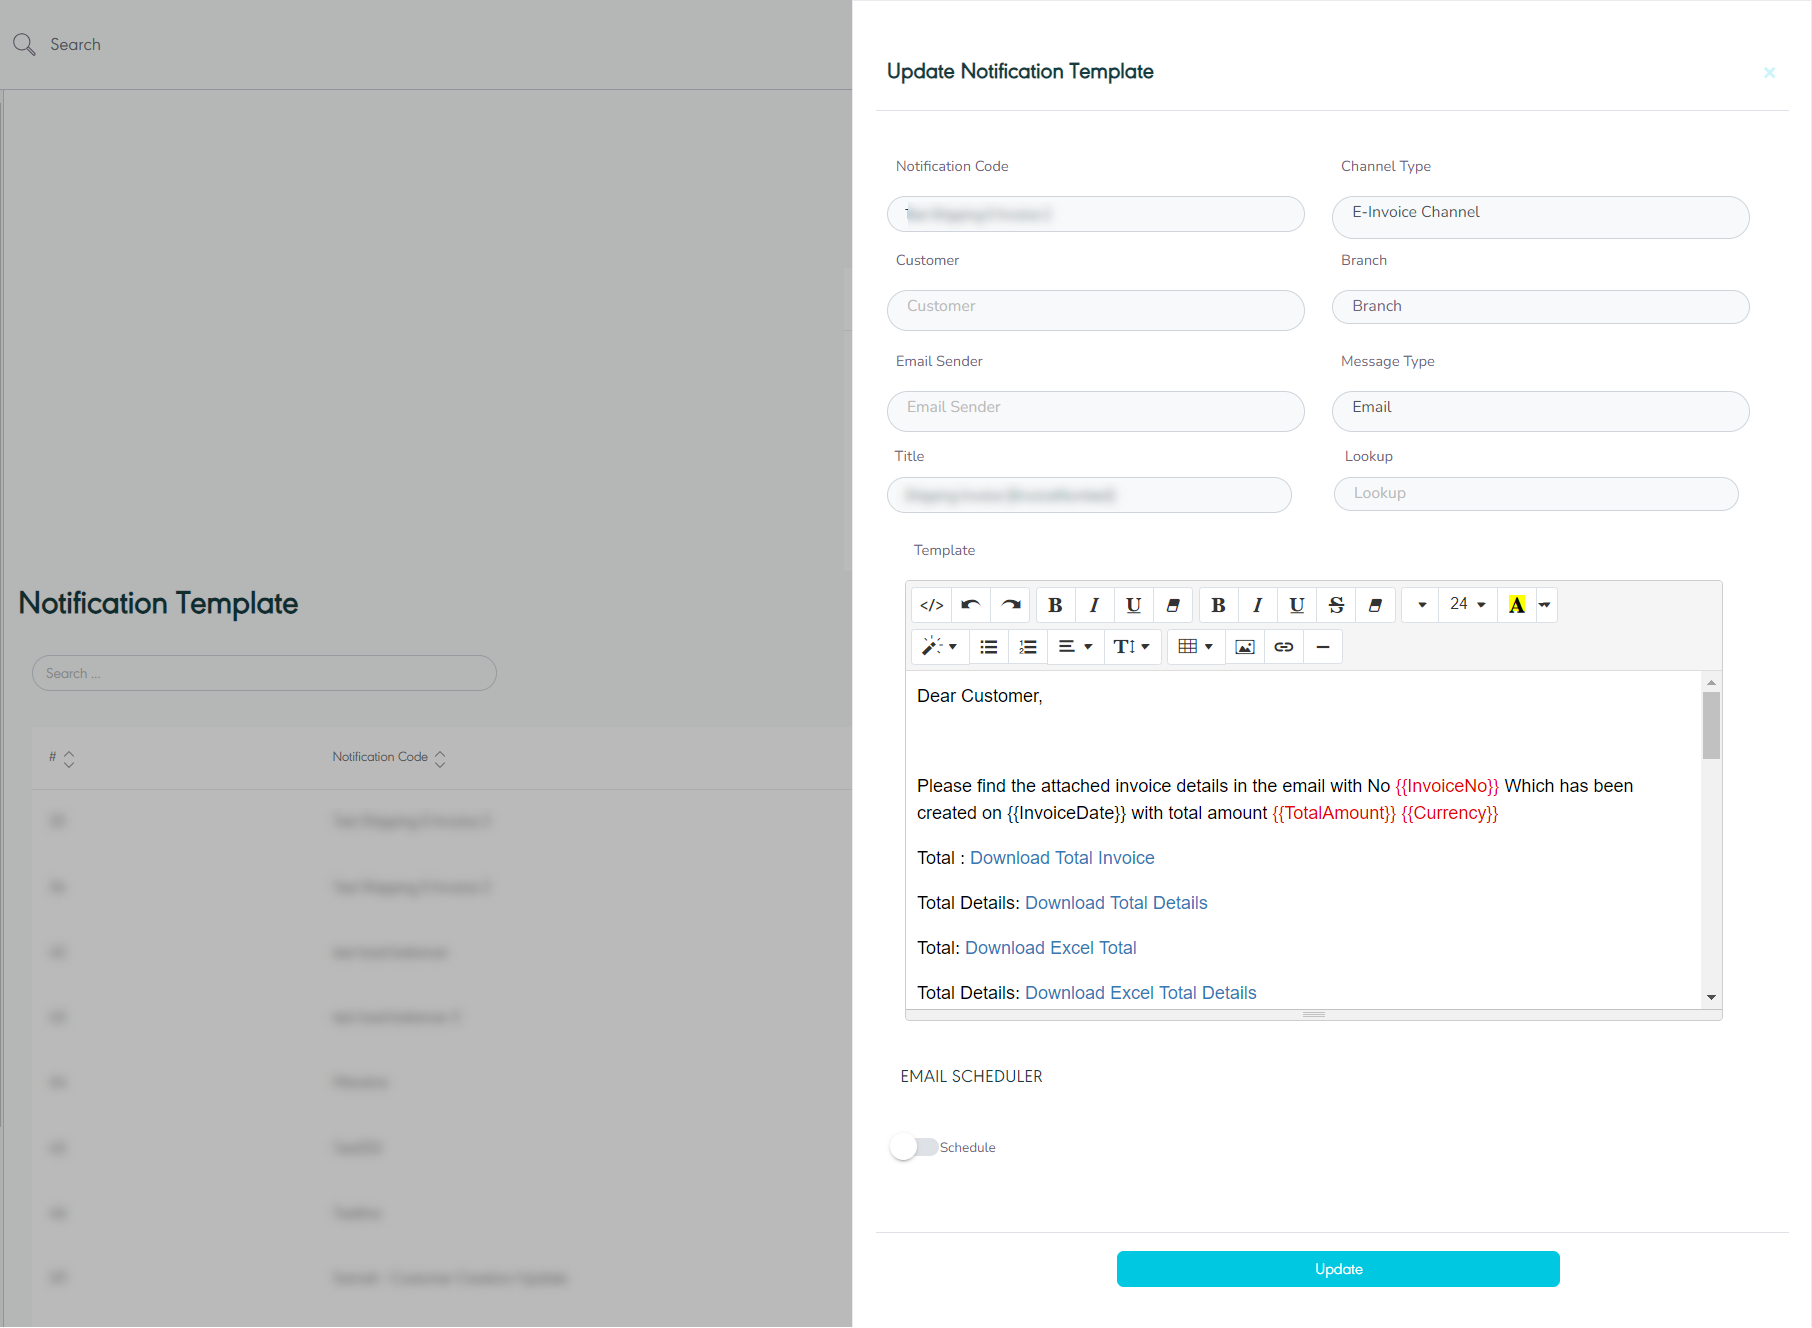
By clicking on Update, the system updates the information successfully.
1.5 Manage Email Recipient
The user can manage email recipient details by navigating to the ‘Notification Template’ screen via the Notification Module and clicking on Manage Email Recipient from Actions as follows:
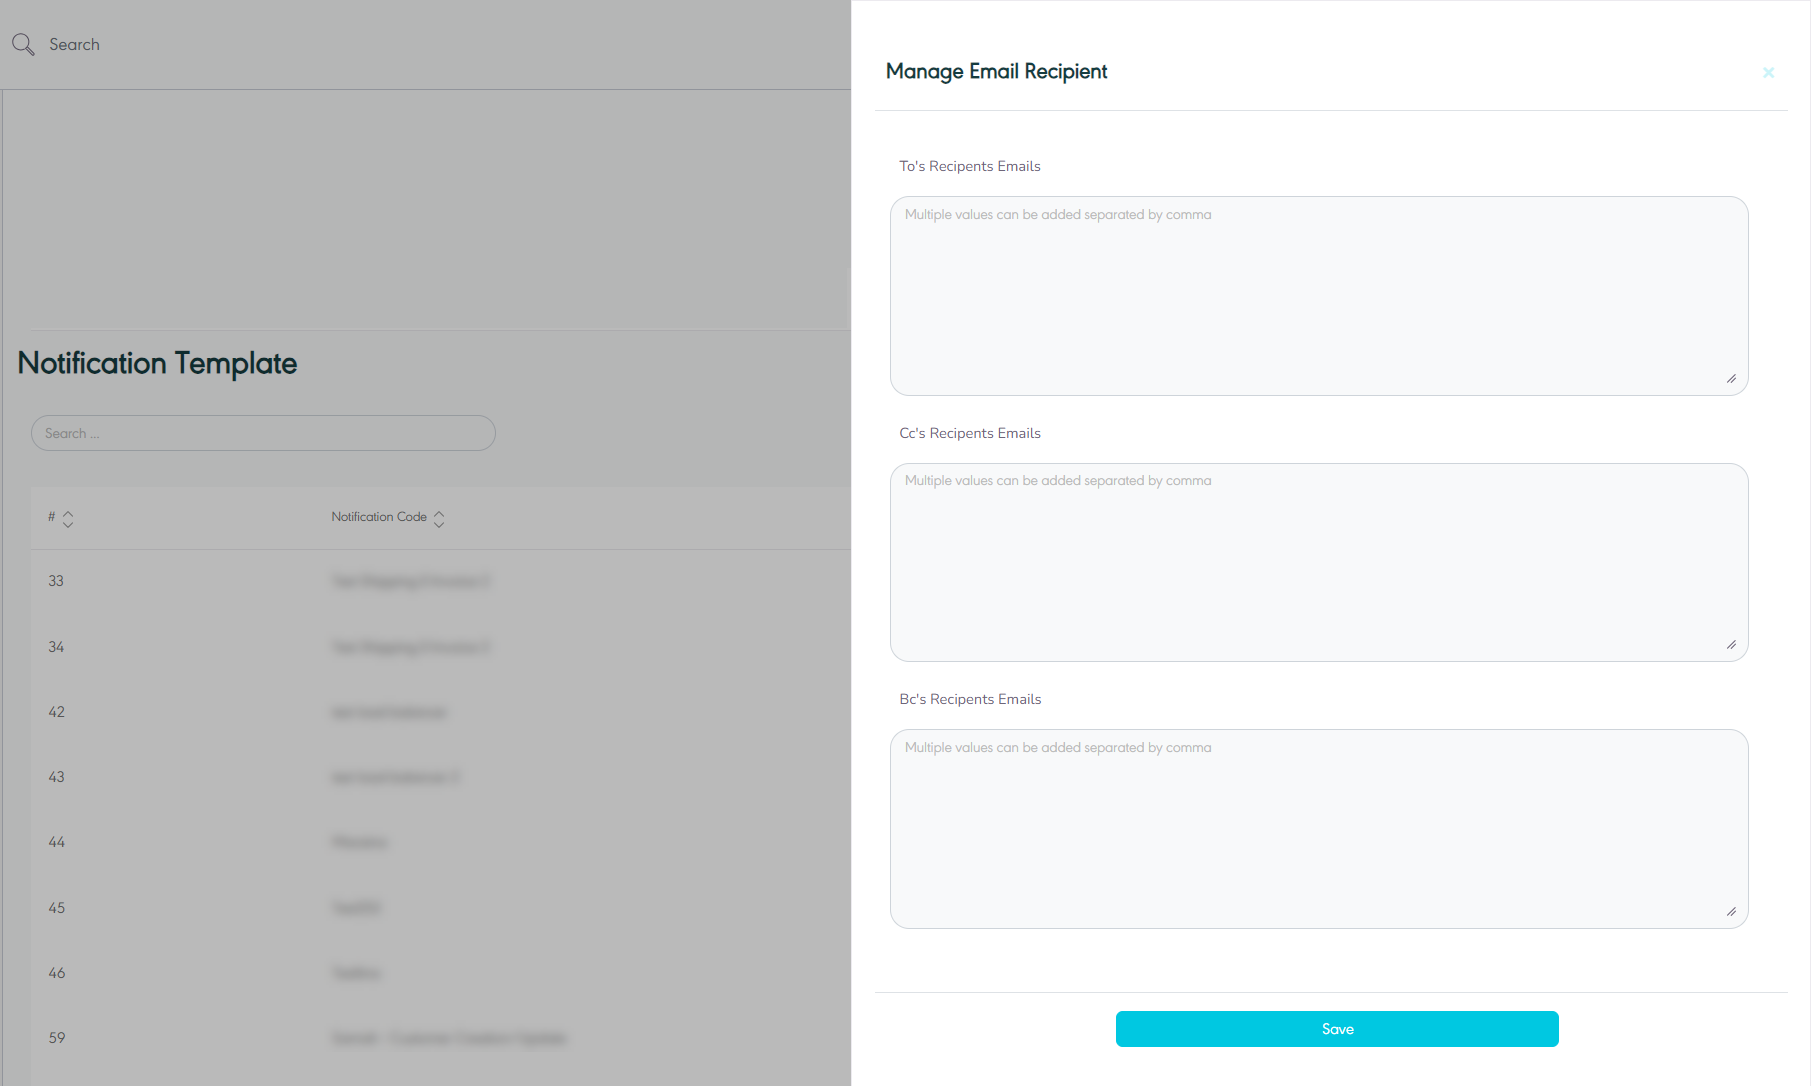
Through this page, the user can specify the recipients list for the notification.
1.6 Delete Notification Template
The user can delete a notification template by navigating to the ‘Notification Template’ screen via the Notification Module and clicking on Delete from Actions.
2. Notification Rule Field
The purpose of this feature is to manage the notification rule field and their related settings through the following functionalities.
2.1 View Notification Rule Field
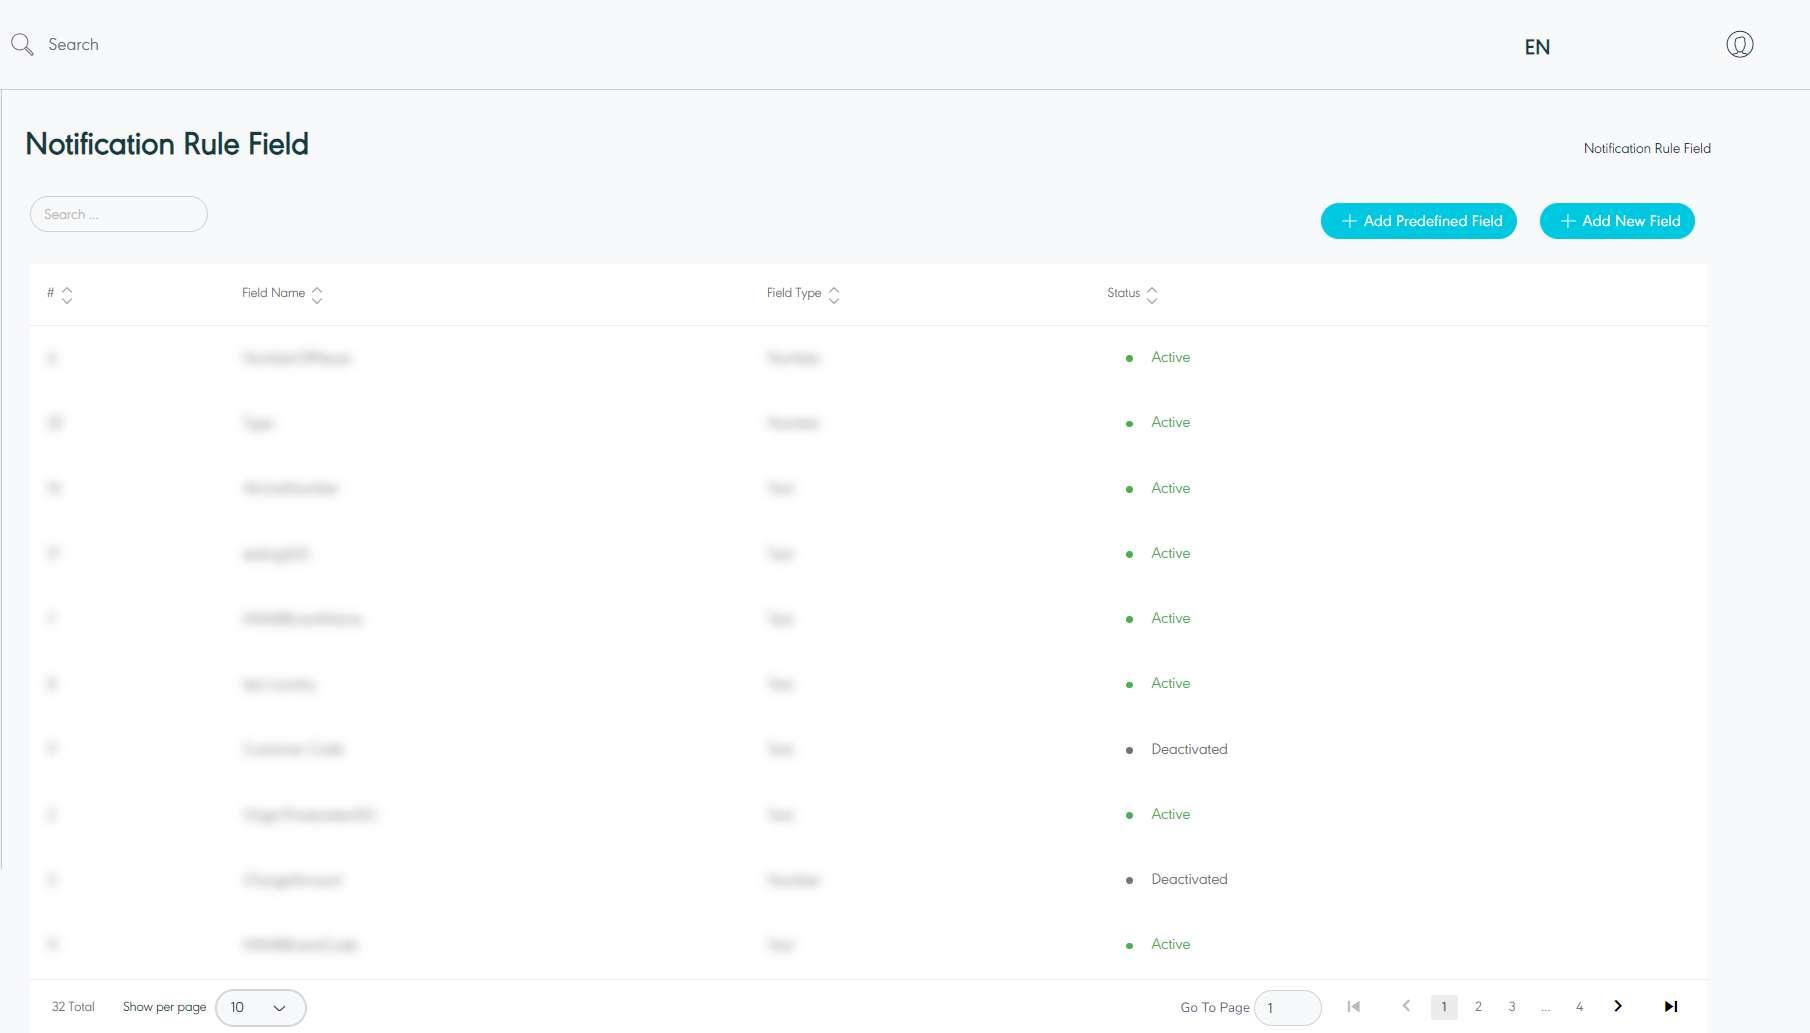
The user can view the defined rule field in the system by navigating to the ‘Notification Rule Field’ screen by choosing the Notification Module from the left navigation panel as follows:
-
Add New Field: the user can add new field by clicking on ‘Add New Field’, referring to add new field section.
-
Add Predefined Field: the user can add predefined by clicking on ‘Add Predefined Field’, referring to add predefined field section.
-
Search: the user can search for the notification rule file by typing the field name or field type the search filter field.
-
Show per page: the user can select the number of items to show on each page.
-
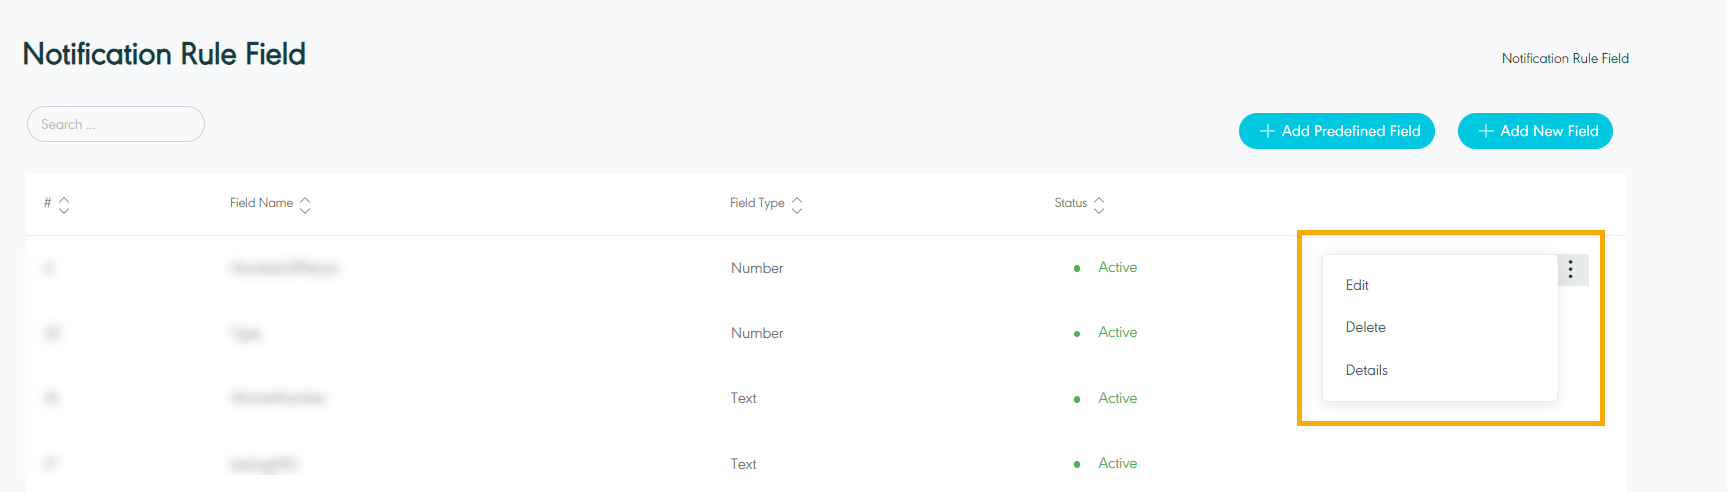
Actions: by clicking on this button the user can view specific notification filed details by referring to View Notification Rule Field Details, edit by referring to Edit Notification Rule Field, or delete by referring to Delete Notification Rule Field, as follows:
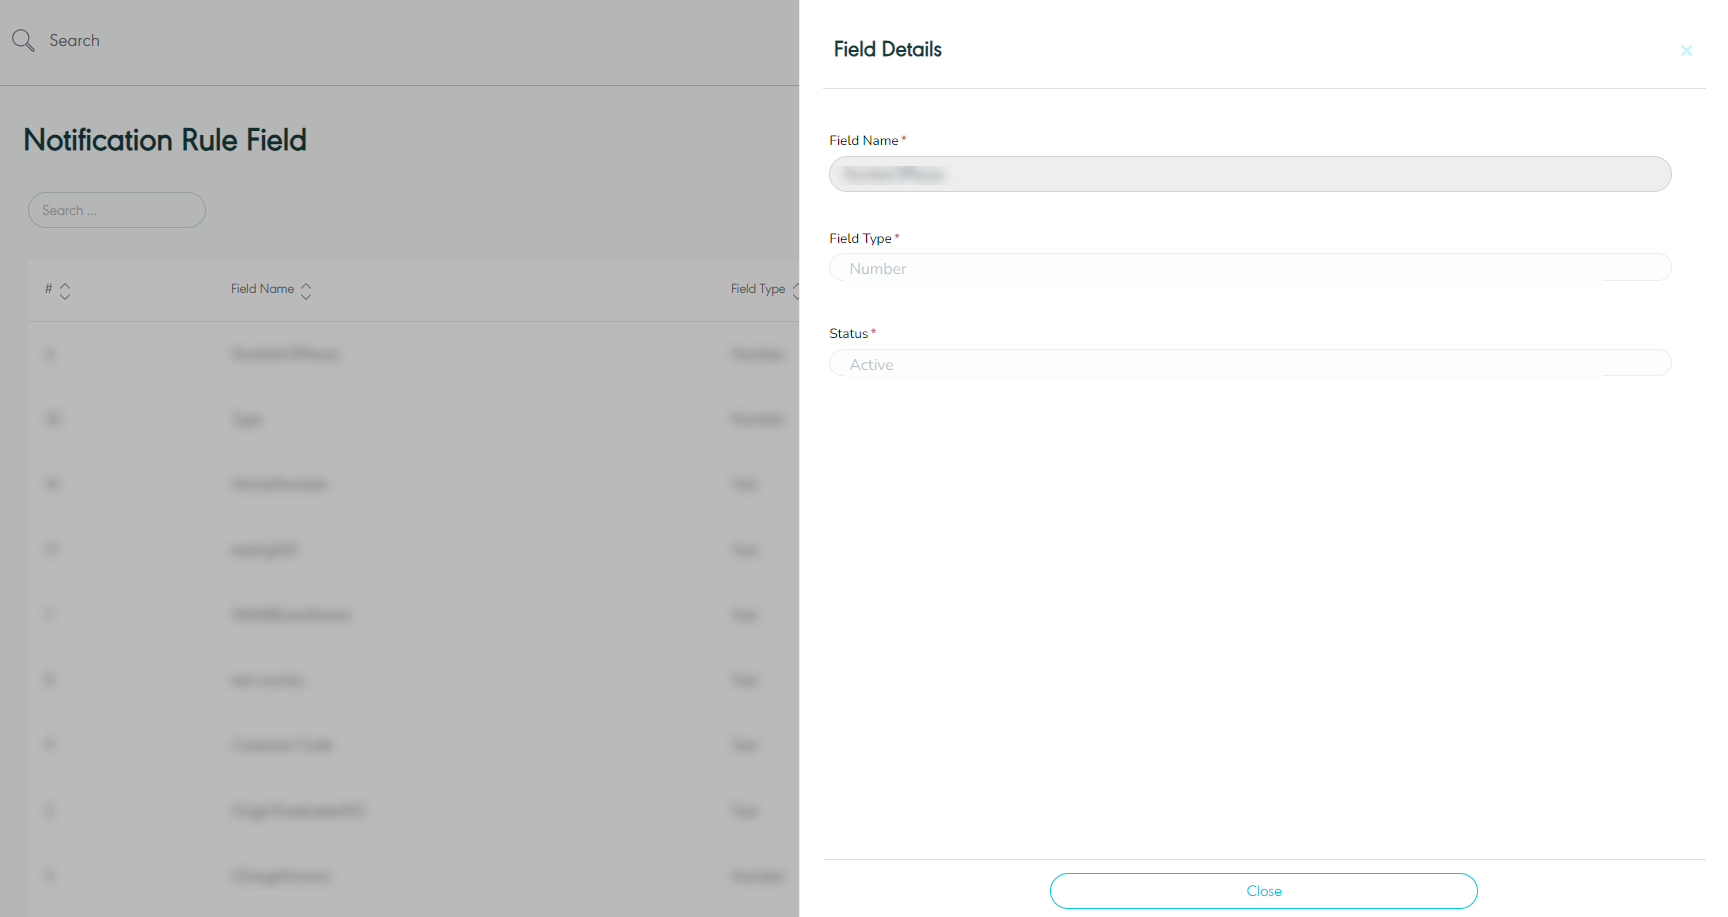
2.2 View Notification Rule Field Details
The user can view the notification rule field details by navigating to the ‘Notification Rule Field’ screen via the Notification Module and clicking on Details from Actions as follows:
2.3 Edit Notification Rule Field
The user can edit an existing notification rule field by clicking on Edit from Actions and navigating to the ‘Notification Rule Field’ screen via the Notification Module as follows:
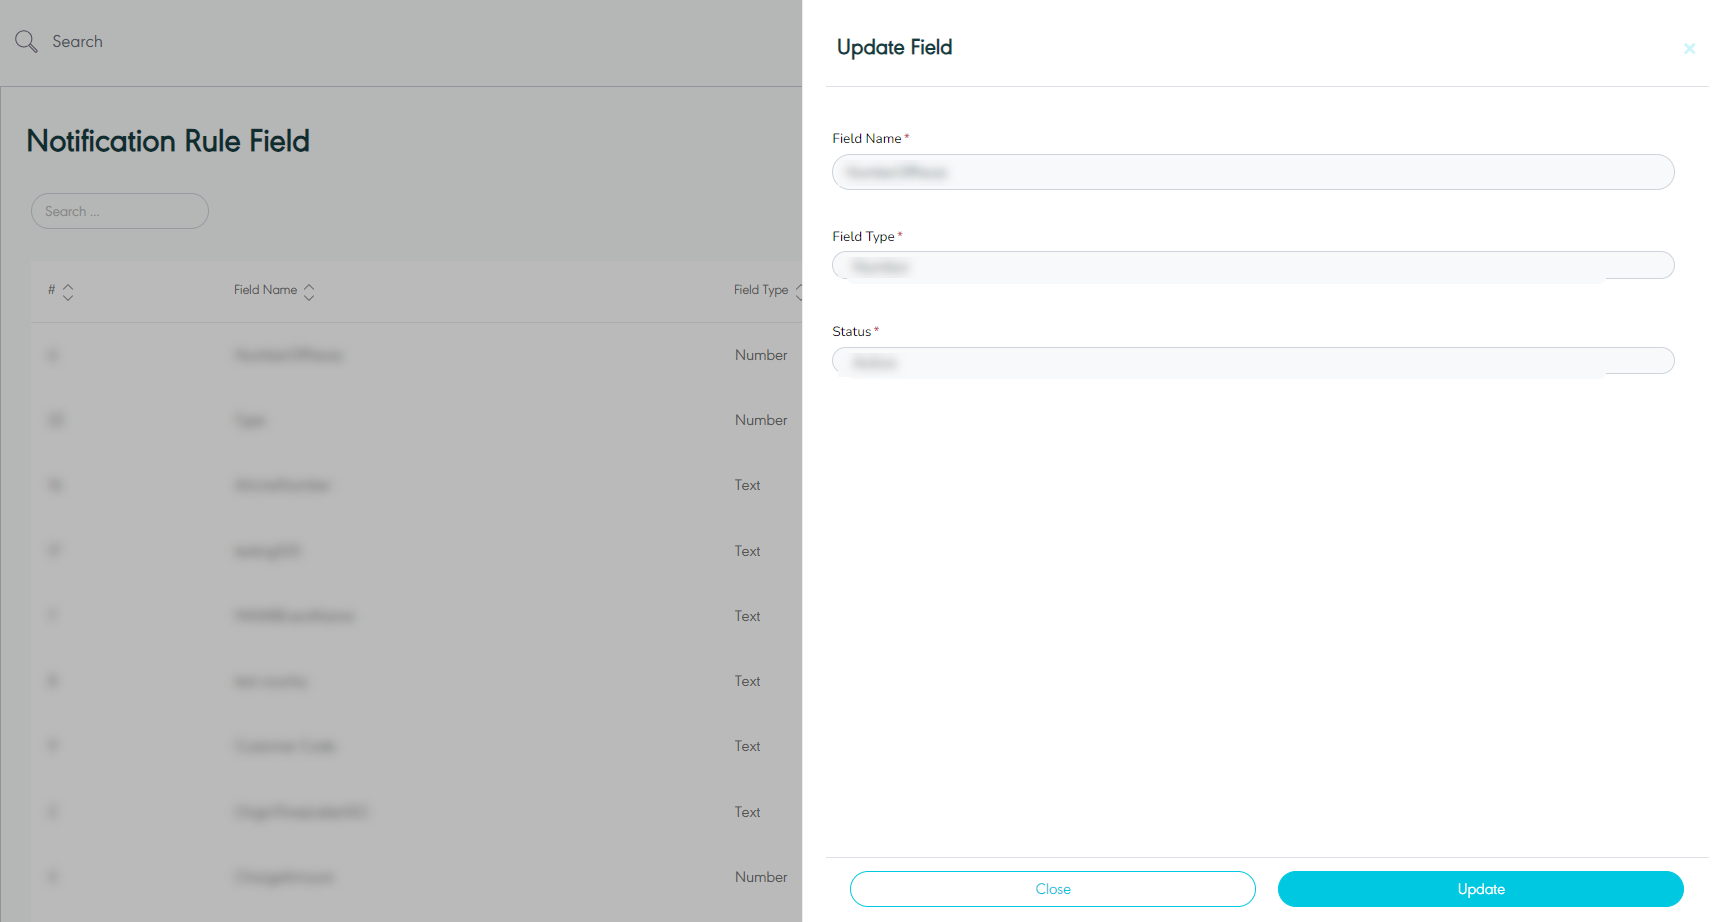
By clicking on Update, the system updates the information successfully.
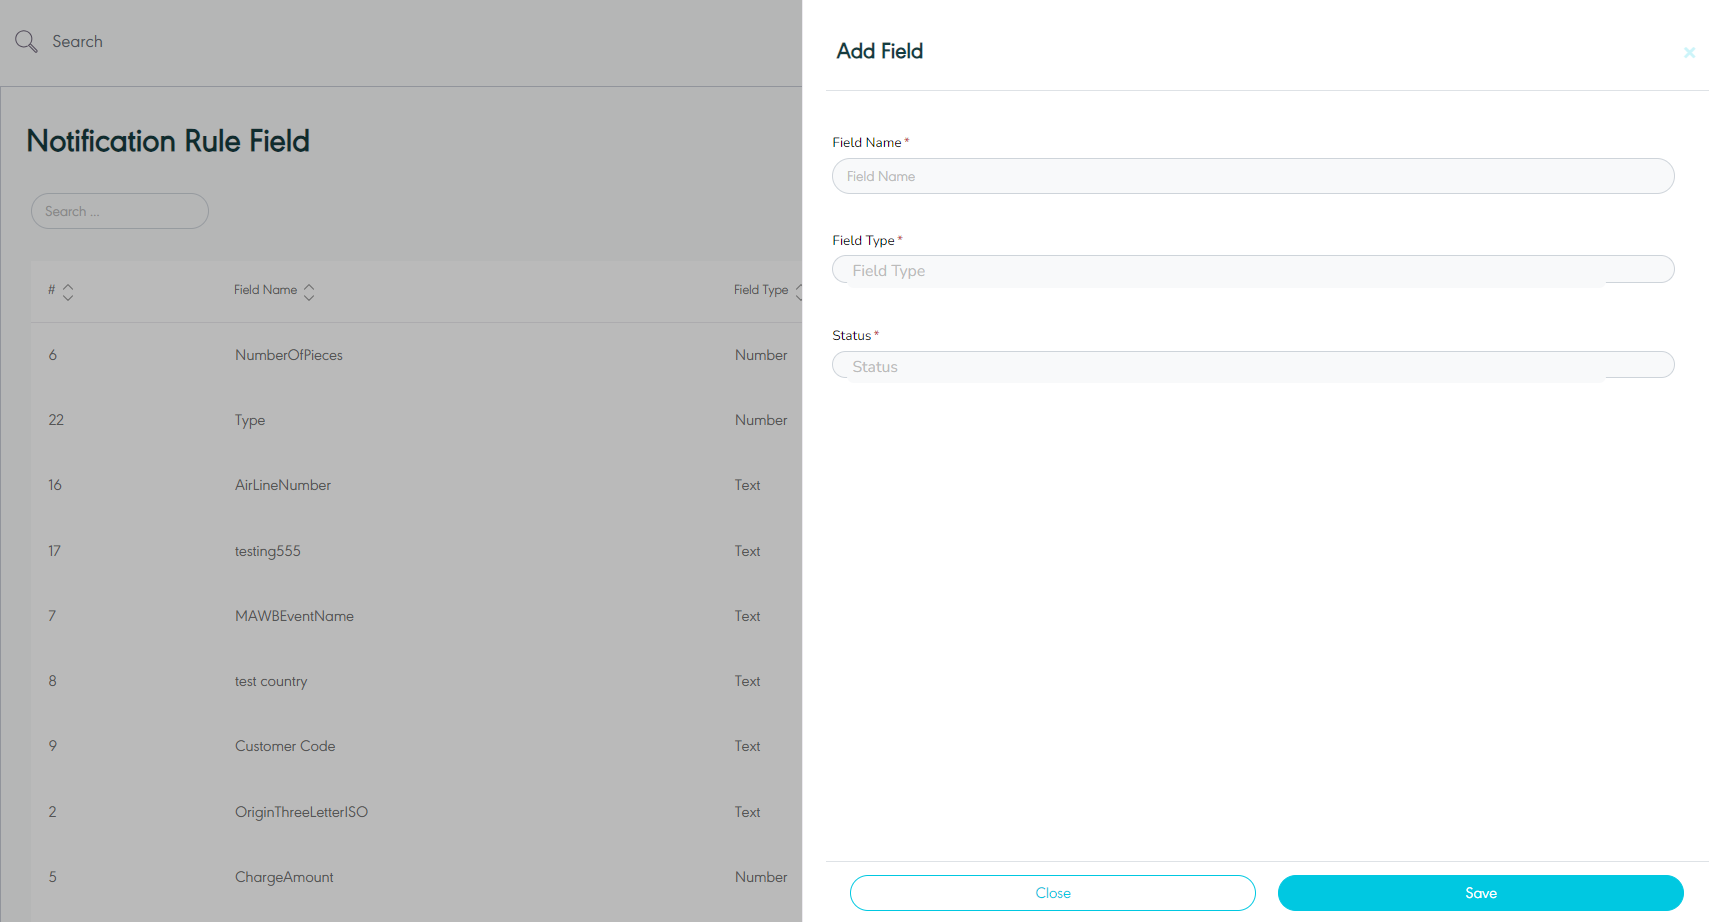
2.4 Add New Field
The user can add a new field by navigating to the ‘New Field’ screen via the Notification Module and clicking on Add New Field as follows:
-
Field Name: this field represents the field’s name.
-
Field Type: this list shows the field’s type e.g.: Test, Number, Boolean … etc.
-
Status: this field represents the status for the field where active means that the field is currently in use and inactive means that the field is no longer used.
By clicking on Save, the system adds new field information successfully.
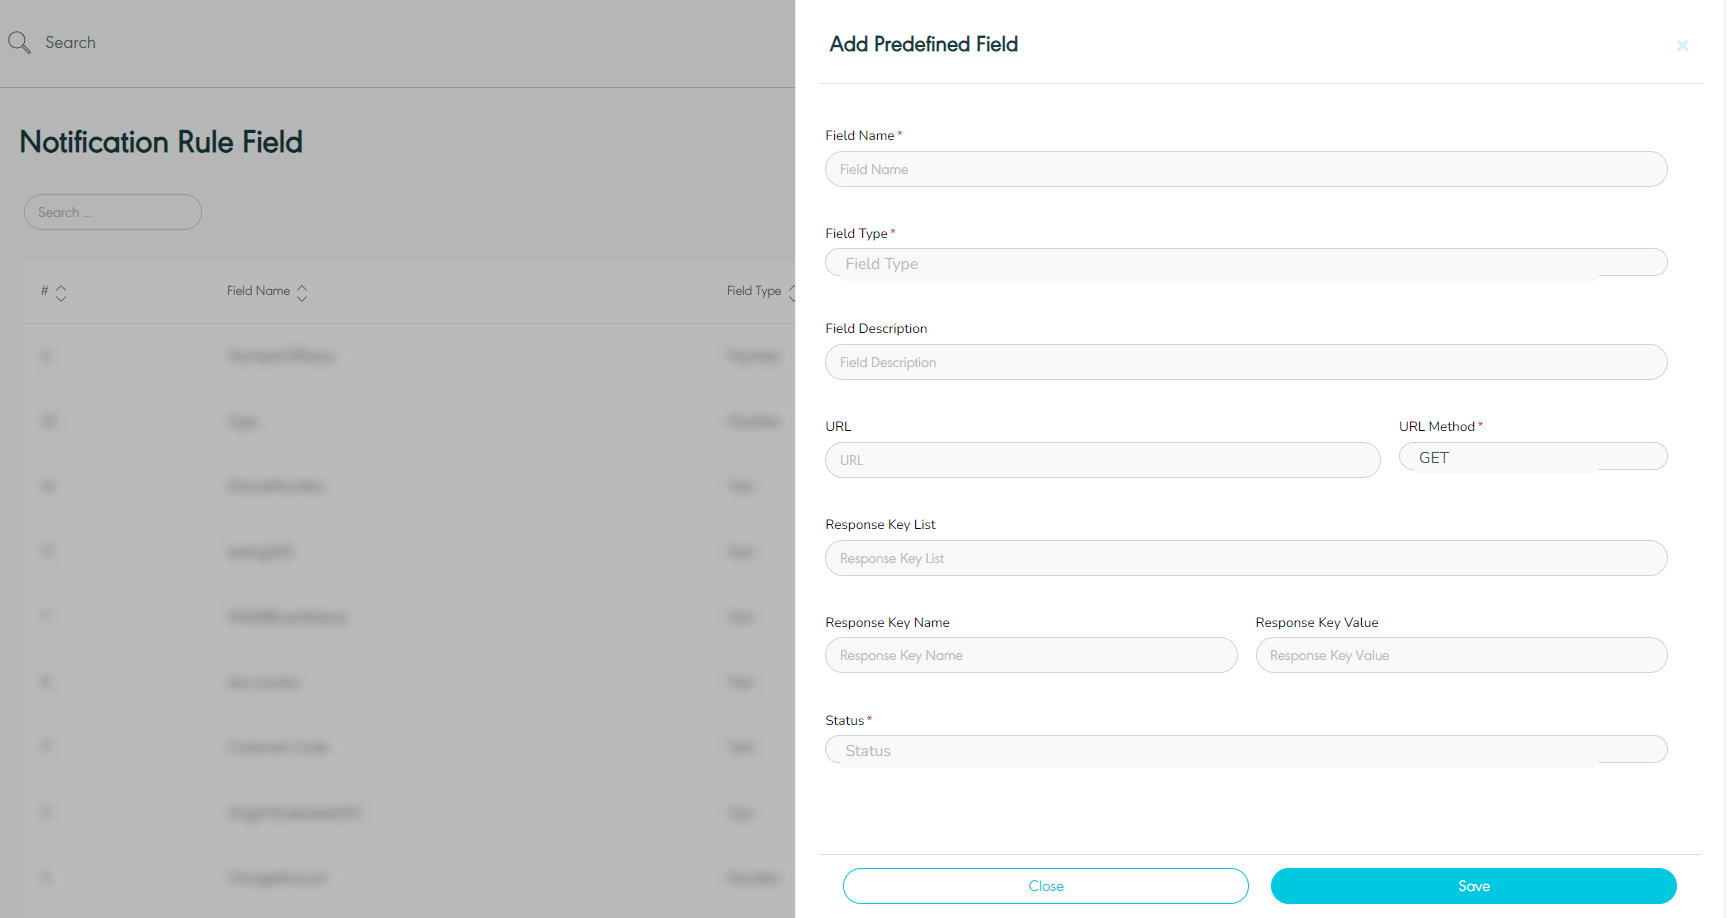
2.5 Add Predefined Field
The user can add a new predefined field by navigating to the ‘Predefined Field’ screen via the Notification Module and clicking on Add Predefined Field as follows:
-
Field Name: this field represents the field’s name.
-
Field Type: this list shows the collection list of the data type.
-
Field Description: this field represents the field’s description.
-
URL: this field represents the API URL from which the field retrieves the values.
-
UPL Method: this field represents the API type e.g.: GET or POST. Note: if the API Type is POST, then the user has to include the body in 'URL Body' field.
-
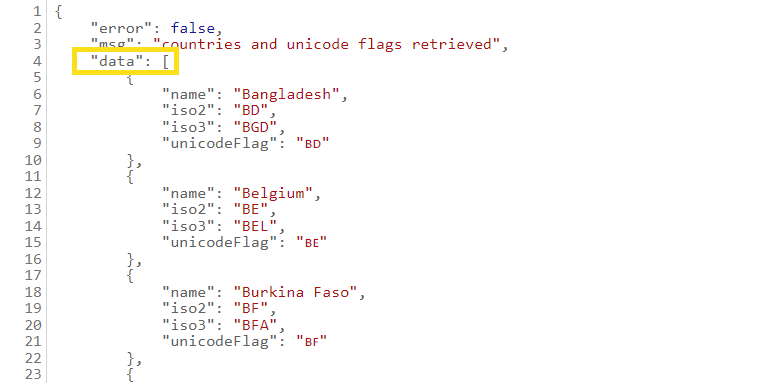
Response Key List: this field represents the list name if the retrieved value if it is part of an array of list. E.g. data
-
Response Key Name: this field represents the defined name for the retrieved value based on the user preference.
-
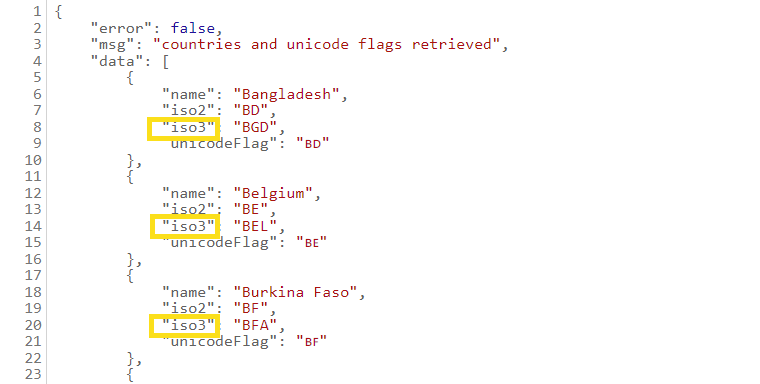
Response Key Value: this field represents the API field that will be mapped with the key name e.g. iso3.
-
Status: this field represents the status of the predefined field. 'Active' means that the predefined field is currently in use, while 'Inactive' means that the predefined field is no longer used
By clicking on Save, the system adds new predefined field information successfully.
2.6 Delete Notification Rule Field
The user can delete a notification rule field by navigating to the ‘Notification Rule Field’ screen via the Notification Module and clicking on Delete from Actions.
3. Notification Rule Management
The purpose of this feature is to manage the notification rule and their related settings through the following functionalities.
3.1 View Notifications Rules
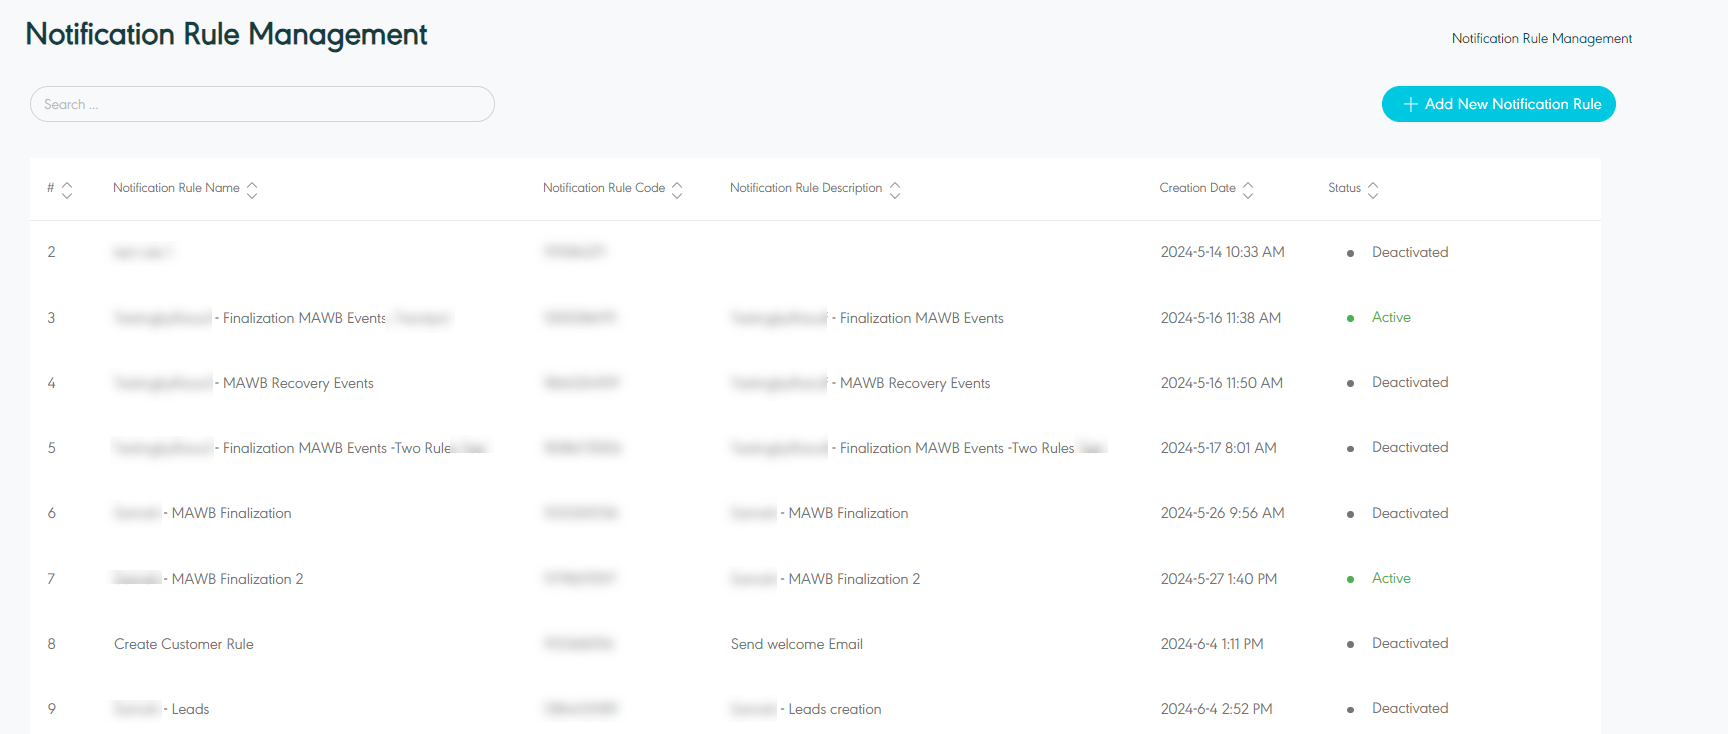
The user can view the defined notifications rules in the system by navigating to the ‘Notification Rules Management’ screen by choosing the Notification Module from the left navigation panel as follows:
-
Add New Notification Rule: the user can add new notification rule by clicking on ‘Add New Notification Rule’, referring to add new notification rule section.
-
Search: the user can search for the notification rule by typing the notification rule code number in the search filter field.
-
Show per page: the user can select the number of items to show on each page.
-
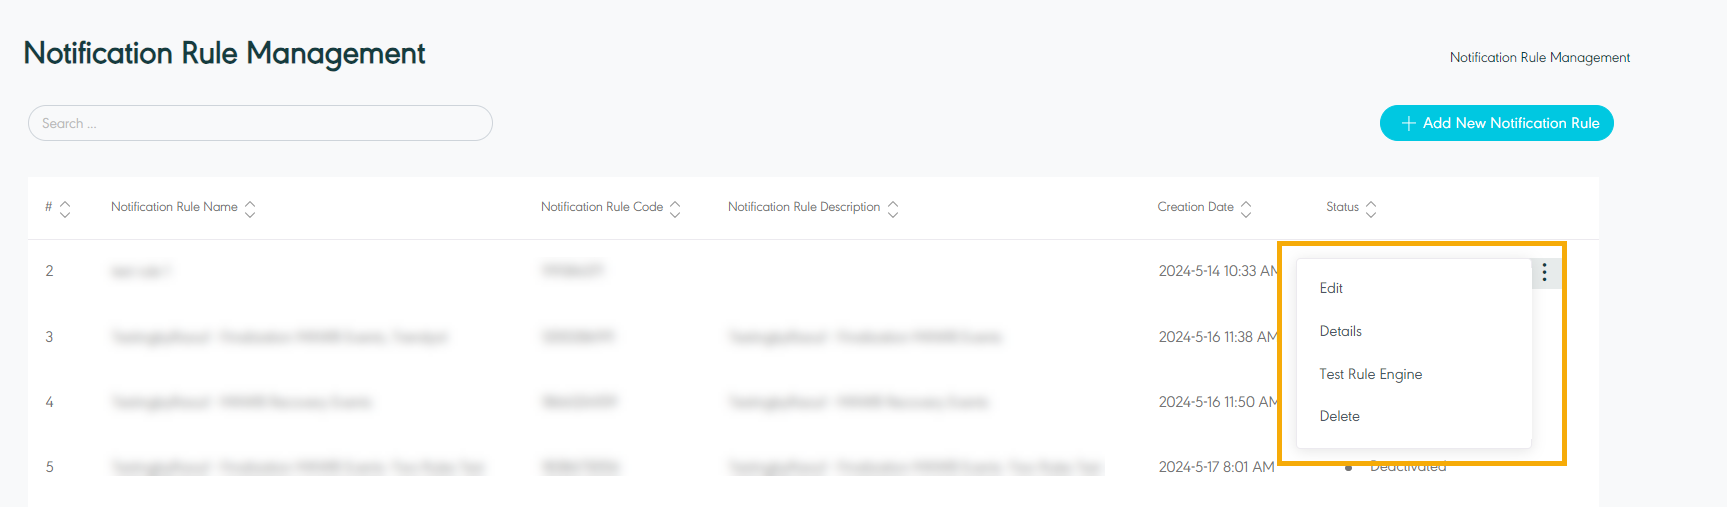
Actions: by clicking on this button the user can view specific notification rules details by referring to View Notification rule Details, edit by referring to Edit Notification Rule, test rule Engine referring to Test Rule Engine or delete by referring to Delete Notification Template, as follows:
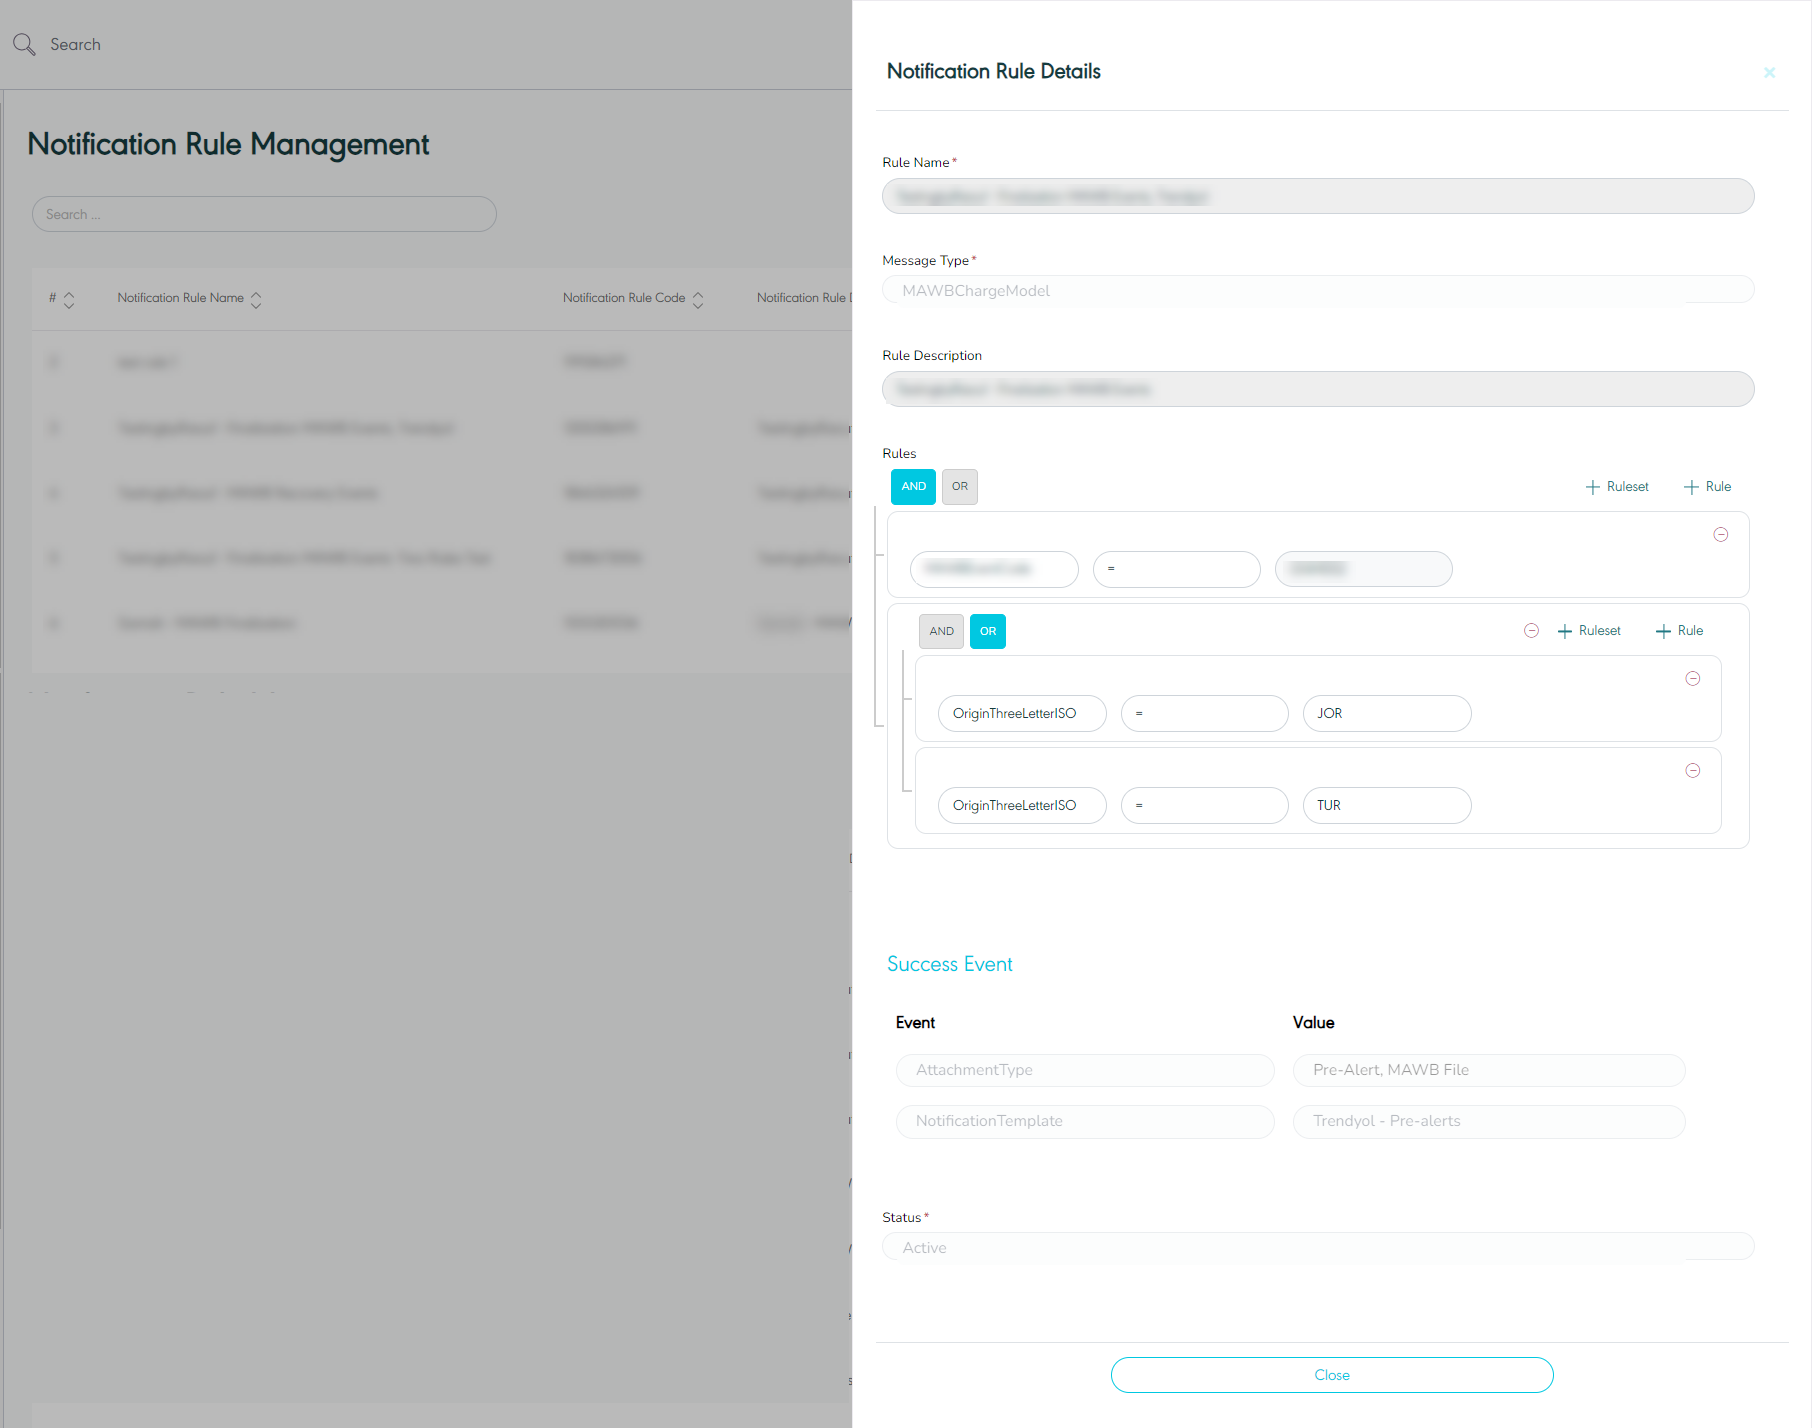
3.2 View Notification Rule Details
The user can view the notification rule details by navigating to the ‘Notification Rule Management’ screen via the Notification Module and clicking on Details from Actions as follows:
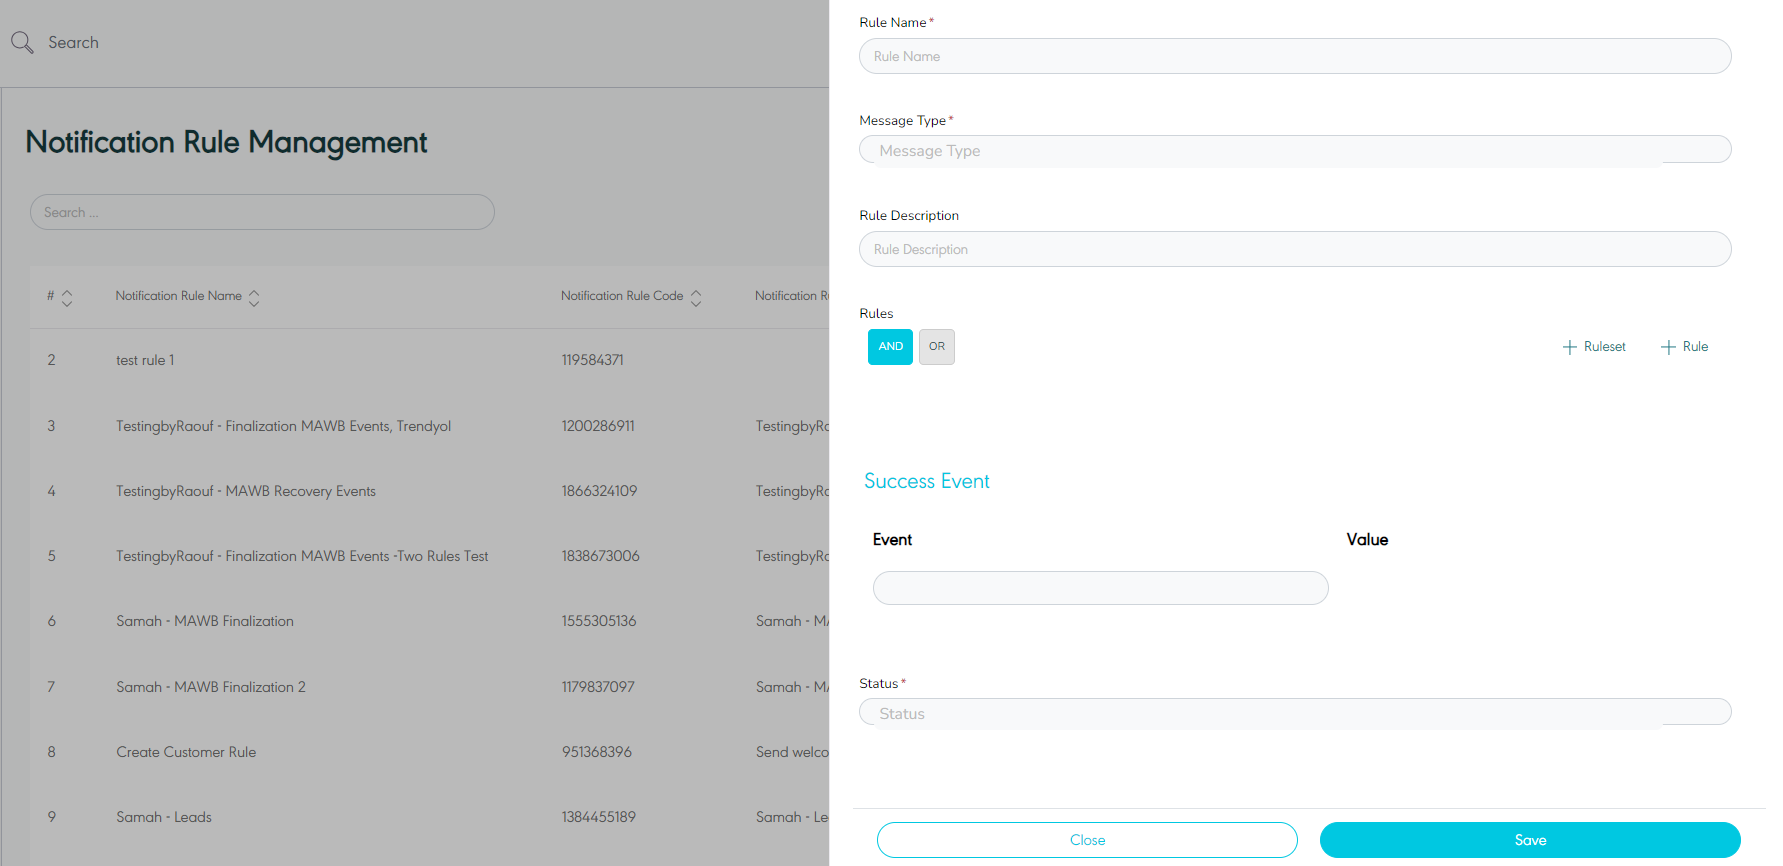
3.3 Add New Notification Rule
The user can add a new notification rule by navigating to the ‘Notification Template’ screen via the Notification Module and clicking on Add Notification Rule as follows:
-
Rule Name: this field represents the rule’s name.
-
Message Type: this field represent the data model source for the notification.
-
Rule Description: this field represents the rule’s description.
-
Rules: this will retrieve the fields as defined in the Notification Rule Field section
-
Success Event: these fields allow the user to define the post events if the rules conditions pass. E.g. send notification template which is defined in the Notification Template.
-
Status: this field represents the status of the rules, where 'active' means that the rule is currently in use and 'inactive' means that the rule is no longer used.
By clicking on Save, the system adds new notification rule information successfully.
3.4 Edit Notification Rule
The user can edit an existing notification rule by clicking on Edit from Actions and navigating to the ‘Notification Rule Management’ screen via the Notification Module as follows:
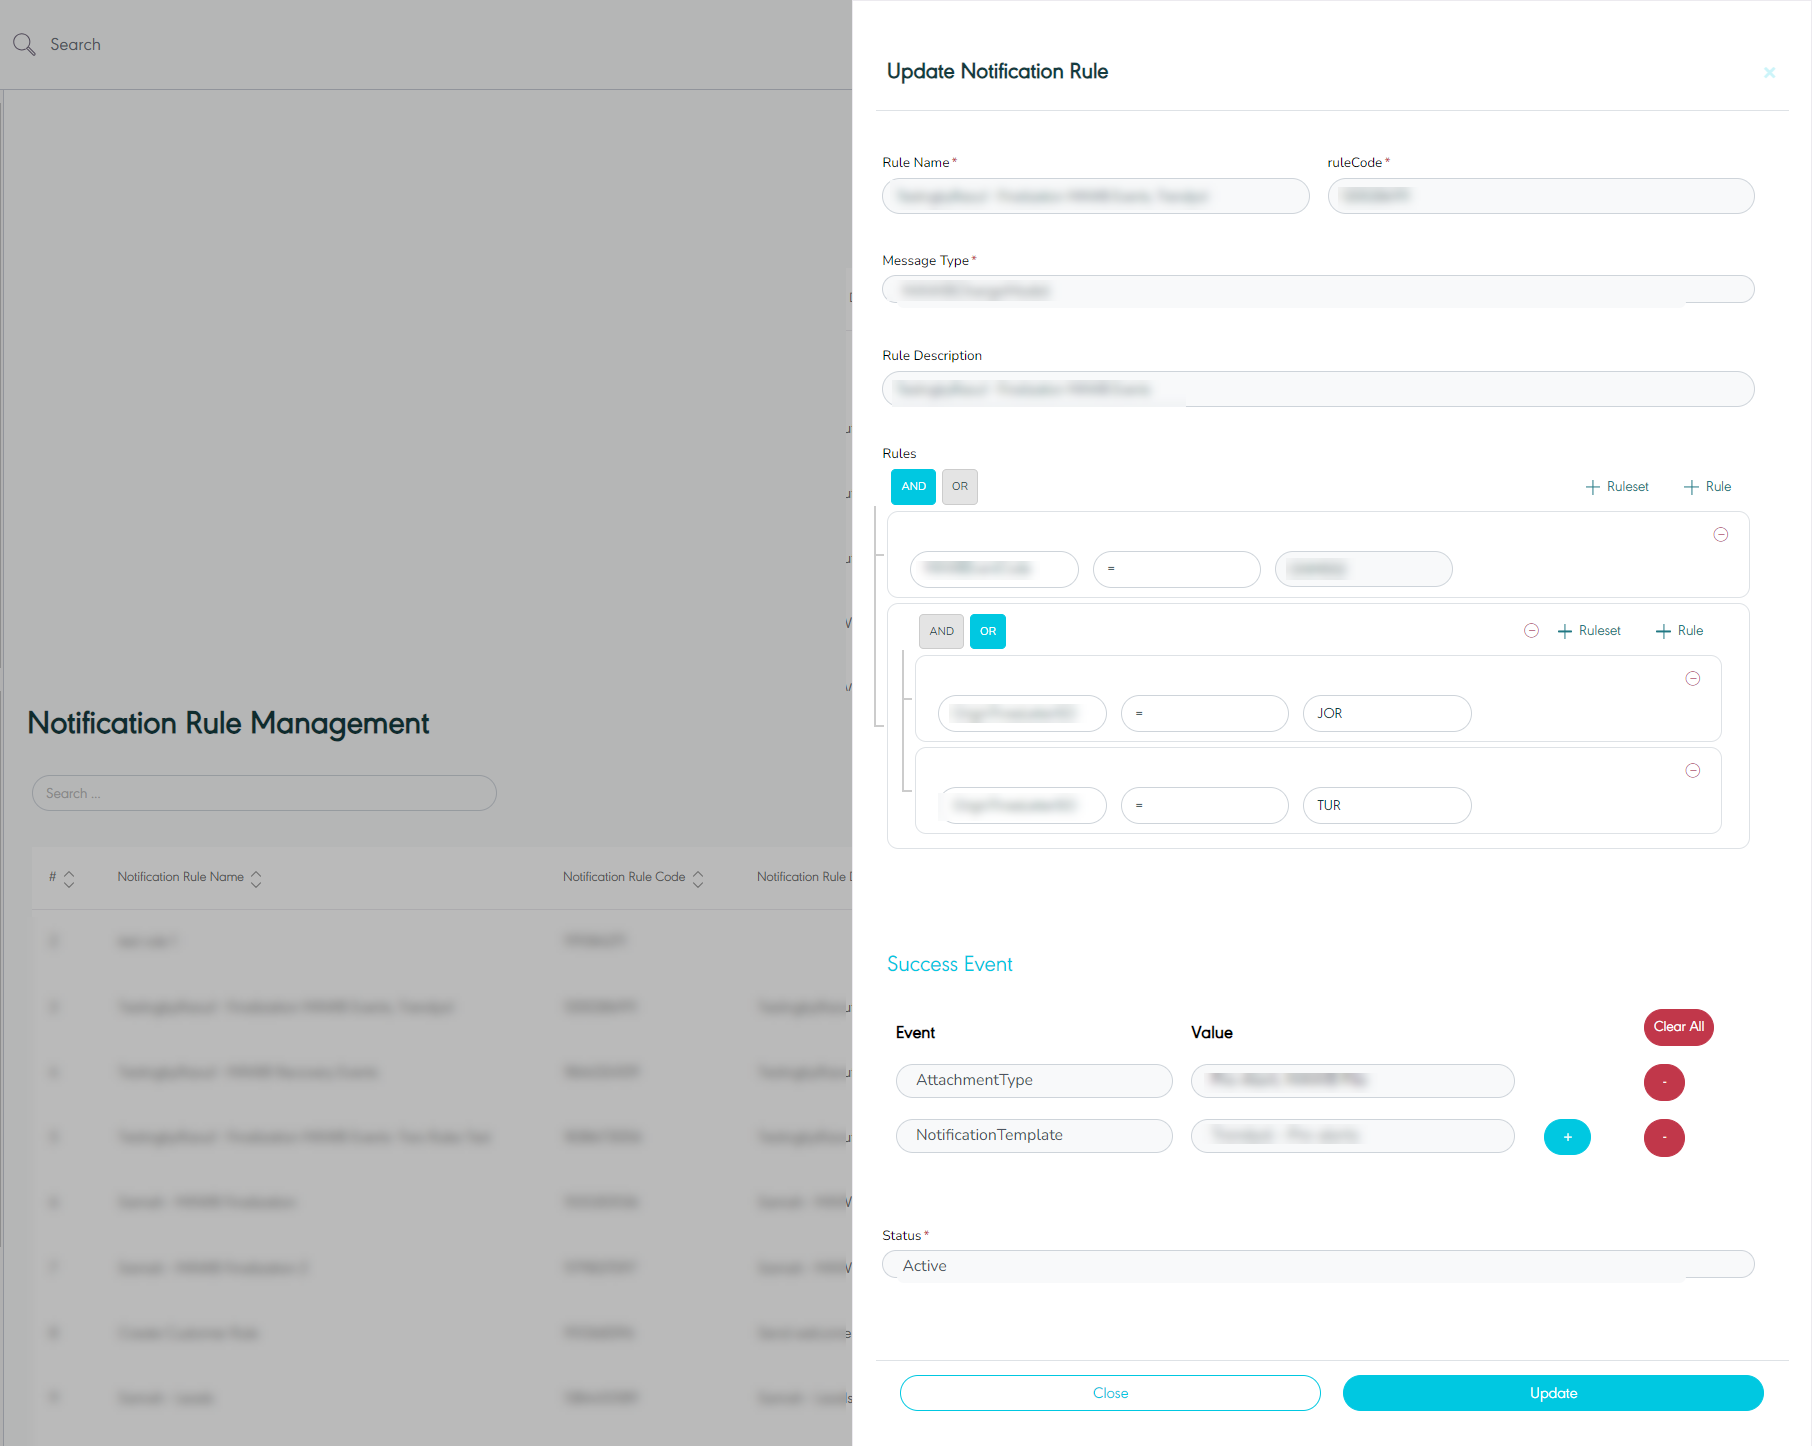
By clicking on Update, the system updates the notification rule successfully.
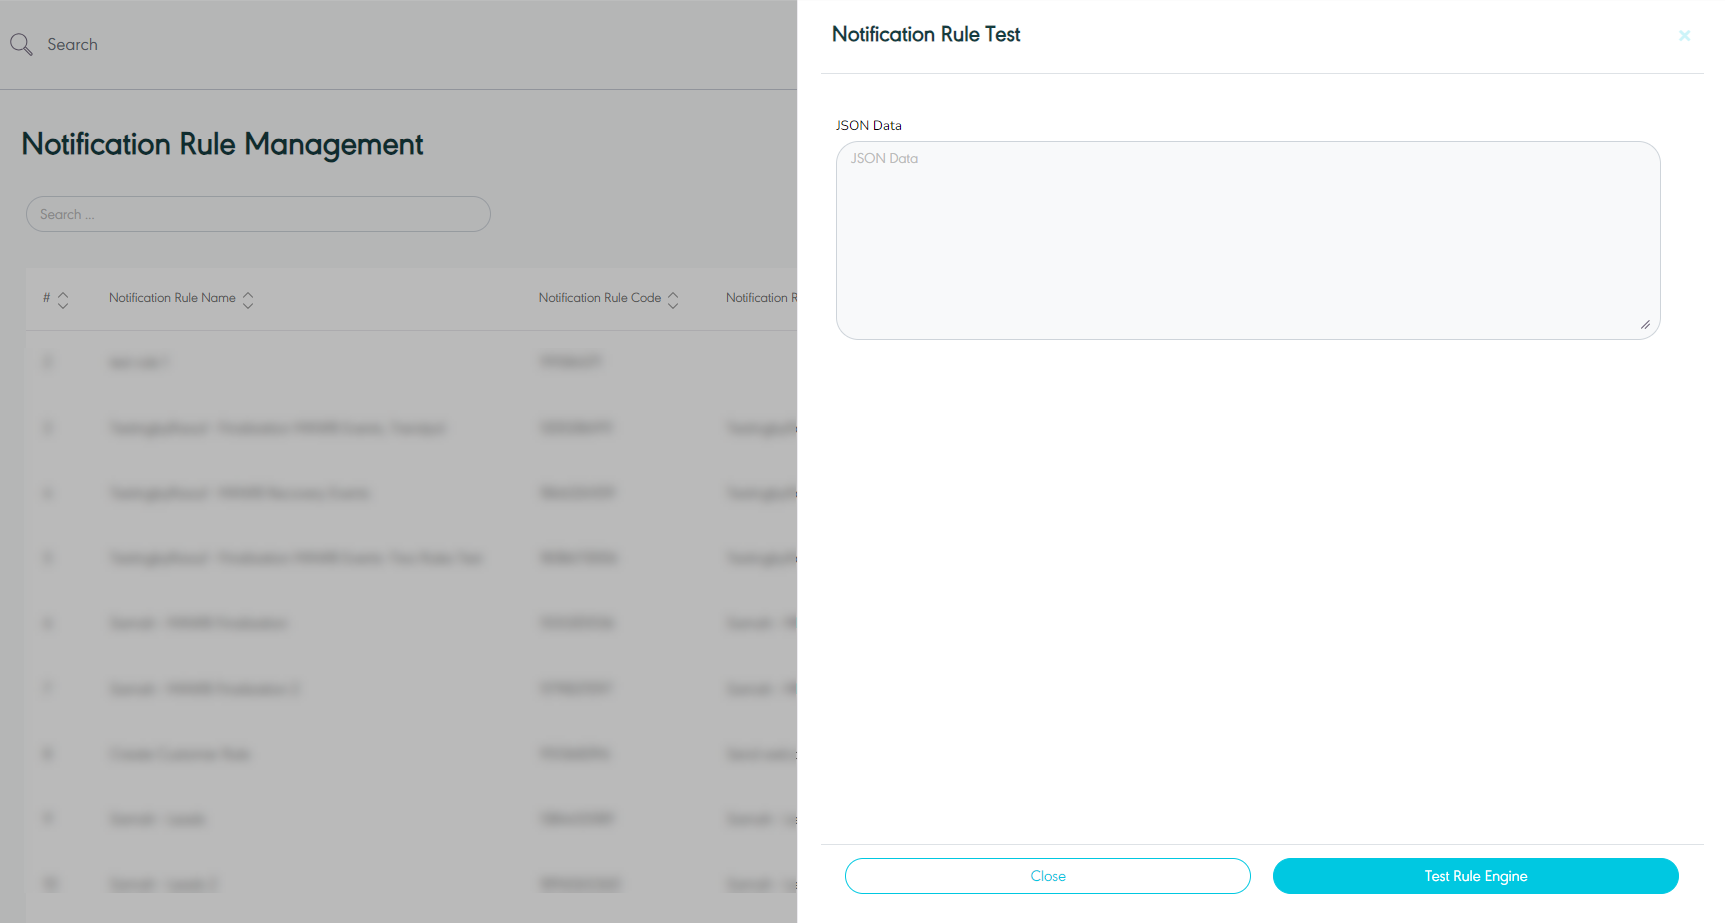
3.5 Test Rule Engine
The user can test the rule engine by navigating to the ‘Test Rule Engine’ screen via the Notification Module and clicking on Test Rule engine from Actions, as follows:
-
JSON Data: this field represent the jason format data (JSON code).
3.6 Delete Notification Rule
The user can delete a notification rule by navigating to the ‘Notification Rule Management’ screen via the Notification Module and clicking on Delete from Actions.