.png)
Customer Relationship Management (CRM) Module

Document History
Version | Author | Reviewer/Approver | Date of Issue | Page / Section | Brief Description |
1.0 | Deema Z. | Asma L. | 3rd Jan 2024 | CRM | Reviewed |
Glossary
Term | Definition |
|---|---|
EORI | EORI is an acronym for ‘Economic Operators Registration and Identification number.’ It's a unique identifier used in the European Union (EU) to track and identify economic operators engaged in customs and trade activities. An EORI number is assigned to businesses and individuals involved in importing, exporting, or other customs-related activities, helping customs authorities efficiently manage and process goods entering or leaving the EU. |
IOSS | IOSS stands for ‘Import One-Stop Shop.’ It's a system used for simplifying the collection and payment of Value Added Tax (VAT) on low-value goods imported into the European Union (EU). The IOSS system enables businesses to declare and pay VAT for these goods in a single EU member state, streamlining the process for cross-border e-commerce transactions |
CRM | Customer Relationship Management |
COD Shipments | COD shipments are a way of buying goods online where the customer pays for the purchase in cash or by card when the package is delivered to their doorstep, instead of paying upfront. It's a convenient option for those who prefer to pay upon receiving their items. |
1. Customer Management
This feature is designed to manage your customers, allowing you to add new customers, edit existing ones, delete customers, and view their details. It provides the necessary configurations and information for creating customer branches and processing shipments effectively.
1.1 View Customers
The user can view their defined customers in the System by navigating to the ‘Customer’ screen in the CRM Module from the left navigation panel as follows:
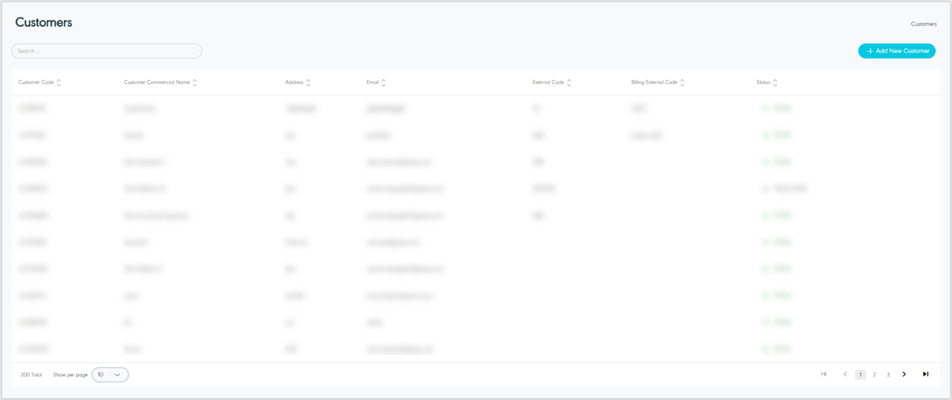
Figure 1- View Customers
Add New Customers: the user can add customers by clicking on ‘Add New Customer’, referring to Add New Customer section.
Search: the user can search for the customers by using the search field.
Actions: by clicking on Actions showing when hovering over a customer, the user can view specific customer details through the View Customer Details section, edit the customer by referring to the Edit Customer section, or delete as shown below:

Figure 2- Customers Related Actions
1.2 View Customers Details
The user can view details of an existing customer and the main branch by navigating to ‘Customer’ Screen via CRM Module and click on Details from Actions as follows:
Video 1- View Customers Details
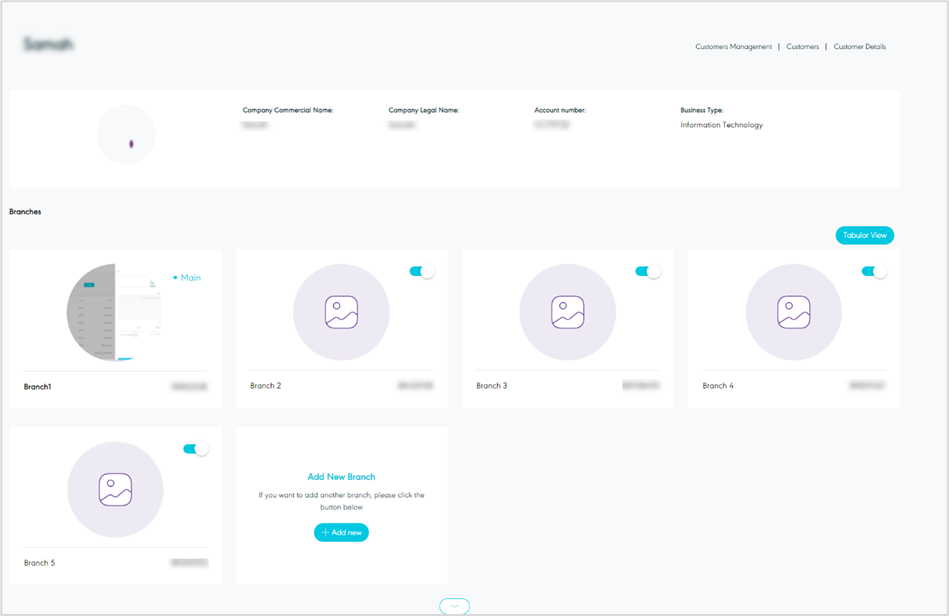
Figure 3- View Customers Details
Edit: the user can edit the customer profile by clicking on the Edit that appears when hovering over the customer details. by referring to Edit Customer section.
Manage Branches: the user can manage the customer-related branches, by referring to the Branches Management section.
1.3 Add New Customer
The user can add a new customer by navigating to the ‘Customer’ screen via CRM Module and clicking on Add New Customer then filling in the information in the below outlined sections:
Video 2- Add New Customer
General Information Section
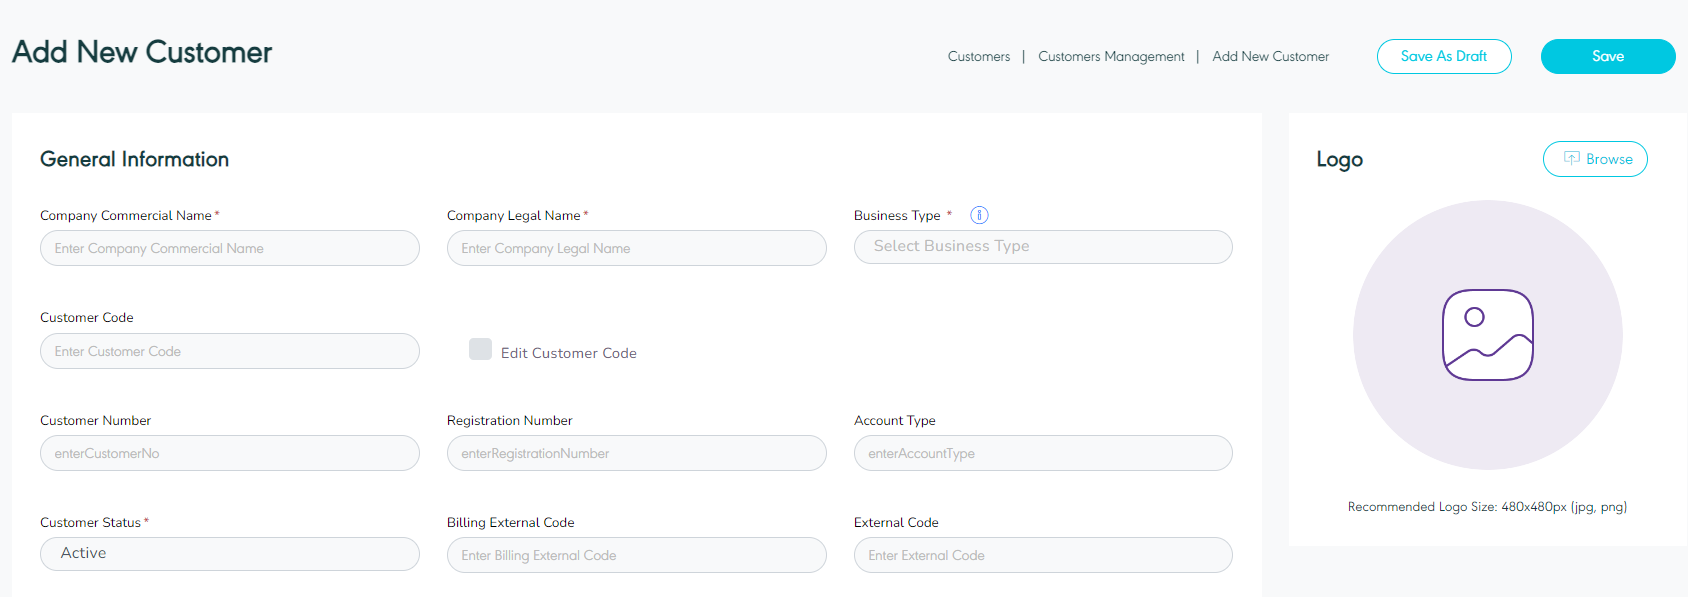
Figure 4- Add New Customer - General Information
Company Commercial Name: this field represents the company’s trading name.
Company Legal Name: this field represents the name that appears on all official documents or legal papers.
Business Type: this field represents the company’s business industry, e.g.: Retail, Banking, e-commerce, etc.
Customer Code: this field represents the customer’s unique alphanumeric value.
Edit Customer Code checkbox: If not check this option it not allowed to fill the customer code field.
Customer Number: the field on the customer level can be entered only through the Create Customer API for dynamics or when converting the customer into a lead.
Registration Number: the field on the customer level can be entered only through the Create Customer API for dynamics or when converting the customer into a lead.
Account type: the field on the customer level can be entered only through the Create Customer API for dynamics or when converting the customer into a lead.
Customer Status: this field represents the status where active means that the customer (main branch) is currently functioning with GN TEQ and inactive means that the customer is not currently using GN TEQ system; ‘Active’ is selected by default upon customer creation.
Billing External code: this field represents the customer’s account number used for billing integration purposes.
External Code: this field represents the customer’s account number used for integration purposes.
Logo: the user can use the ‘Browse’ button to attach a picture of the company’s official logo.
Branch Information Section
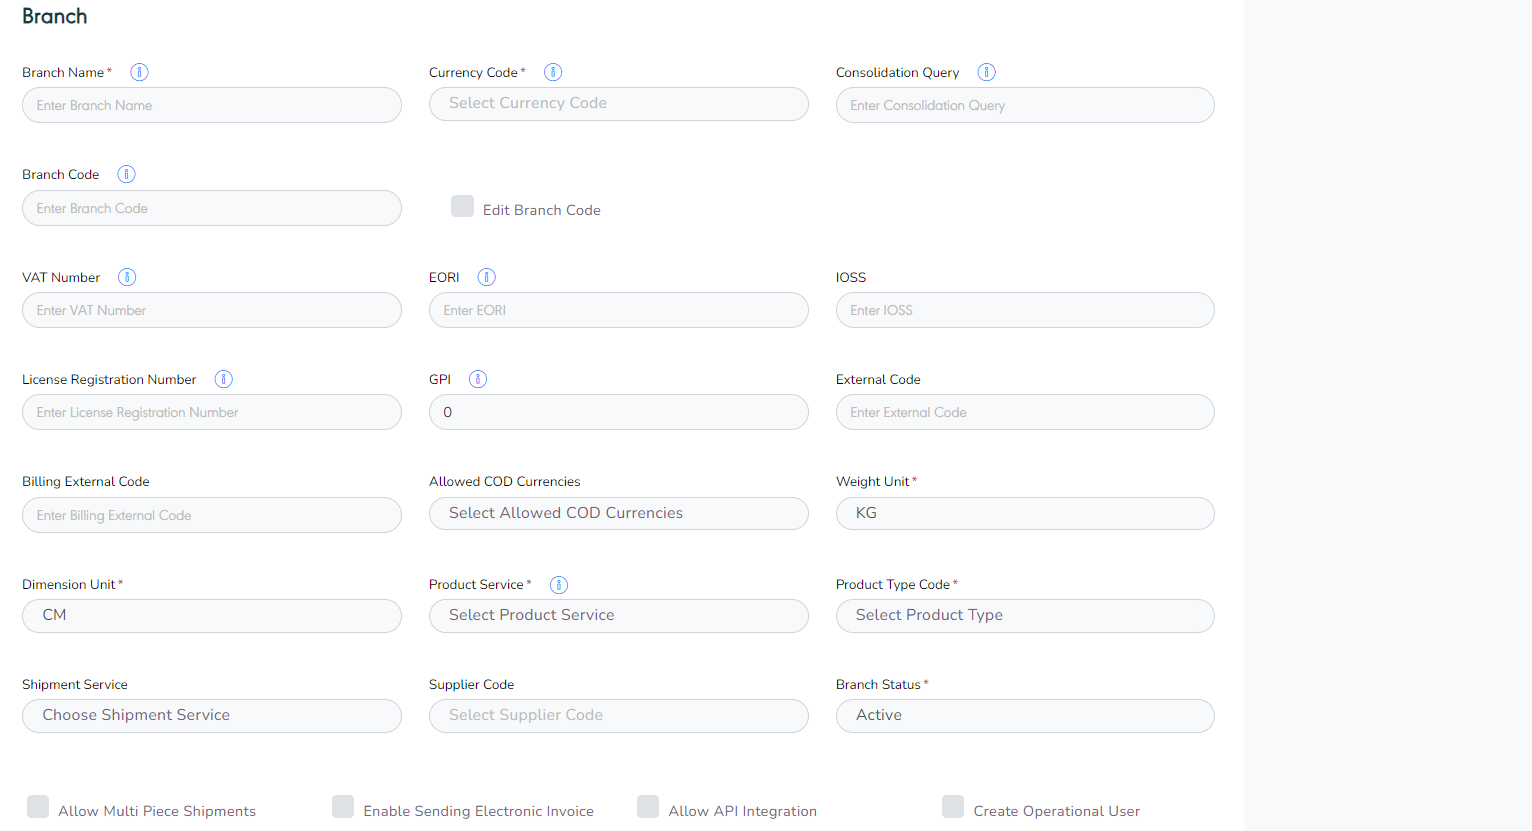
Figure 5- Add New Customer - Branch Information
Branch Name: this field represents the branch’s name.
Currency Code: this field represents the main branch’s currency code for all payments, e.g.: USD, SAR, EUR, etc.
Consolidation Query: this field represents the shipment properties that allow the user to combine shipment pieces together.
Branch Code: this field represents the branch’s unique alphanumeric value.
Edit Branch Code checkbox: If not check this option it not allowed to fill the branch code field.
VAT Number: this field represents the main branch’s tax registration number.
EORI: this field represents the main branch’s economic operator’s registration where this Identification Number (EORI) is used for businesses that operate in and out of the EU /UK.
IOSS: this field represents the branch’s Import One Stop Shop (IOSS) Number which is used to declare and pay import VAT into EU countries for e-commerce packages.
License Registration Number: this field represents the main branch’s number that is usually found on the company trade license.
GPI: this field represents the main branch’s gross profit income.
External Code: this field represents the customer’s account number for integration purposes.
Billing External Code: this field represents the customer’s account billing number used for integration purposes.
Allowed COD Currencies: this field represents the currencies that are accepted for Cash on Delivery (COD) shipments that will be paid by the consignee.
Weight Unit: this field represents the unit of measurement for weighing customer shipments, with the default value pre-set to KG (kilograms).
Dimension unit: this field represents the unit of measurement for measuring dimensions of customer shipments, with the default value pre-set to CM (centimeters).
Product Service: this field represents the product service surcharges: International, Domestic, Return ... etc.
Product Type: this field represents the delivery type of product service. e.g.: DLV: Home Delivery, PUD: Office Drop off, or PSD: Parcel Station Drop off.
Branch Status: this field represents the status for the customer’s main branch where active means that the branch is currently in use and inactive means that the address is not currently in use.
Allow Multi-Piece Shipments checkbox: this field represents any shipment that contains more than one package and is grouped under one tracking number which should be marked as a multi-piece shipment.
Enable Sending Electronic Invoice checkbox: this option allows the branch to send the invoice as a soft copy electronically to the customer.
Allow API Integration checkbox: this field represents the branch’s integration made through API, when checked, the system displays the below fields:
o API User Name.
o API User Password.
o Email.
Create Operational User checkbox: this field represents the branch’s integration through the portal (system), when checked, the system displays the below fields:
o Operational User Name.
o Operational Password.
o Email.
Additional Value: this section represents the extra fields based on the supplier/client needs:
o Property Name: this represents the field name.
o Property Value: this represents the field value.
Location Section
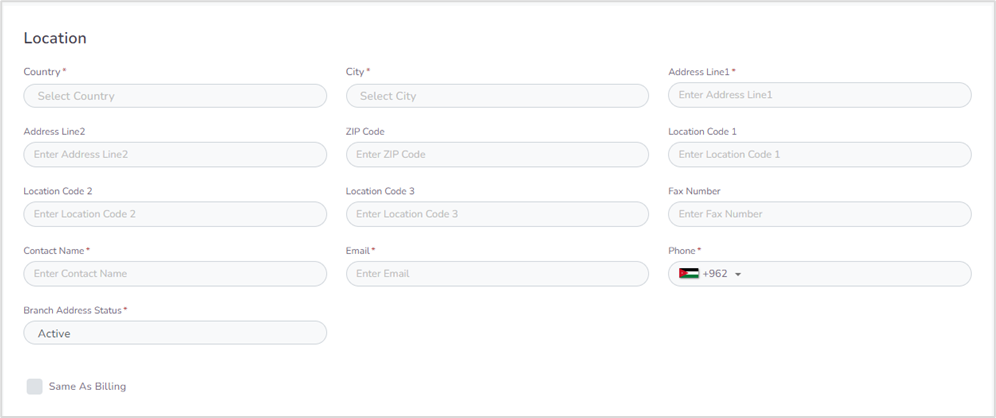
Figure 6- Add New Customer - Location Information
Country: this field represents the country of the company’s main branch.
City: this field represents the city of the company’s main branch.
Address Line1: this field represents the company’s primary contact address.
Address Line2: this field represents the company’s secondary contact address.
ZIP Code: this field represents the company’s Zip Code.
Location Code 1: this field represents the company’s location address using any of the following options, e.g.: W3words, google maps short address, etc.
Location Code 2: this field represents the company’s location address using any of the following options, e.g.: W3words, google maps short address, etc.
Location Code 3: this field represents the company’s location address using any of the following options, e.g.: W3words, google maps short address, etc.
Fax Number: this field represents the company’s fax number.
Contact Name: this field represents the person who is responsible for communicating on behalf of the company.
Email: this field represents the contact person’s email address.
Phone: this field represents the contact person’s mobile number.
Branch Address Status: this field represents the status for the customer’s main branch address where active means that the branch address is currently in use and inactive means that the address is no longer used, ‘active’ is selected by default upon account creation.
Same As Billing checkbox: if this option is checked, then the system replicates the information added in contact info to reflect as the billing address as well. If this is not checked, the user can then add the preferred billing address.
Note: the system creates two addresses: a Branch Address and a Contact Address based on the entered information, where the billing address is created if ‘Same As Billing’ is checked.
Upon filling in the required information mentioned above, the user can create the customer by clicking on the 'Save' button, where the account will successfully be saved, and the following page will be displayed:
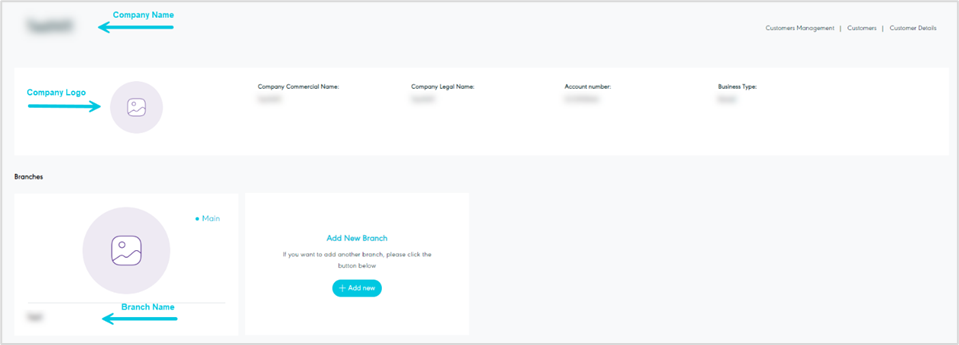
Figure 7 -Customer Profile
Note: the user can save the profile as a draft by selecting the 'Save as draft' option. This action will result in the account being created in a 'Draft' status, allowing users to revisit and complete the customer profile later.
1.4 Edit Customer
The user can edit the details of an existing customer by navigating to the ‘Customer’ screen via clicking on Edit from Actions.
The user can also edit a customer by viewing the customer details, referring to section 1.2.
Video 3- Edit Customer
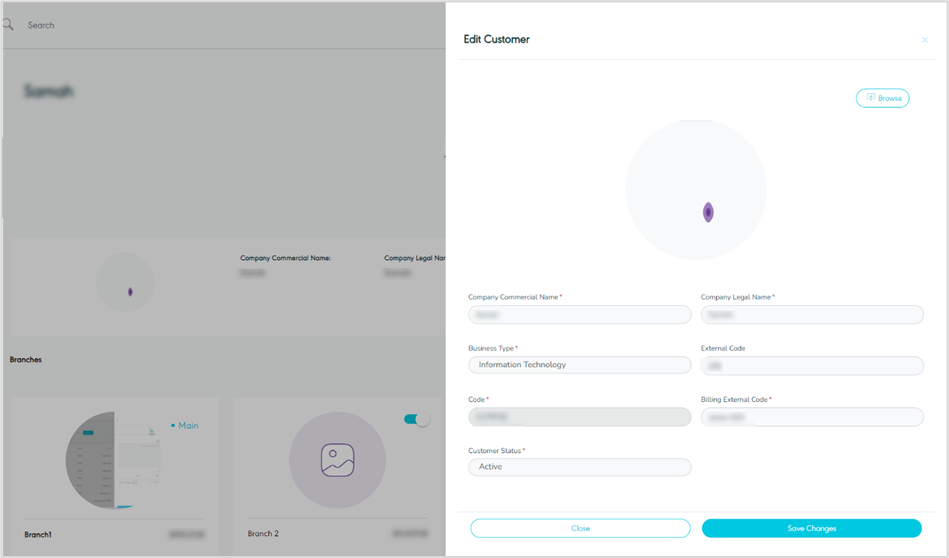
Figure 8- Edit Customer
By clicking on ‘Save changes’, the system updates the customer’s information successfully.
1.5 Delete Customer
The user can delete an existing customer by navigating to the ‘Customer’ screen via CRM Module and clicking on Actions when hovering over the customer then clicking on ‘Delete’.
Video 4- Delete Customer
Note: A user is unable to remove a customer who has associated branches. In order to delete a customer, all branches linked to that customer must first be deleted in addition to the main branch.
2. Branches Management
Branches Management allows you to view, add, edit, and delete branches associated with your customers. You can also manage addresses, attachments, service level agreements (SLAs), e-invoices, and billing settings for each branch. This enables you to streamline your operations and offer tailored services to your customers.
2.1 View Branch
The user can view and add Branches in the system by navigating to the ‘Customer’ screen and clicking on Actions then the Details option to view the Branches section as follows:
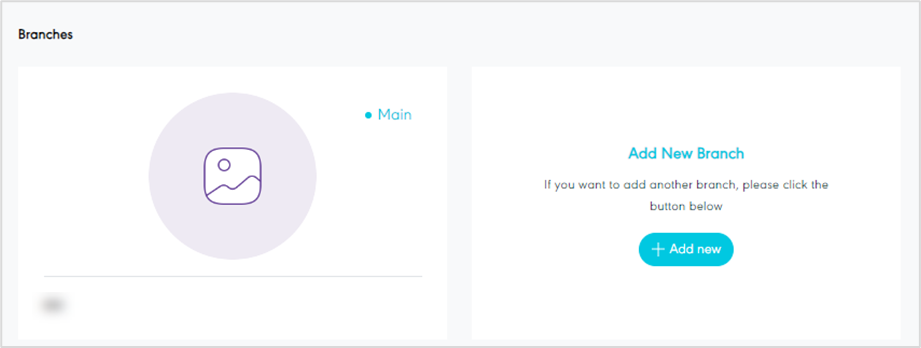
Figure 9- View Branch
Add New Branch: The user can add a Branch by clicking on Add New, referring to the Add New Branch section.
Edit: the user can edit the branch by clicking on the branch and clicking on Edit referring to the Edit Branch section.
Delete: the user can delete the branch by clicking on Delete
Manage Address: the user can manage the address by adding, editing, or deleting the address, by referring to the Manage Addresses section.
Manage Attachment: the user can manage attachments by adding, editing, deleting, or downloading, by referring to the Manage Attachment section.
Manage SLAs: the user can manage the SLA-related branches, by referring to the SLA Management section.
Manage E-Invoice: the user can manage the E-Invoice-related branches, by referring to the E-Invoice Management section.
Manage Billing Settings: the user can manage the billing-related branches, by referring to the Billing Settings Management section.
2.2 Add New Branch
The user can add a Branch by navigating to the customer profile screen via the CRM Module and clicking on ’Add new’ as follows:

Figure 10- Add New Branch
The user can create the new branch by filling in all the required information as explained in the 'Branch' section of the Add New Customer. By clicking on ’Save Changes’, the system adds the branch successfully.
2.3 Edit Branch
The user can edit the information of an existing branch by clicking on the Branch that requires editing from the customer profile, then hovering over the section that requires editing and clicking on Edit as below:
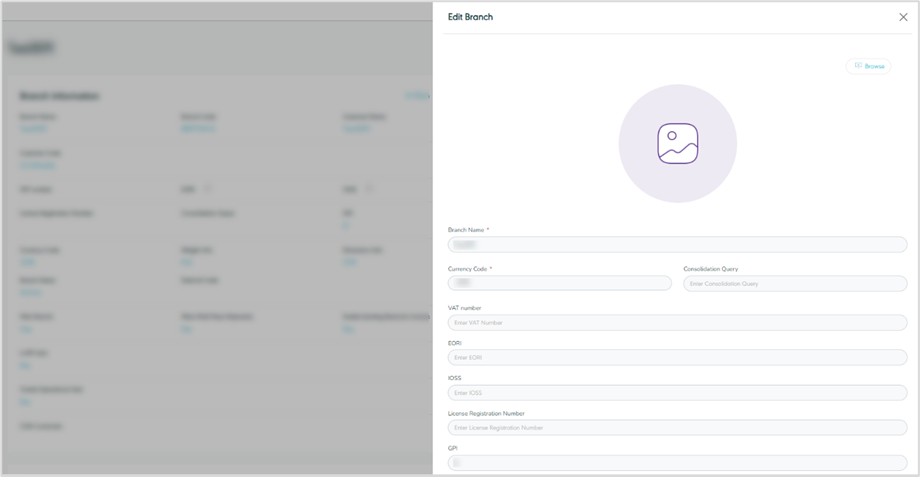
Figure 11- Edit Branch
By clicking on ’Save Changes’, the system updates the branch successfully.
2.4 Delete Branch
The user can delete an existing branch by clicking on the related branch, then clicking on Delete.
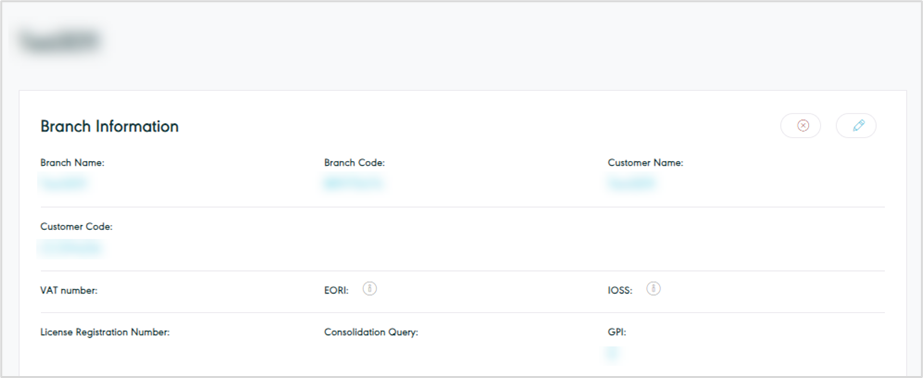
Figure 12- Delete Branch
Notes:
· If the customer has only one branch which is the main branch, then deleting that branch will result in the deletion of the customer.
· If the customer has multiple branches, then deleting the main branch will require the user to assign another main branch.
2.5 Manage Address
The user can view different addresses, add a new address, Edit and Delete an existing address by navigating to the ‘Branches’ section on the customer profile via the CRM Module and choosing the Branch to manage its addresses.
2.5.1 Add Address
The user can navigate to the Branch that requires adding a new address, then click the ‘Add Address’ button as follows:
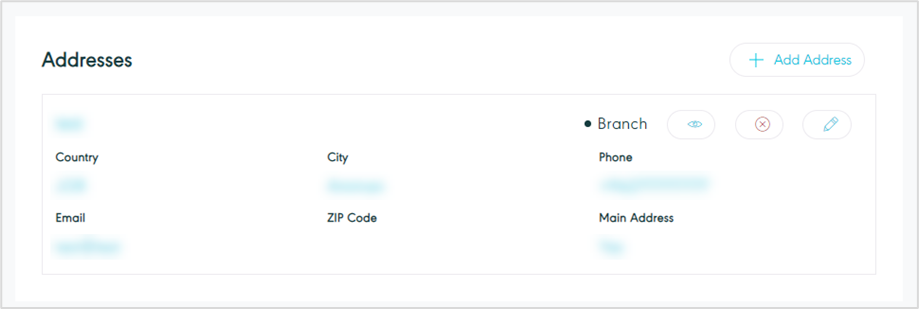
Figure 13- Add Address
Once the user clicks the button, the user should fill in the required information below:
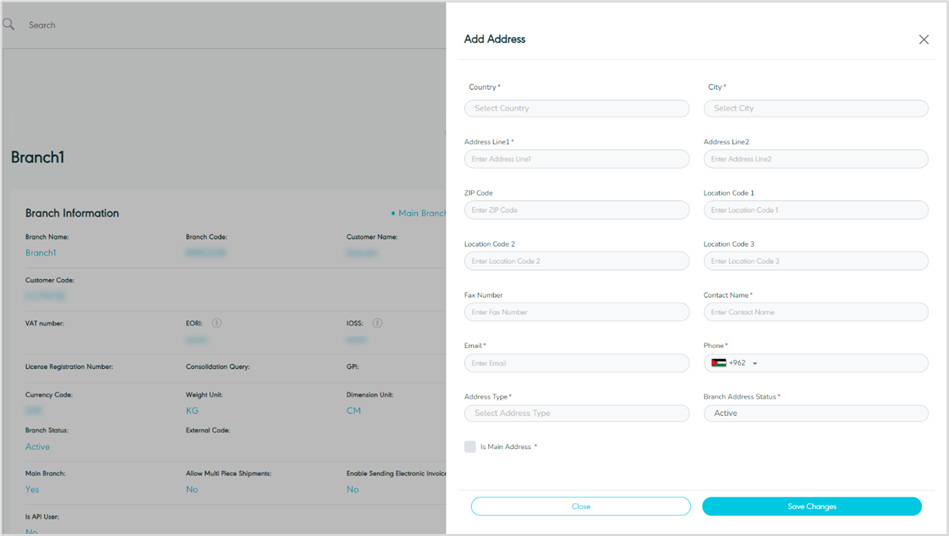
Figure 14- Add New Address
Address Type: this field is used to assign an address type, e.g.: Branch, Billing, Contact, or Return Shipments.
The user can view all information, by referring to the ‘Location’ section of Add New Customer.
By clicking on ’Save changes’, the user adds a new branch address.
2.5.2 Edit Address
The user can navigate to the Address that requires editing, then click on Edit to edit any of the below information:
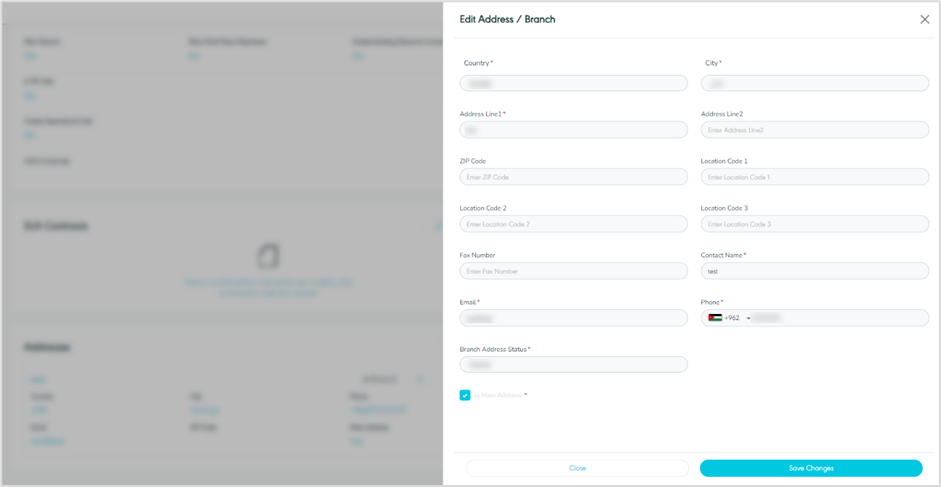
Figure 15- Edit Address
By clicking on ’Save changes’, the system updates the address successfully.
2.5.3 Delete Address
The user can delete any of the existing addresses by clicking on Delete as shown below:
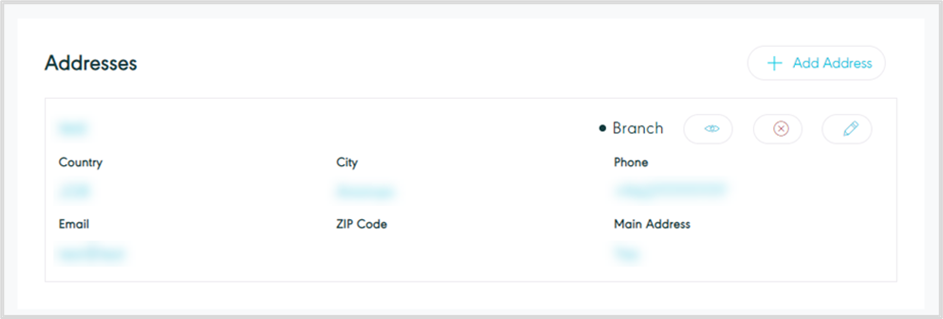
Figure 16- Delete Address
2.6 Manage Attachment
The user can click on ’Add Attachment’ to attach any document related to the branch:
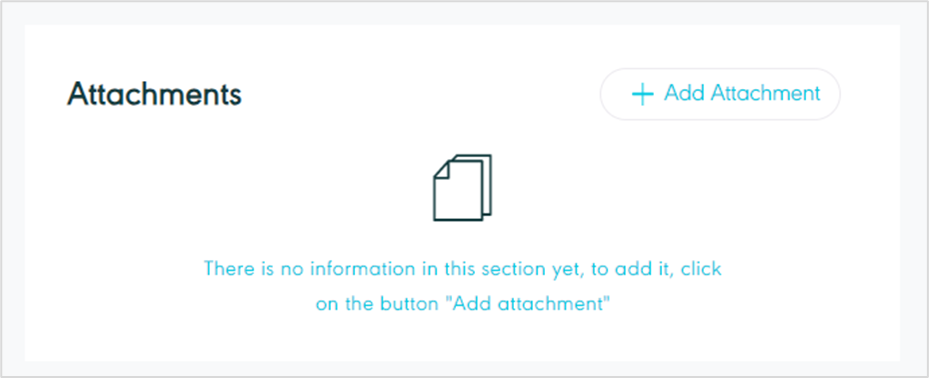
Figure 17- Manage Attachments
By clicking on ’Save’, the system adds attachments to the branch successfully.
The user can then Edit, Delete and Download attachments using the action buttons shown below:
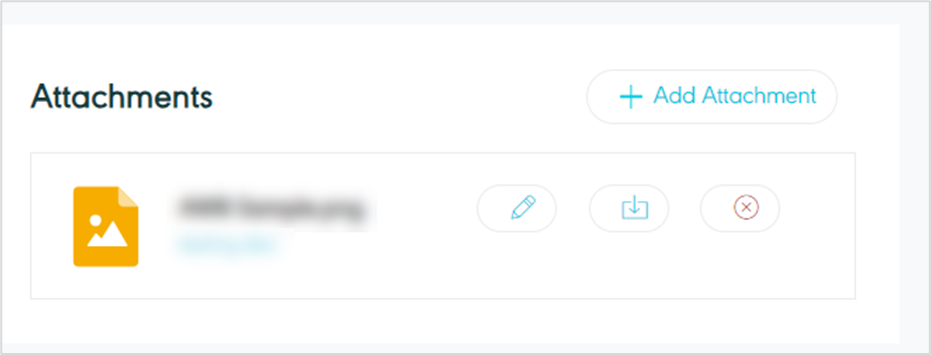
Figure 18- Manage Attachments Related Actions
2.7 SLA Management
The user can manage and Add, View, or Edit Service Level Agreement (SLA) between the branch and supplier, by navigating to the Branch screen via CRM Module as follows:
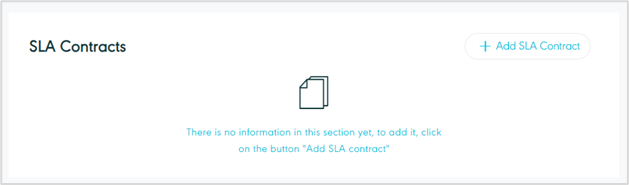
Figure 19- Add SLA Contract button
In order to Add SLA Contract, the user should then enter the below information:
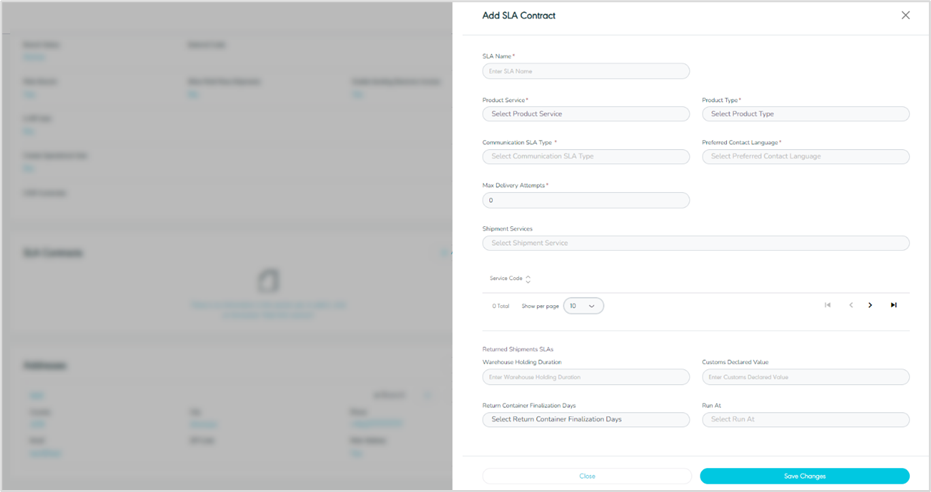
Figure 20- Add SLA Contract
SLA Name: this field represents the name of SLA.
Product Service: this field represents the services e.g., Return, International, Domestic etc.…
Product Type: this field represents the delivery service type e.g., Home Delivery, Office Delivery, Drop Off, etc.…
Communication SLA Type: this field represents the preferred communication channel with the consignee when delivering the shipment.
Preferred Contact Language: this field represents the preferred communication language for all communication done on behalf of the company.
Max Delivery Attempts: this field represents the branch’s maximum delivery attempts per shipment.
Shipment Services: this field represents the services that can be added to the shipment.
Warehouse Holding Duration: this field represents the allowed period for keeping the return shipments in the warehouse.
Customs Declared Value: this field represents the shipment value to be declared to custom authorities.
Return Container Finalization Days: this field represents the allowed period to add return shipments until finalizing the container where the options are: Daily, Weekly and Monthly.
Run At: this field is linked to the ‘Return Container Finalization Days’ where the user has to select a certain time or date based on the selected value e.g.: If the user chooses an interval like ‘Weekly’ for the ‘Return Container Finalization Days,’ then the ‘Run At’ field allows you to specify a particular day of the week when this finalization process should occur, etc.
By clicking on ’Save’, the system adds SLA for the branch successfully.
2.8 E-invoice Management
The user can manage and Add a new branch E-invoice to be sent to the consignee. The user can also View, or Edit the invoice by navigating to the Branch screen via CRM Module as follows:
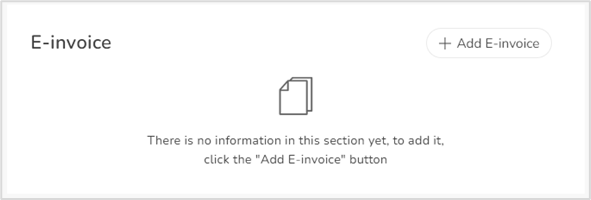
Figure 21- E-Invoice Section
Once the user clicks the ‘Add E-invoice’ button, the below page shows for setting the E-invoice, the user should fill in the below details:
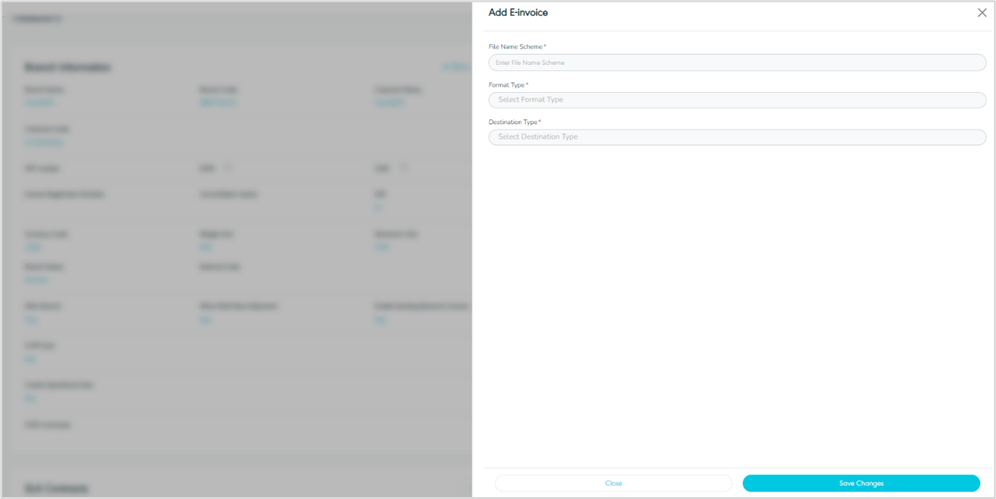
Figure 22 - Add E-Invoice
File Name Scheme: this field represents the invoice file name that will be sent.
Format Type: this field represents the preferred file format to share. e.g.: PDF, CVC, etc.
Destination Type: this field represents the file’s destination type e.g.: Email link, email with an attachment, FTP, or system file that is yet to be shared.
By clicking on ’Save’, the system adds the E-Invoice for the branch successfully.
2.9 Billing Settings Management
2.9.1 Add New Billing Settings
The user can add a New Billing Setting under the selected branch by navigating to the Branch screen via CRM Module as follows and clicking on ‘Manage billing settings’:
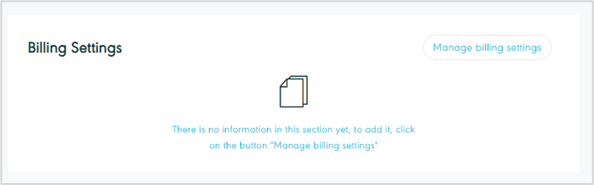
Figure 23 - Manage Billing Settings Section
The user should then proceed with filling in the required information in sections: General Information, Shipping charges, Customs duty, COD charges and Return charges:
General Information
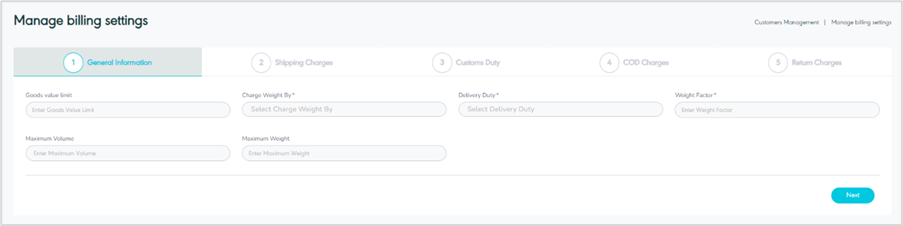
Figure 24- Manage Billing Settings - General Information
Goods Value Limit: this field represents the maximum customs-declared value for the shipment.
Charge Weight By: this field represents the weight value used for calculating shipping charges.
Delivery Duty: this field represents the payment method for the charges.
Weight Factor: this field represents the conversion factor that is used for calculating the volumetric weight.
Max Volume: this field represents the maximum allowed shipment dimensions.
Max Weight: this field represents the maximum allowed shipment weight.
Shipping Charges
The user can add shipping charges details to the billing:
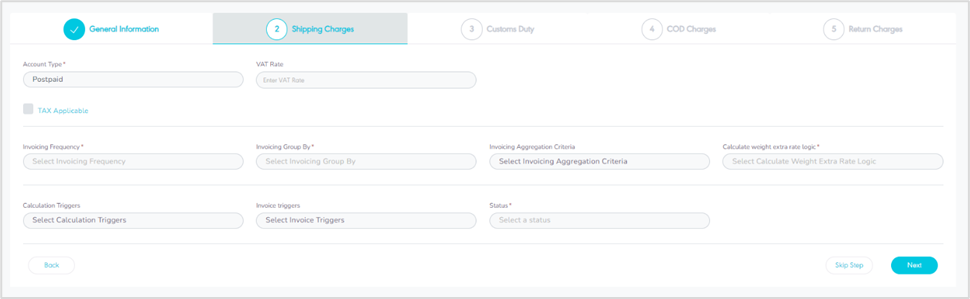
Figure 25- Manage Billing Settings - Shipping Charges
Account Type: this field represents the branch account type e.g., Postpaid or Prepaid. If the user chooses prepaid, two fields appear:
Shipping Charges Credit: this field represents the available amount to pay shipping charges in advance.
Shipping Charges Credit Limit: this field represents the minimum limit amount that should be available in the account.
VAT Rate: this field represents the VAT ratio.
Tax Applicable: by checking this field, the tax will be considered when calculating the shipping charges, and the Tax rate field would appear to be filled.
Invoicing Frequency: this field represents when shipment invoices are generated for the selected branch, e.g.: daily, monthly, or weekly.
Run At: this field sets the time frame for generating the shipping charges invoice based on the chosen value in the ‘Invoicing Frequency’ field.
Invoicing group by: this field represents the grouping type to generate the invoice whether to group shipments by customer, branch, or only AWB numbers.
Invoicing Aggregation Criteria: this field represents the aggregation criteria for the shipping charges invoice, e.g., by branch or by consignee.
Calculate Weight Extra Rate logic: this field represents the option for calculating the shipment extra weight for the rate sheet either accumulatively or breaking down the extra weight according to the defined ranges.
Handling Charges Applicable: by checking this field, the handling charges will be considered when calculating the shipping charges, and the Handling charges fees field would appear to be filled.
Calculation Triggers: this field represents what shipment events will be defined to calculate the shipment charges.
Invoice Triggers: this field represents the shipment events that will trigger the shipping charges invoices.
Status: this field represents the status where active means that the shipping charges is currently functioning with GN TEQ and inactive means that the shipping charges is no longer using GN TEQ system
Custom Duty
The user can add related details of custom charges under the billing settings as follows:
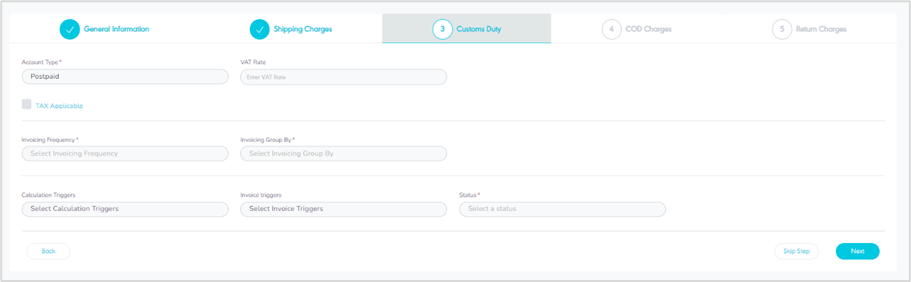
Figure 26- Manage Billing Settings - Customs Duty
Account Type: this field represents the branch account type e.g., Postpaid or Prepaid If the user chooses prepaid, two fields appear:
Duties Credit: this field represents the customs balance used to pay customs charges in advance.
Duties Credit Limit: this field represents the branch duties’ balance limit.
VAT Rate: this field represents the VAT ratio.
Tax Applicable: by checking this field, the tax will be considered when calculating the customs charges, and Tax rate field will appear to be filled.
Invoicing Frequency: this field represents when shipment invoices are generated for the selected branch, e.g.: daily, monthly, or weekly.
Run At: this field sets the time frame for generating the customs charges invoice.
Invoicing group by: this field represents the grouping type to generate the invoice whether to group shipments by customer, branch, or only AWB numbers.
Duty Handling Fee Applicable: If check box is enabled, the user can define the handling charges fees, and Duty Handling fee percentage field would appear to be filled.
Calculation Triggers: this field represents what shipment events will be defined to calculate the shipment customs charges.
Invoice Triggers: this field represents the shipment events that will trigger the customs charges invoices.
Status: this field represents the status where active means that the customs charges is currently functioning with GN TEQ and inactive means that the customs charges is no longer using GN TEQ system
COD Charges
The user can add custom COD Charges to the billing as follows:
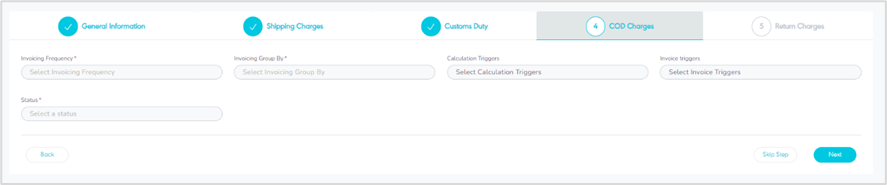
Figure 27- Manage Billing Settings - COD charges.
Invoicing Frequency: this field represents when COD charges invoices are generated for the selected branch, e.g.: daily, monthly, or weekly.
Invoicing group by: this field represents the grouping type to generate the invoice whether to group shipments by customer, branch, or only AWB numbers.
Calculation Triggers: this field represents what shipment events will be defined to calculate the COD charges.
Invoice Triggers: this field represents the shipment events that will trigger the COD charges invoices.
Status: this field represents the status where active means that the COD charges is currently functioning with GN TEQ and inactive means that the COD charges is no longer using GN TEQ system.
Return Charges
The user can add Return Charges to the billing as follows:
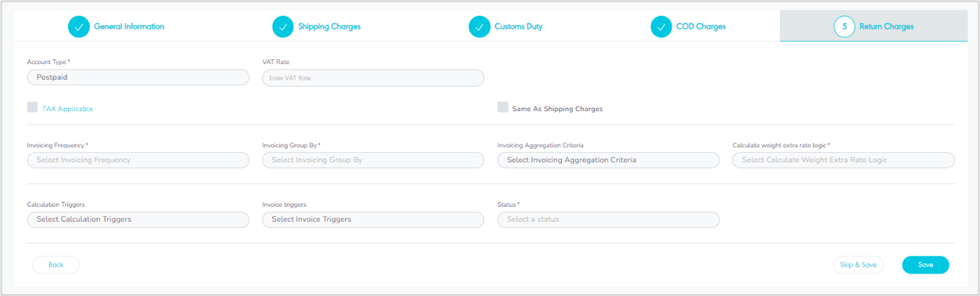
Figure 28- Add Return Charges
Account Type: this field represents the branch account, e.g., Postpaid or Prepaid. If the user chooses prepaid, two fields appear:
Charge Weight by (Return Charges Credit): this field represents the amount of balance used to pay return charges in advance.
Return Charges Credit Limit this field represents the minimum limit amount that should be available in the account.
Vat Rate: this field represents the VAT ratio.
Tax Applicable: by checking this field, the tax will be considered when calculating the return charges, and Tax rate field will appear to be filled.
Same As Shipping Charges: by checking this field, same rates as the shipping charges will be applied.
Invoicing Frequency: this field represents when return invoices are generated for the selected branch, e.g.: daily, monthly, or weekly.
Run At: this field sets the time frame for generating the return charges invoice.
Invoicing group by: this field represents the grouping type to generate the invoice whether to group shipments by customer, branch, or only AWB numbers.
Aggregation Criteria: this field represents the aggregation criteria for the return charges invoice, e.g., by branch or by consignee.
Calculate Weight Extra Rate logic: this field represents the option for calculating the shipment extra weight for the ratesheet either accumulatively or breaking down the extra weight according to the defined ranges.
Handling Charges Applicable: by checking this field, the handling charges will be considered when calculating the return charges.
Calculation Triggers: this field represents what shipment events will be defined to calculate the return charges.
Invoice Triggers: this field represents the shipment events that will trigger the return charges invoices.
Status: this field represents the status where active means that the return charges is currently functioning with GN TEQ and inactive means that the return charges is no longer using GN TEQ system
By clicking on ’Save’, the system adds all charges on the billing for the branch successfully.
2.9.2View Billing Setting Details
The user can view the existing billing setting information by clicking on View Details in the ‘Billing Setting’ section as follows:
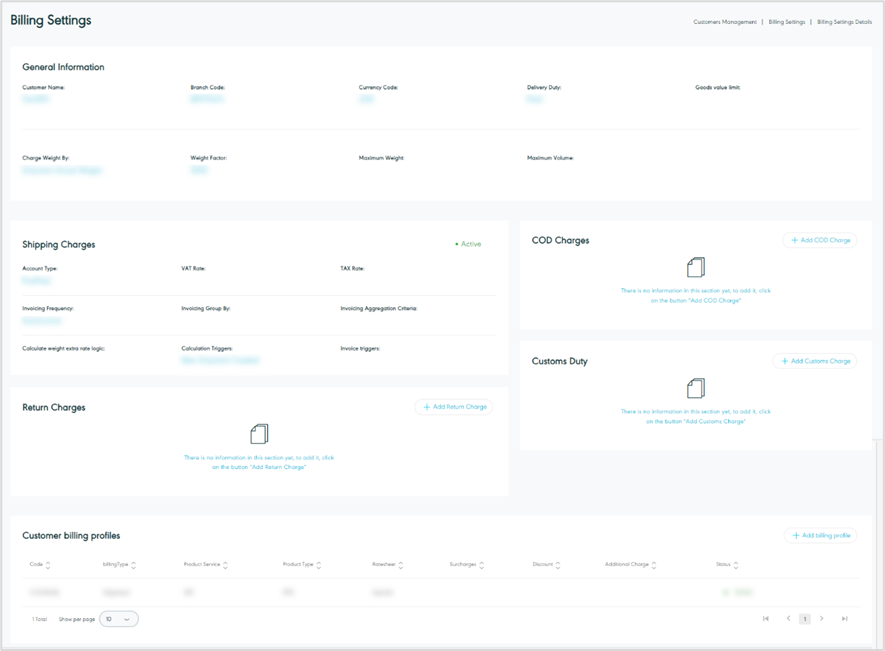
Figure 29- View Billing Setting Details
2.10 Add Billing Profile
The user can add a billing profile through ’Add Billing profile’ action button as below:
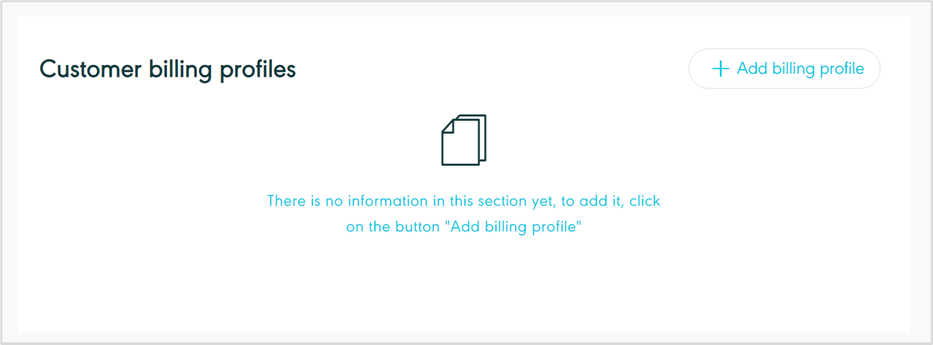
Figure 30 - Customer Billing Profile Section
The user should enter the below required information:

Figure 31- Add Billing Profile
Product Service: this field represents the services e.g., Return, International, Domestic, etc...
Product Type: this field represents the delivery service type e.g., Home Delivery, Office Delivery, Drop Off, etc....
Ratesheet: this field represents the billing profile’s ratesheet type.
Discount: this field represents the billing profile’s discount rate.
Start Date: this field represents the beginning of the effectiveness of the billing profile.
End Date: this field represents the end date of the effectiveness of the billing profile.
Additional Services Charges: this field represents the additional services charges to be added to the billing profile.
Surcharges: this field represents the surcharges to be applied to the billing profile.
Status: this field represents the billing profile’s status.
By clicking on ’Save’, the system adds the billing profile to the billing setting successfully.
3. Leads Management
This feature is designed to manage your leads (Possible customer), allowing you to add new leads, edit existing ones, delete leads, and view their details.
3.1 View Leads
The user can view their defined leads (possible customers) in the system by navigating to the ‘Leads’ screen in the CRM Module from the left navigation panel as follows:
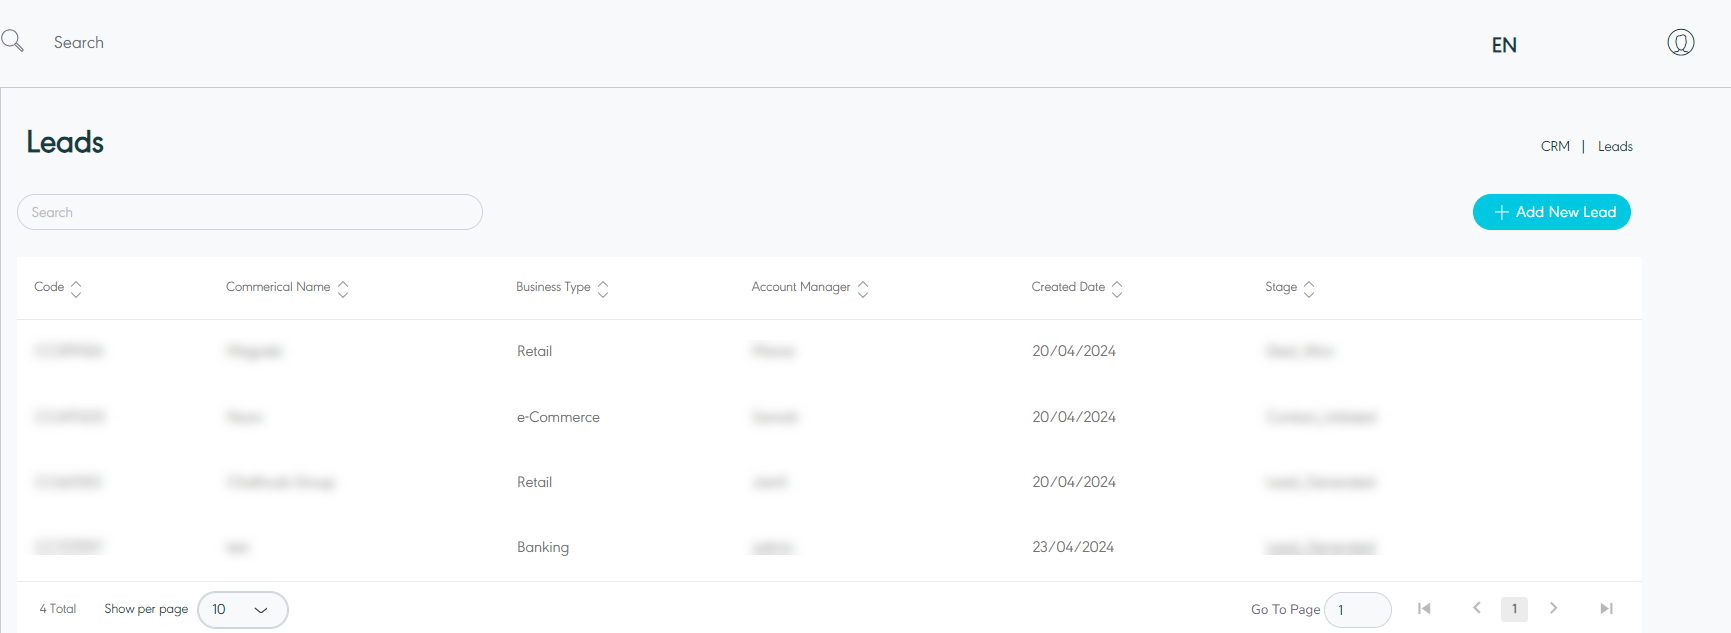
Figure 32- View Leads
Add New Leads: the user can add customers by clicking on ‘Add New Lead’, referring to 'Add New Lead’ section.
Search: the user can search for the customers by using the search field.
Show per page: the user can select the number of items to show on each page.
Actions: by clicking on actions the user can view specific customer……
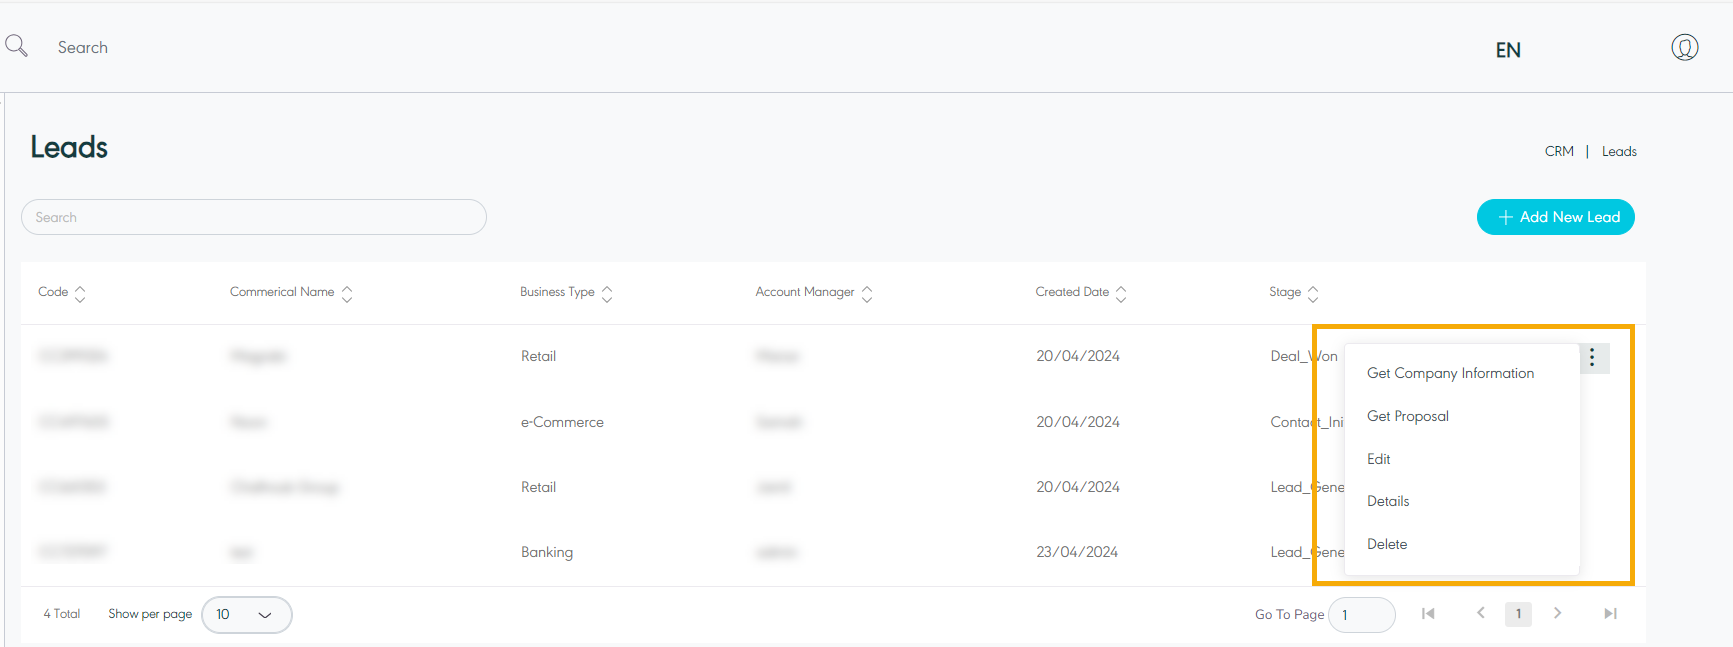
Figure 33- Leads Related Actions
3.2 View Leads Details
The user can view details of an existing lead (Possible customer) by navigating to ‘Leads’ Screen via CRM Module and click on Details from Actions as follows:
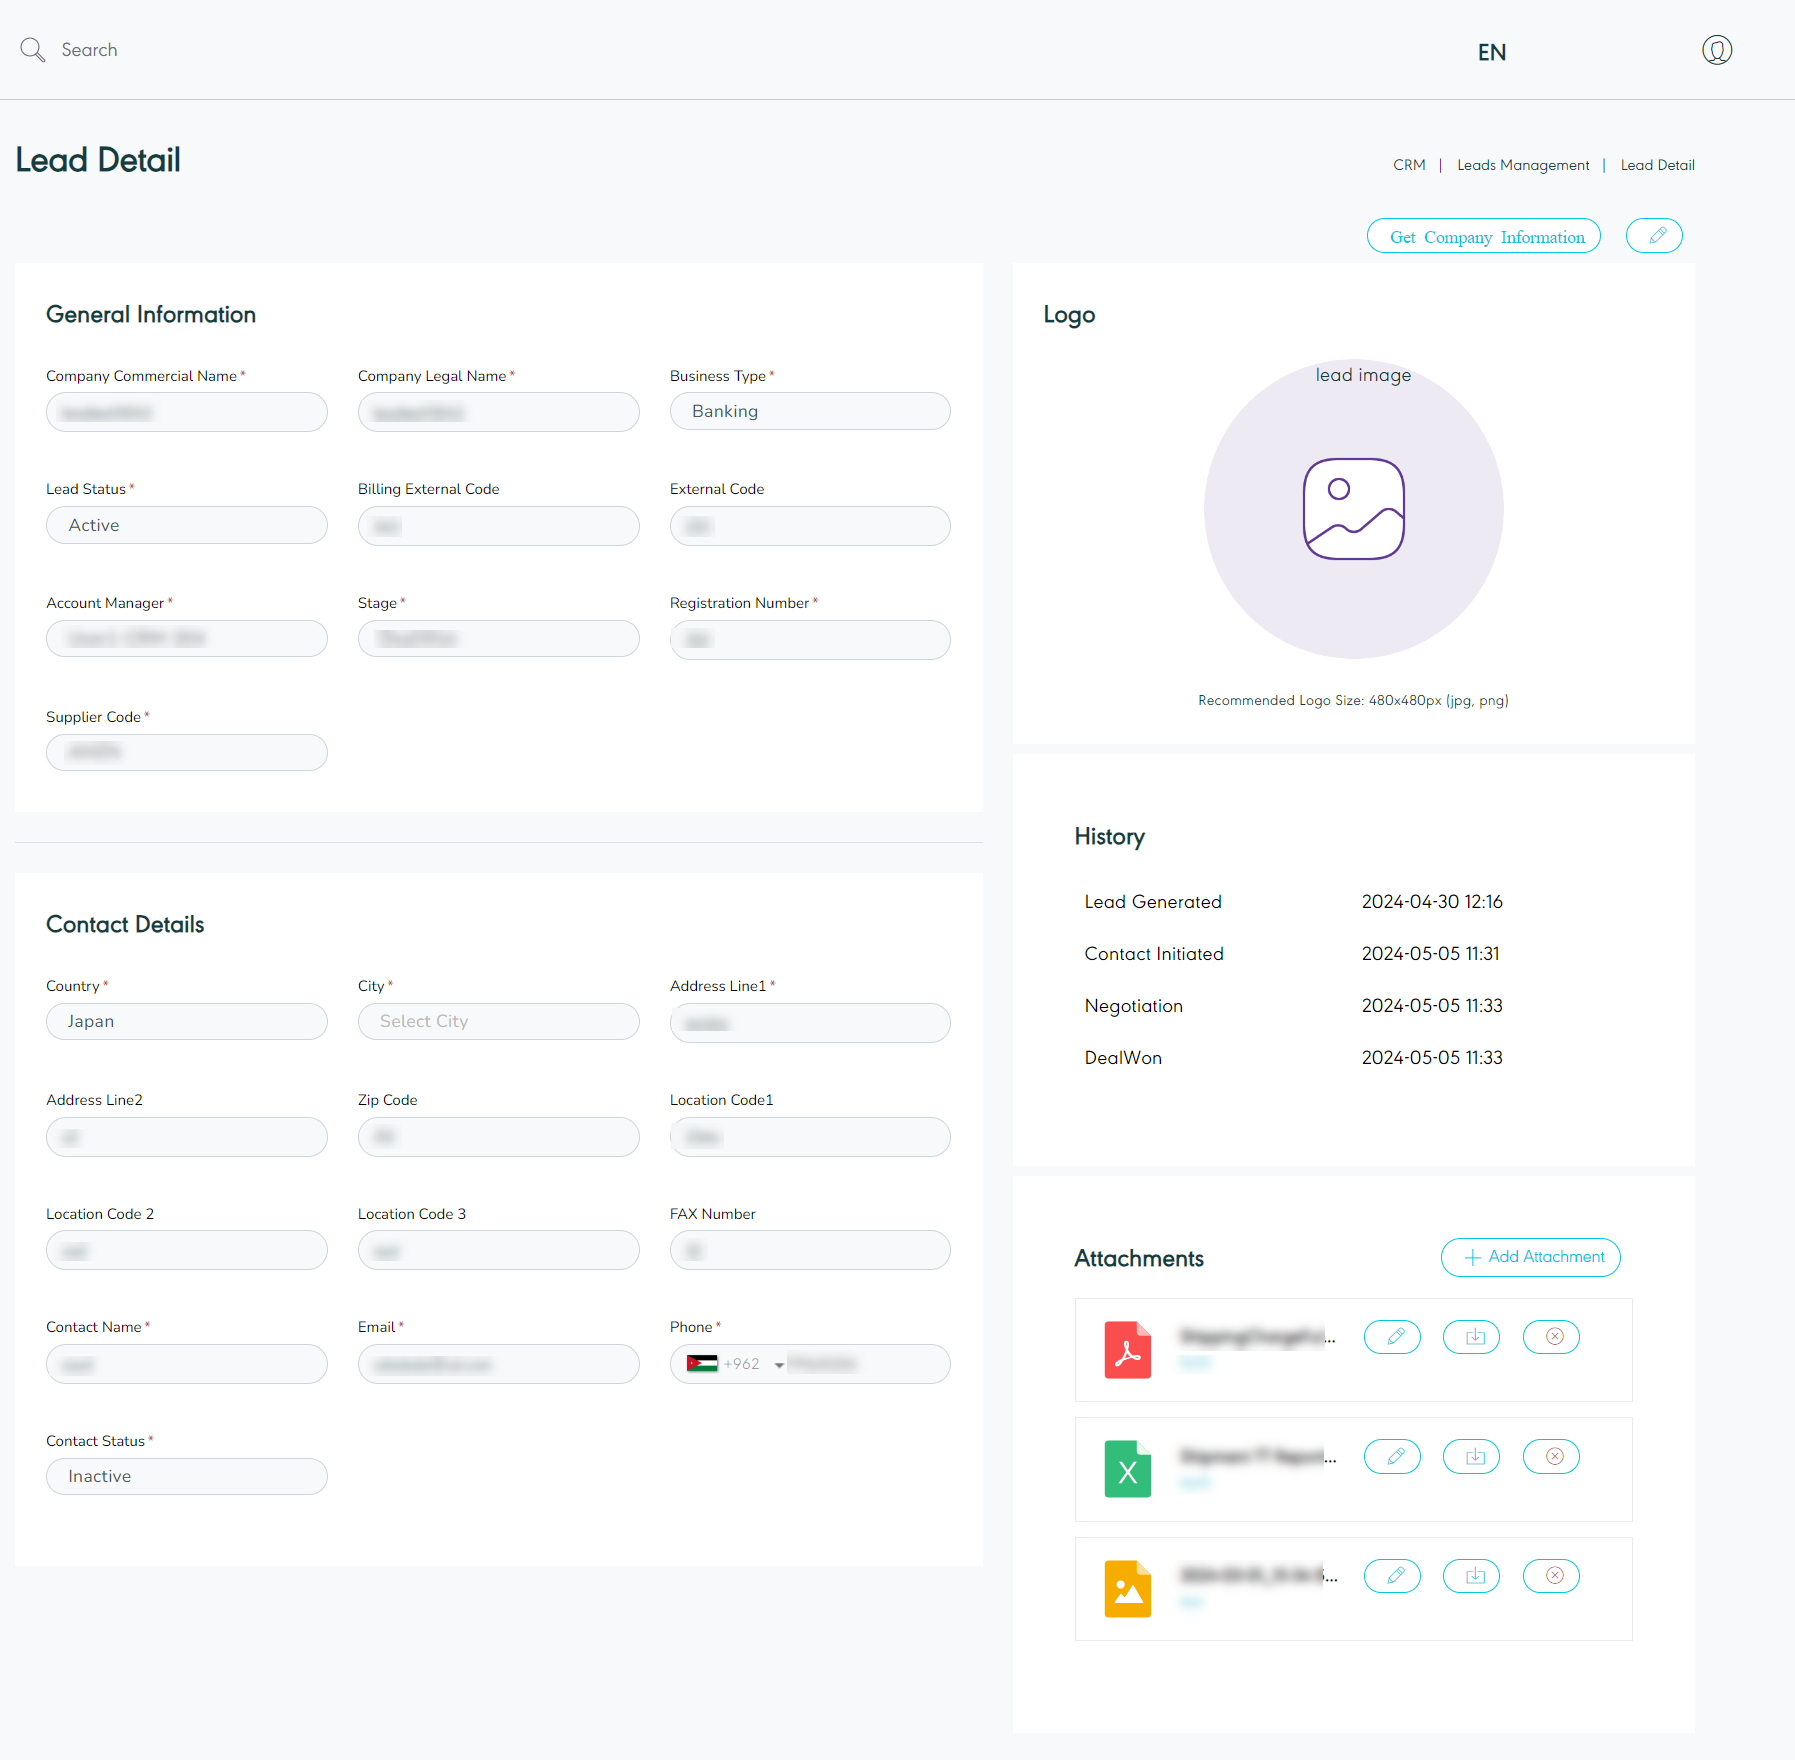
Figure 34- View Leads Details
Edit: the user can edit the lead profile by clicking on the Edit that appears when hovering over the lead details. by referring to Edit Lead section.
Get Company Information:
Add Attachment: the user can click on ’Add Attachment’ to attach any document related to the lead.
3.3 Edit Lead
The user can edit the details of an existing lead by navigating to the ‘Leads’ screen via clicking on Edit from Actions:
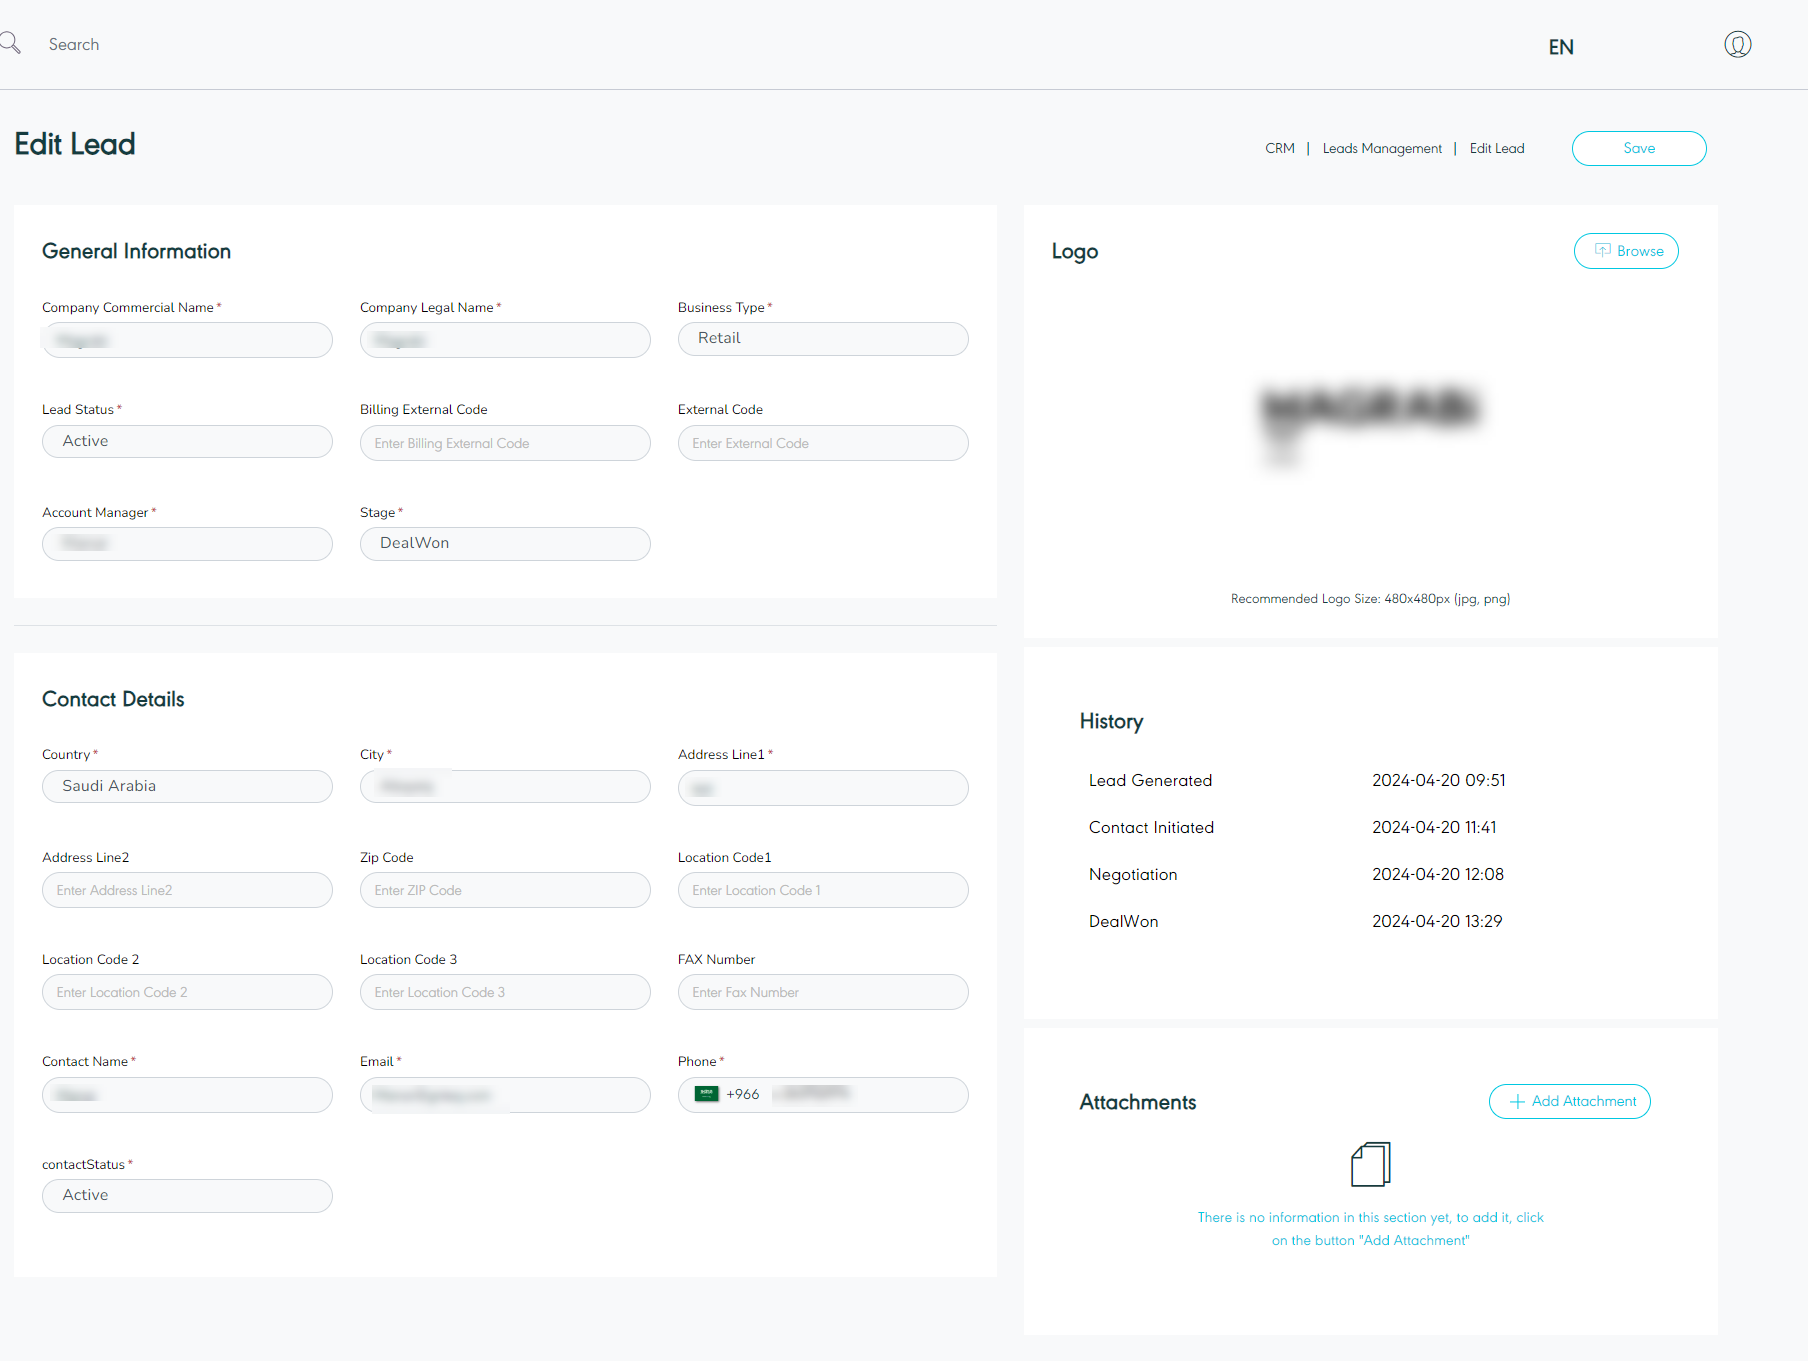
Figure 35- Edit Lead
By clicking on ‘Save changes’, the system updates the customer’s information successfully.
3.4 Add New Lead
The user can add a new lead by navigating to the ‘Leads’ screen via CRM Module and clicking on Add New Lead then filling in the information in the below outlined sections:

Figure 36-Add New Lead
General Information
Logo: this section represents the company’s special logo.
Company Commercial Name: this field represents the company’s trading name.
Company Legal Name: this field represents the name that appears on all official documents or legal papers.
Business Type: this field represents the company’s business industry, e.g.: Retail, Banking, e-commerce, etc.
Lead Status: this field represents the status for the lead’s where active means that the lead is currently in use and inactive means that the lead is not currently in use.
Billing External code: this field represents the lead’s account number used for billing integration purposes.
External Code: this field represents the lead’s account number used for integration purposes.
Account Manager: this field represents the user responsible for the lead account.
Registration Number:
Supplier Code: this field represents the special code for the supplier.
Product Service: this field represents the services e.g., Return, International, Domestic etc.…
Product Type Code: this field represents the delivery service type e.g., Home Delivery, Office Delivery, Drop Off, etc.…
Contact Details
Country: this field represents the country of the company’s main branch.
City: this field represents the city of the company’s main branch.
Address Line1: this field represents the company’s primary contact address.
Address Line2: this field represents the company’s secondary contact address.
ZIP Code: this field represents the company’s Zip Code.
Location Code 1: this field represents the company’s location address using any of the following options, e.g.: W3words, google maps short address, etc.
Location Code 2: this field represents the company’s location address using any of the following options, e.g.: W3words, google maps short address, etc.
Location Code 3: this field represents the company’s location address using any of the following options, e.g.: W3words, google maps short address, etc.
Fax Number: this field represents the company’s fax number.
Contact Name: this field represents the person who is responsible for communicating on behalf of the company.
Email: this field represents the contact person’s email address.
Phone: this field represents the contact person’s mobile number.
Contact Status: this field represents the status for the contact’s where active means that the contact is currently in use and inactive means that the contact is not currently in use.
By clicking on Save, the system adds new lead information successfully.