.png)

Document History
|
Version |
Author |
Reviewer/Approver |
Date of Issue |
Page / Section |
Brief Description |
|---|---|---|---|---|---|
|
1.0 |
Deema Z. |
|
20 Aug 2024 |
Shipment, Container and MAWB management |
|
Glossary
|
Term |
Description |
|---|---|
|
Hub Ops |
The hub operations for managing the shipments, return shipments, containers, and MAWBs. |
|
AWB |
An Air Waybill is a document used in the air transportation of goods. It serves as a receipt issued by an international airline for the goods and includes information about the shipment, such as the shipper's and consignee's details, the description of the goods, and the flight details. |
|
MAWB |
Master Air Waybill which represents the master shipment ID that consists of multiple shipments. |
|
Container |
A standardized box used for packaging the shipments. |
|
COG |
Cost of Goods Sold. |
|
HS Code |
A standardized international classification system for products used to categorize and identify goods. |
|
Consignee |
The individual designated to receive a shipment, typically the recipient of goods or products at the final destination. |
1. Shipment Management
The purpose of this feature is to manage the shipments and their related settings through the following functionalities:
1.1 View Shipment
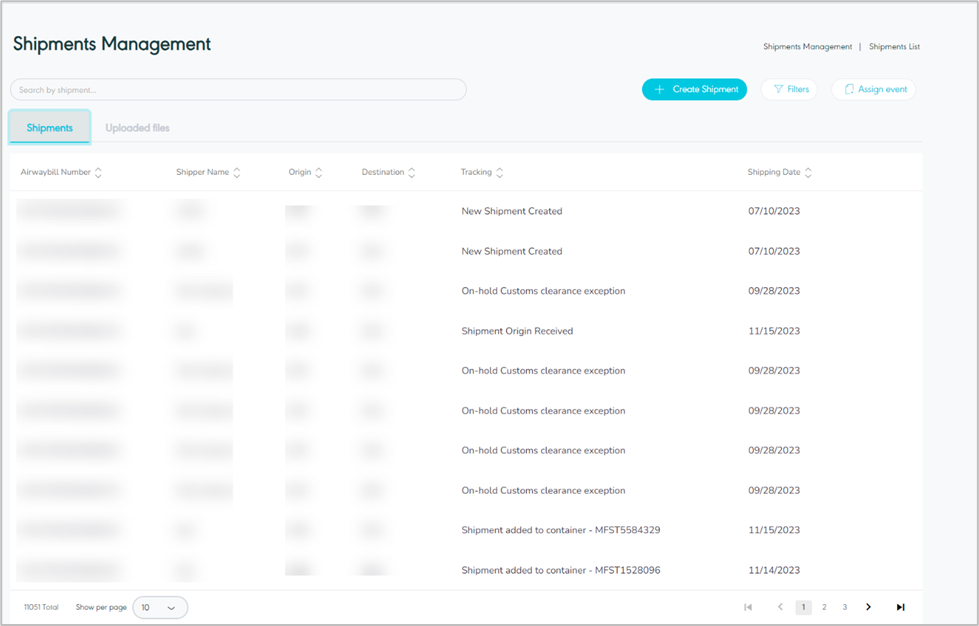
The user can view the defined shipments in the system by navigating to the ‘Shipment’ screen by choosing the Hub Ops Module from the left navigation panel as follows:
-
Search: the user can search for the shipment by typing the AWB number in the search filter field.
-
Create Shipment: the user can add new shipment by clicking on ‘Create Shipment’, referring to Create Shipment section.
-
Filters: the user can search for the shipments by typing the shipment number (AWB), shipper name, origin, destination, tracking and branch code in the search filter field.
-
Assign event: the user can assign events to shipments by referring to the Assign event section.
-
Show per page: the user can select the number of items to show on each page.
-
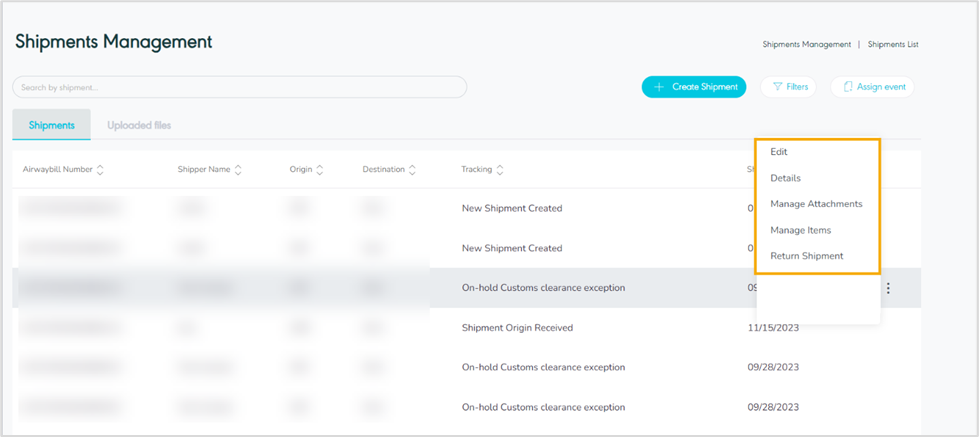
Actions: by clicking on this button the user can view specific shipment details by referring to View Shipment Details, edit by referring to Edit Shipment, manage attachments by referring to Manage attachments, manage items by referring to Manage Items, or return shipments by referring to Return Shipment, as follows:
-
Upload Files
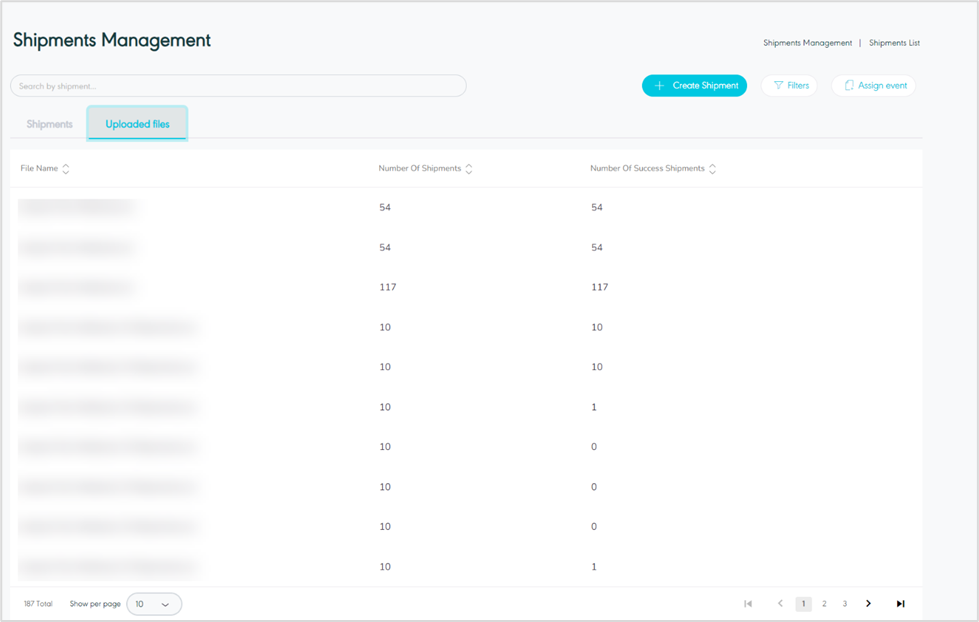
The user can view the bulk shipment list in the system by navigating to the ‘Shipment’ screen by choosing the Hub Ops module from the left navigation panel as follows:
-
Search: the user can search for the shipment by typing the file name in the search filter field.
-
Rows Per Page: the user can select the number of items to show on each page.
-
Assign event: by clicking on this button the user can assign events to the shipment.
Assign Event - Single event
-
General Information (assign event)
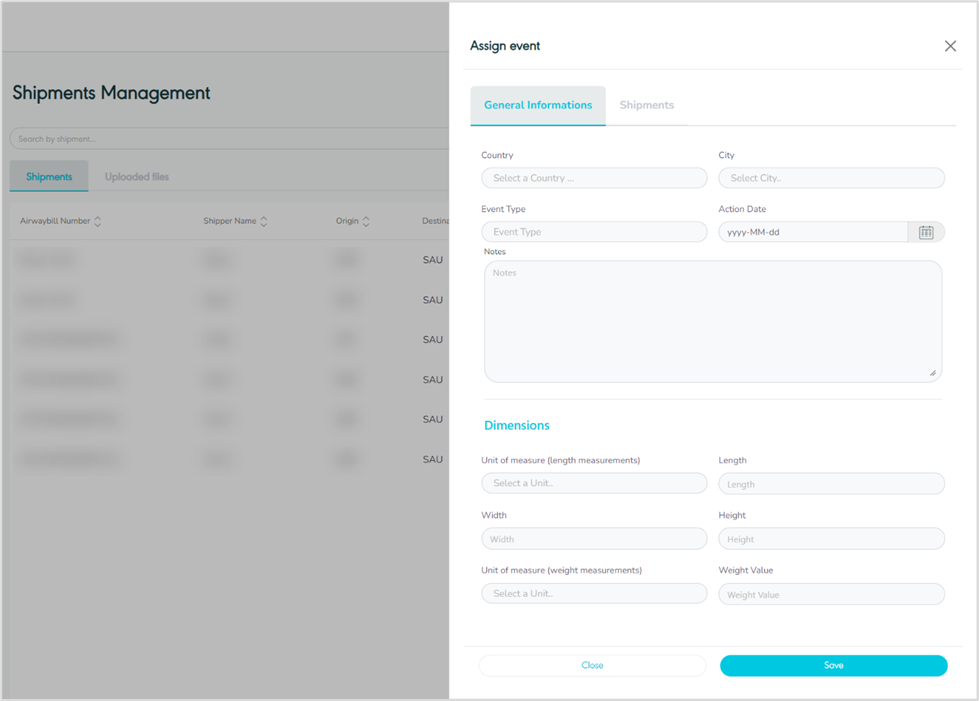
On the general information page, the user fills in shipment information based on the type of event.
-
Shipments (assign event)
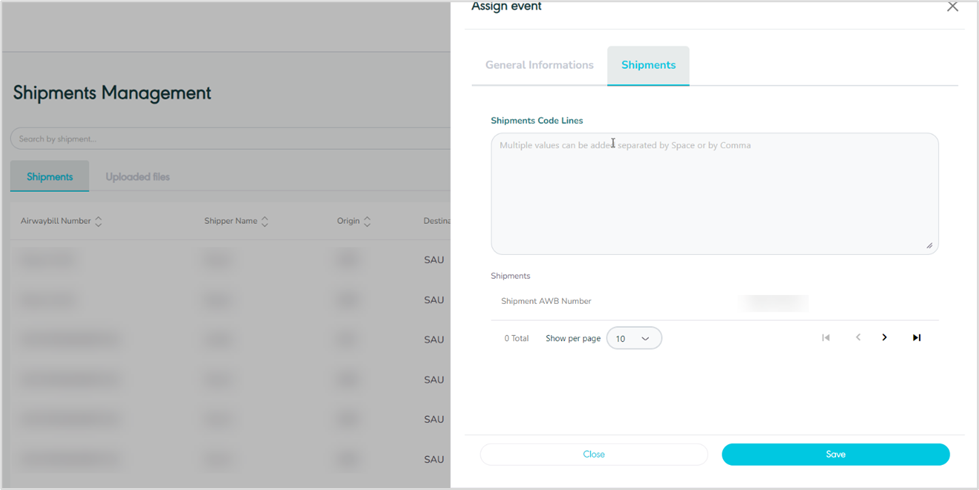
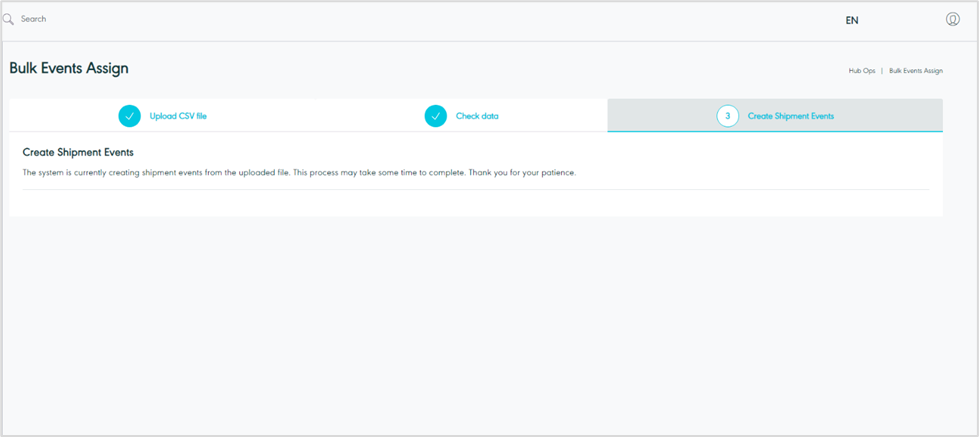
Assign Event - Multiple events via excel import
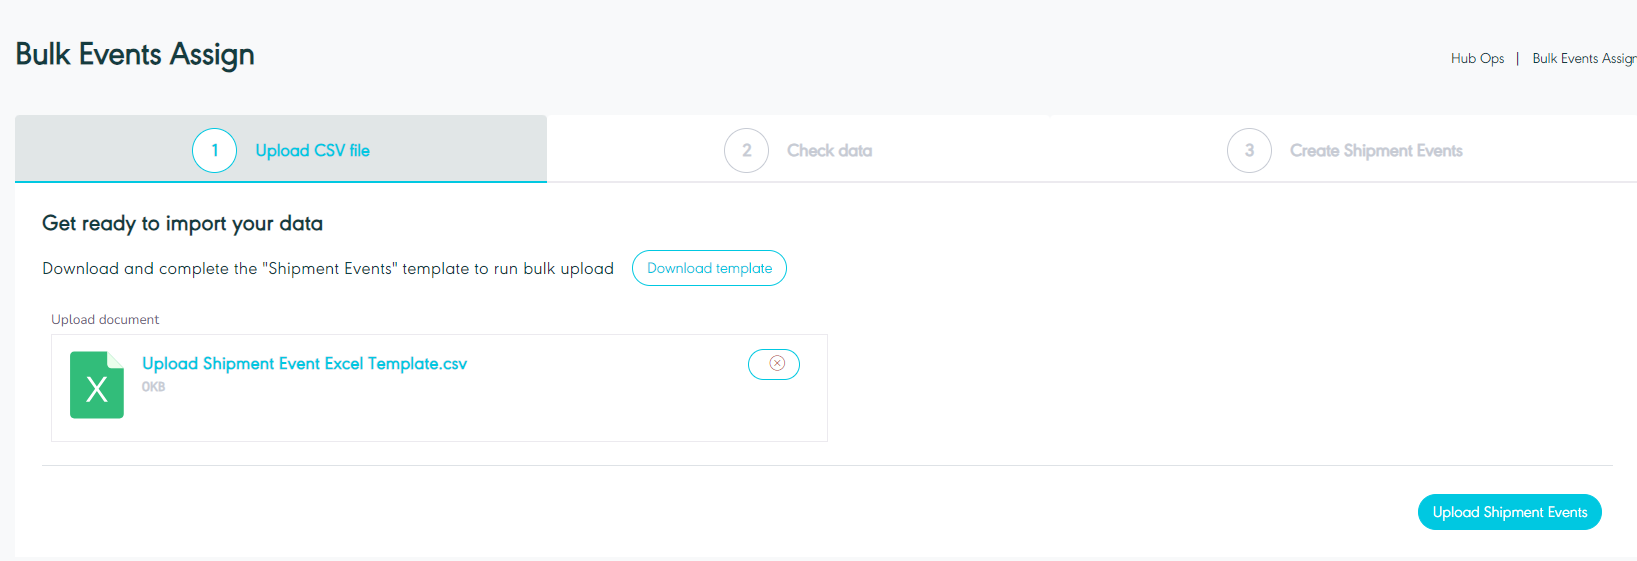
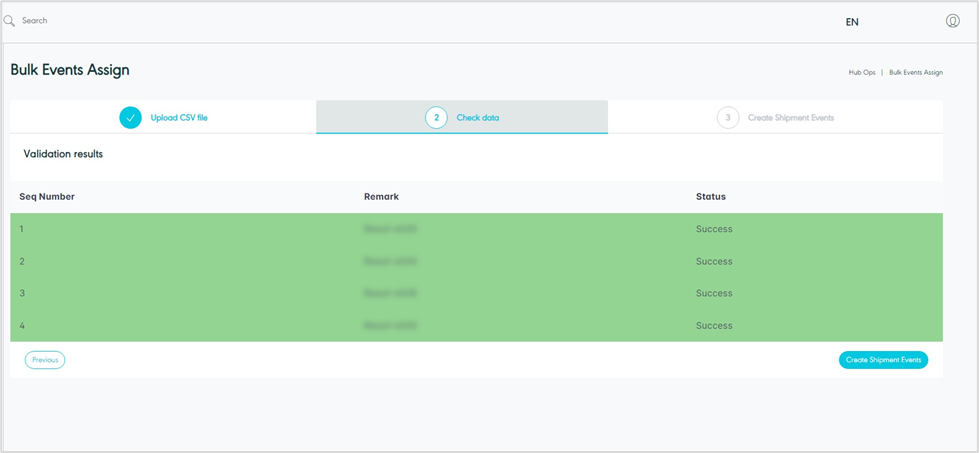
1.2 View Shipment Details
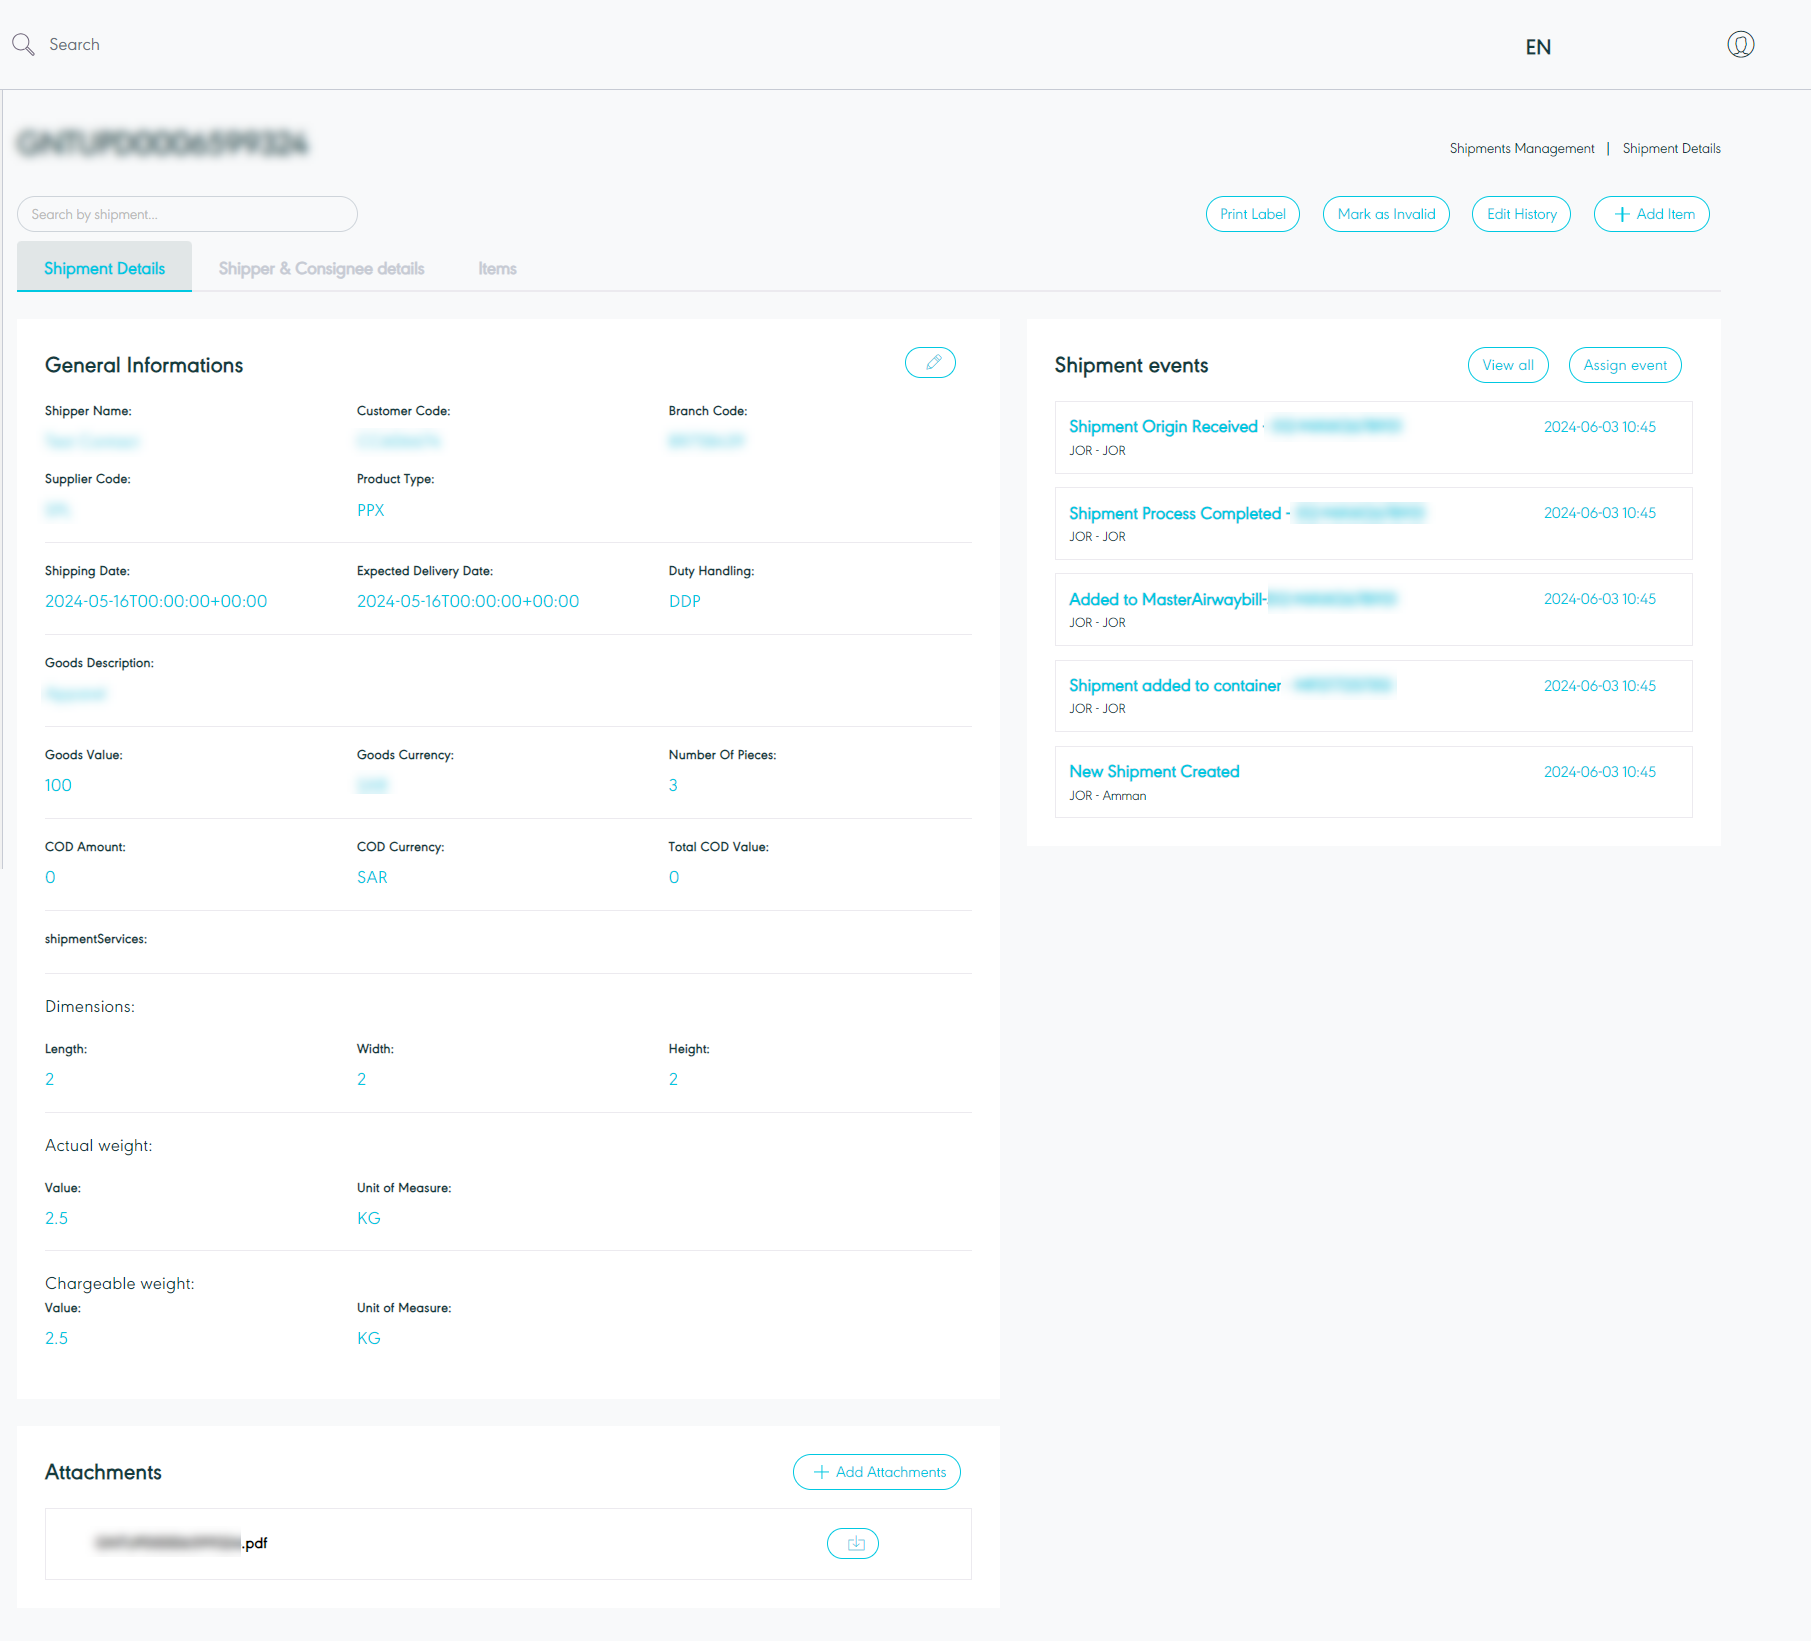
The user can view the shipment details and shipment events by navigating to the ‘Shipment’ screen via the Hub Ops Module and clicking on Details from Actions as follows:
-
Print label: the user can print the label for the shipment by clicking on print label button.
-
Make as Invalid: the user can manage the missing shipments and complete their shipping journey cycle. By missing shipment, those shipment created in SPL's system successfully but failed to be created in SPL without being listed under the invalid control tower or failed shipments control tower.
-
Edit History: the user can access the edit history, displaying details of the user who made the edit, the timestamp of the edit, and the type of edit performed.
-
Edit: the user can edit the shipment information if needed.
-
Add Item: the user can add items and move to the items list section.
-
Add Attachment: the user can add an attachment to the shipment information.
-
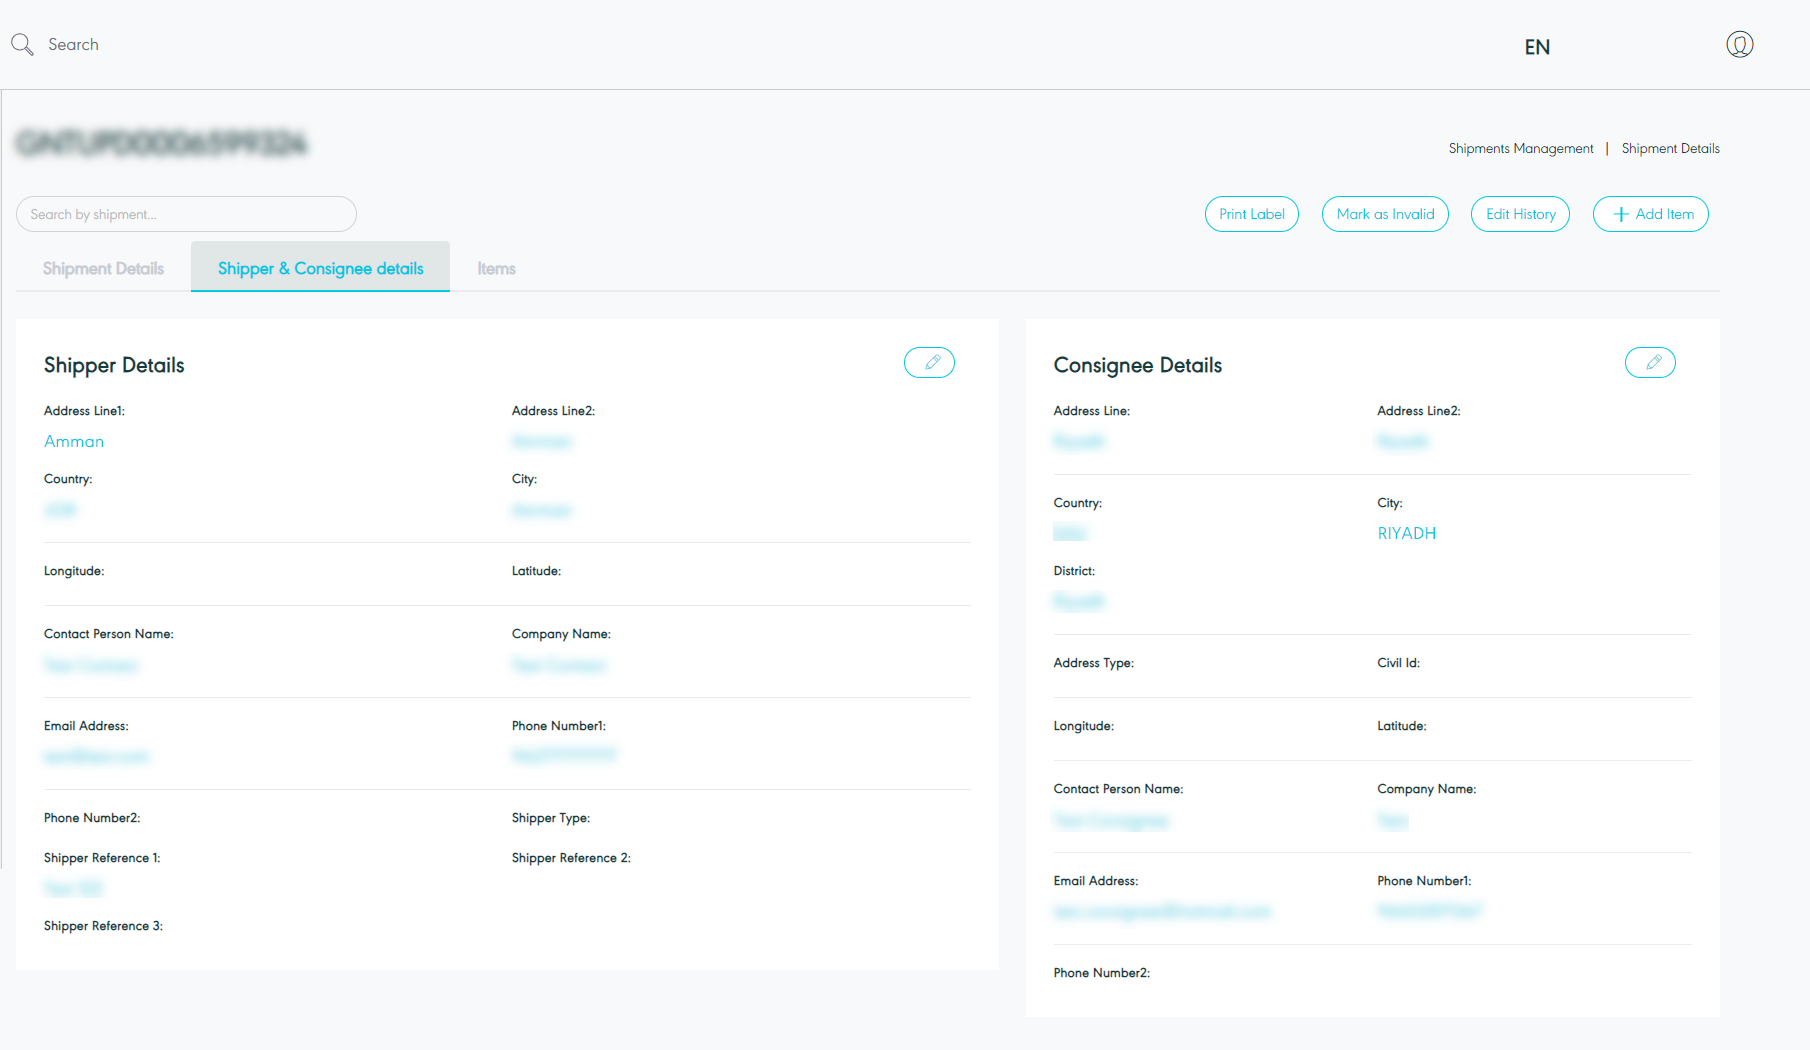
Shipper & Consignee details
-
Print label: the user can print the label for the shipment by clicking on print label button.
-
Make as Invalid: the user can manage the missing shipments and complete their shipping journey cycle. By missing shipment, those shipment created in SPL's system successfully but failed to be created in SPL without being listed under the invalid control tower or failed shipments control tower.
-
Edit History: the user can access the edit history, displaying details of the user who made the edit, the timestamp of the edit, and the type of edit performed.
-
Add Item: the user can add items and move to the items list section.
-
Edit: the user can edit the shipper reference and consignee information.
-
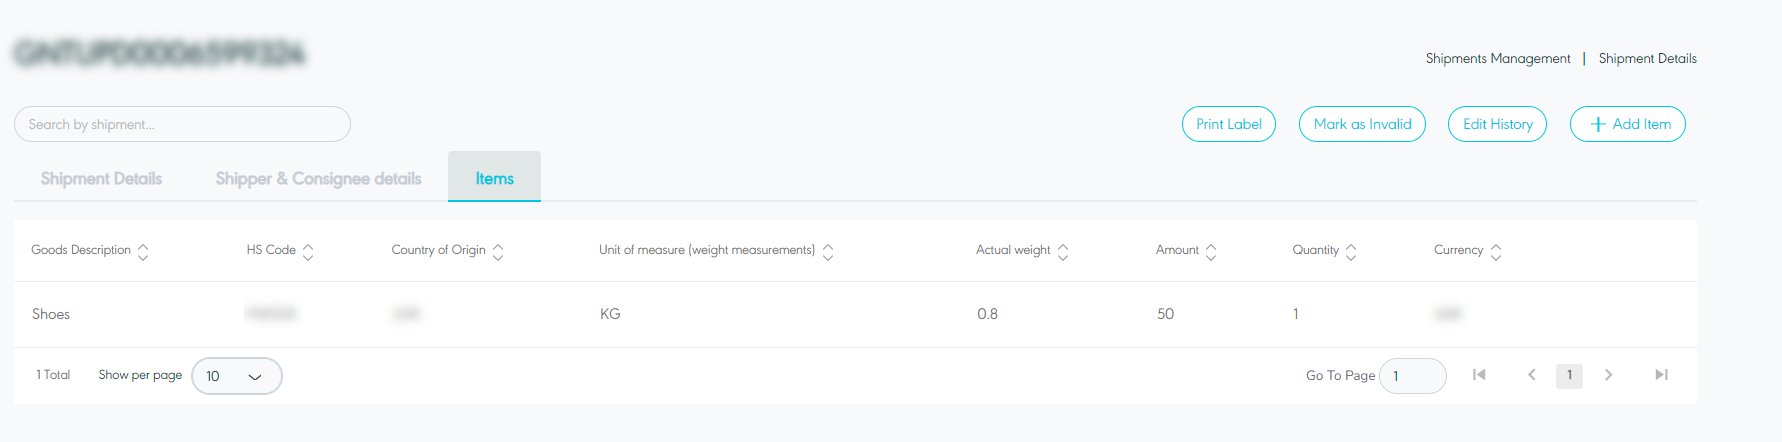
Items
1.3 Create Shipment
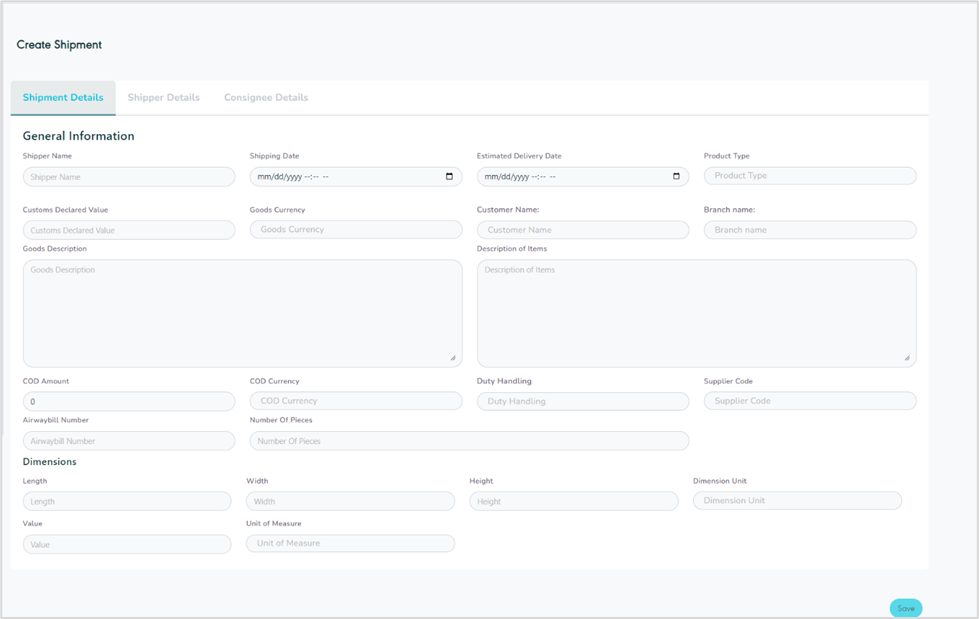
The user can add a new shipment by navigating to the ‘Shipment’ screen via the Hub Ops Module and clicking on Create Shipment as follows:
-
Shipper Name: this field represents the shipper’s name.
-
Shipping Date: this field represents the date and time the order was shipped from the origin to the destination.
-
Estimated delivery date: this field represents the date a shipment is expected to be delivered to the end user.
-
Product Type: this field represents the delivery service type e.g., Home Delivery, Office Delivery, Drop Off, etc.
-
Customs Declared Value: this field represents the shipment value to be declared to custom authorities.
-
Customer Name: this field represents the customer’s name related to the shipment.
-
Branch Name: this field represents the branch name related to the shipment.
-
Goods Description: this field represents a detailed description of the shipped goods.
-
COD Amount: this field represents the amount to be collected on delivery from the consignee.
-
COD Currency: this field represents the currency of the COD amount value.
-
Duty Handling: this field represents the customs handling charge (Delivery Duty Paid / Unpaid).
-
Supplier Code: this field represents the special code for the supplier.
-
Airwaybill Number: this field represents the unique number of shipments.
-
Number of Pieces: this field represents the number of items within the shipment.
-
Length: this field represents the shipment’s length.
-
Width: this field represents the shipment’s width.
-
Height: this field represents the shipment’s height.
-
Dimension Unit: this field represents the unit for shipment (CM: centimeter, M: Meter)
-
Value: this field represents the goods value.
-
Unit of Measure: this field represents the unit used to quantify the size of the goods being shipped in kilograms (KG) or pounds (LB).
-
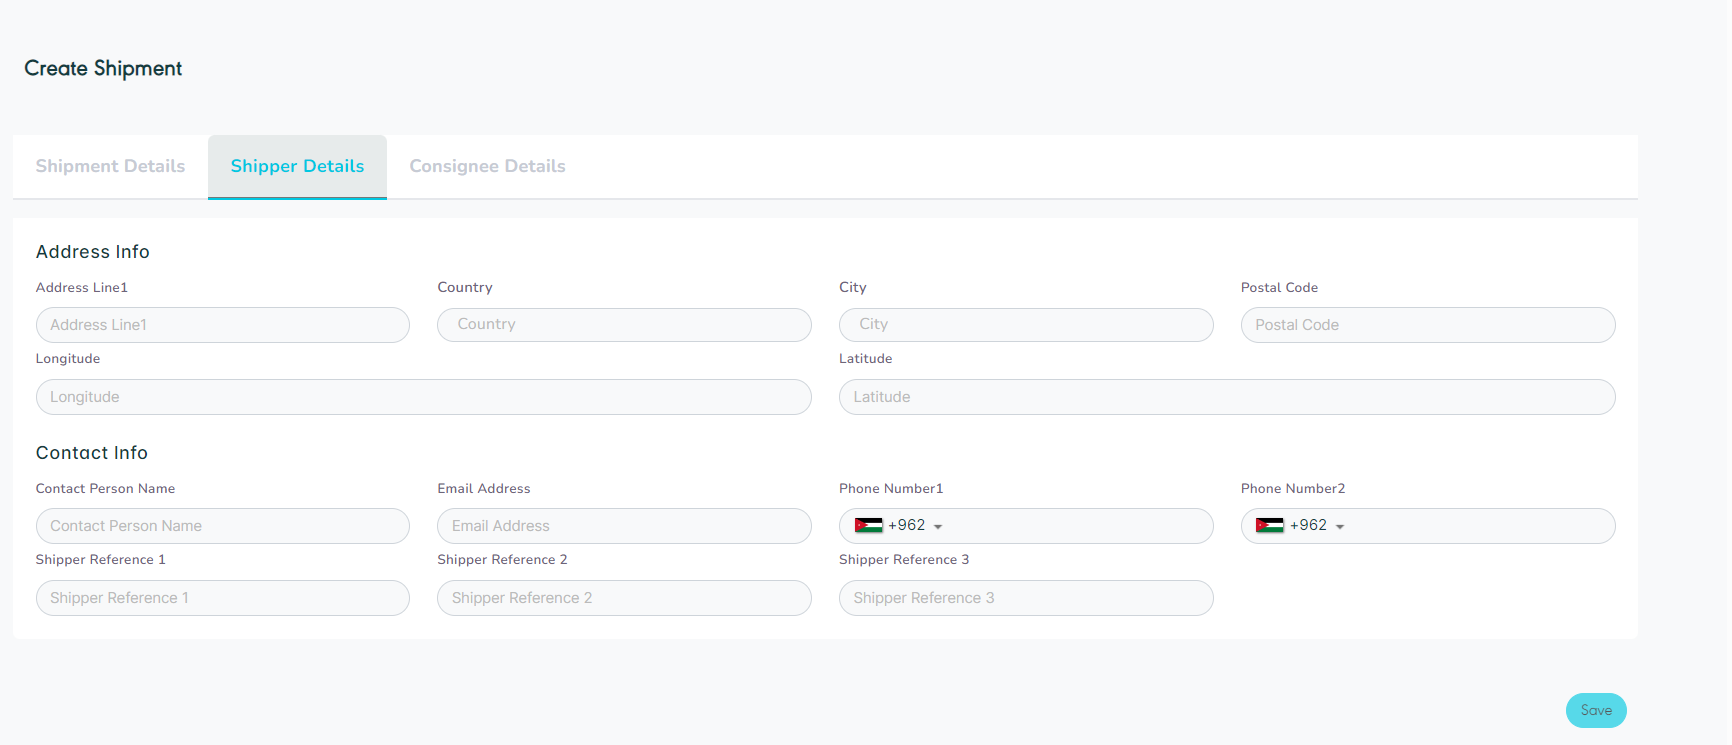
Shipper Details
-
Address line (1): this field represents the shipper’s address.
-
Country: this field represents the shipper’s country.
-
City: this field represents the shipper’s city.
-
Postal Code: this field represents a series of letters and numbers appended to the postal address to sort and classify mail.
-
Longitude: this field represents the address longitude to locate a location.
-
Latitude: this field represents the address latitude to locate a location.
-
Contact Person Name: this field represents the consignee’s name.
-
Email Address: this field represents the shipper’s email address.
-
Phone Number (1): this field represents the shipper’s main phone number.
-
Phone Number (2): this field represents the shipper’s secondary phone number.
-
Shipper Reference (1): this field represents any reference number or text added by the shipper.
-
Shipper Reference (2): this field represents any reference number or text added by the shipper.
-
Shipper Reference (3): this field represents any reference number or text added by the shipper.
-
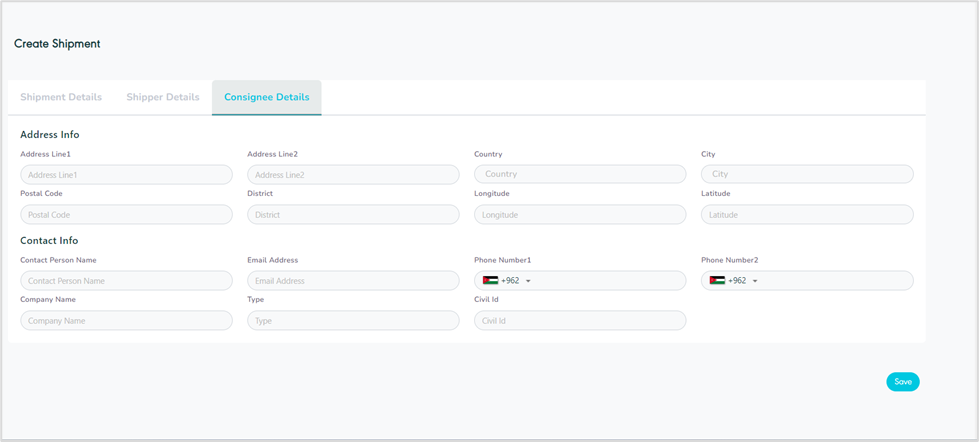
Consignee Details
-
Address Line (1): this field represents the consignee’s main address.
-
Address Line (2): this field represents the consignee’s secondary address.
-
Country: this field represents the consignee’s country.
-
City: this field represents the consignee’s city.
-
Postal Post: this field represents a series of letters and numbers appended to the postal address to sort and classify mail.
-
District: this field represents a location, area, or region linked to the address provided.
-
Longitude: this field represents the address longitude to locate a location.
-
Latitude: this field represents the address latitude to locate a location.
-
Contact person Name: this field represents the consignee’s name bound to receive the shipment.
-
Email Address: this field represents the consignee’s email address.
-
Phone Number (1): this field represents the consignee’s main phone number.
-
Phone Number (2): this field represents the consignee’s secondary phone number.
-
Company Name: this field represents the company name of the consignee.
-
Type: this field represents the address type e.g., Residential, Industrial, or office location.
-
Civil Id: this field represents the consignee’s national id number.
By clicking on Save, the system adds new shipment information successfully.
1.4 Edit Shipment
The user can edit the shipment information by clicking on Edit from Actions by navigating to the ‘Shipment’ screen via the Hub Ops Module as follows:
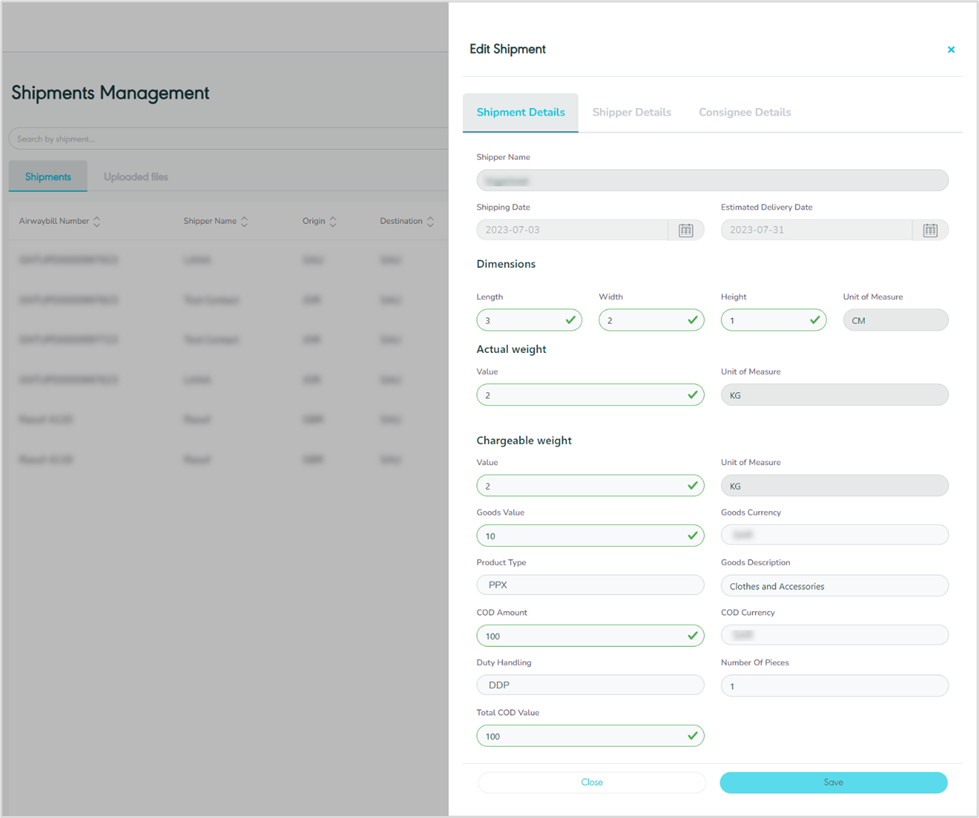
By clicking on Save, the system updates the information under the respective shipment successfully.
-
Edit Shipper
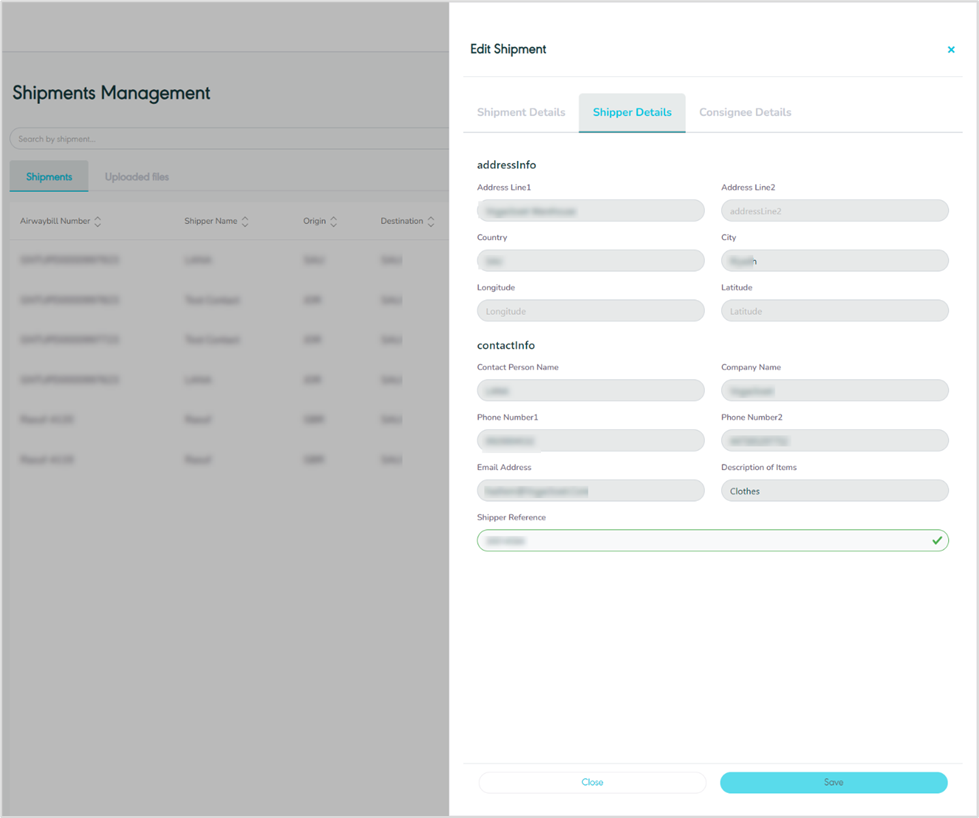
-
Edit Consignee
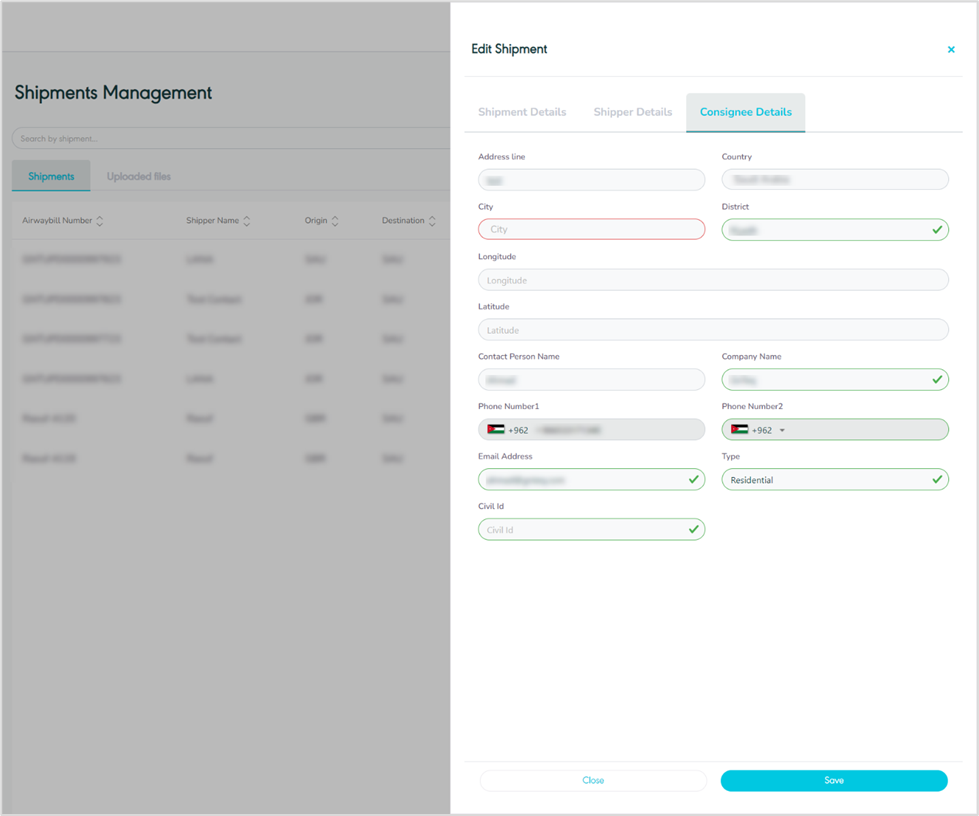
By clicking on Save, the system updates the consignee’s information successfully.
1.5 Manage Attachments
The user can add an attachment to the shipment by clicking on ‘Manage Attachments’ from Actions by navigating to the ‘Shipment’ screen the via Hub Ops Module as follows:
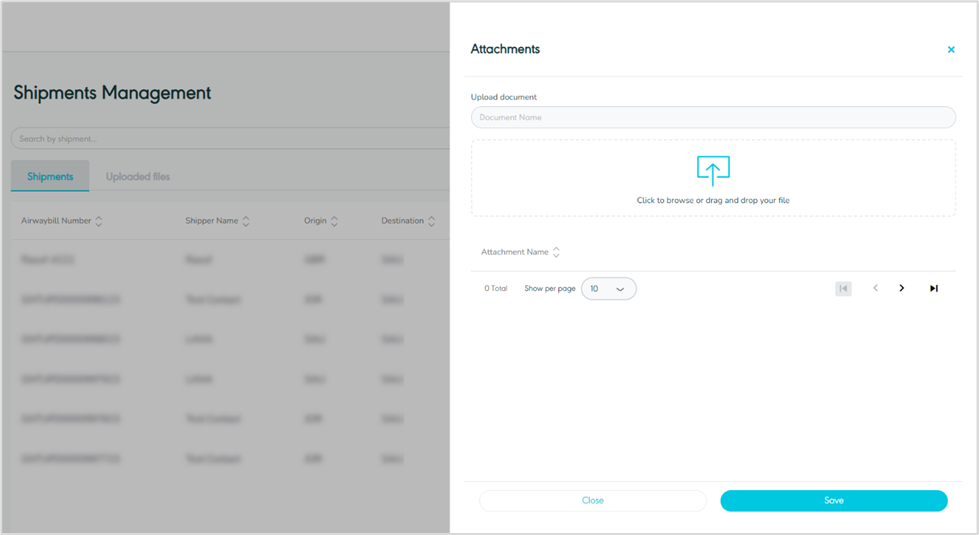
-
Upload Document: this field represents the document name.
By clicking on Save, the system will add the selected attachments to be linked to the respective shipment.
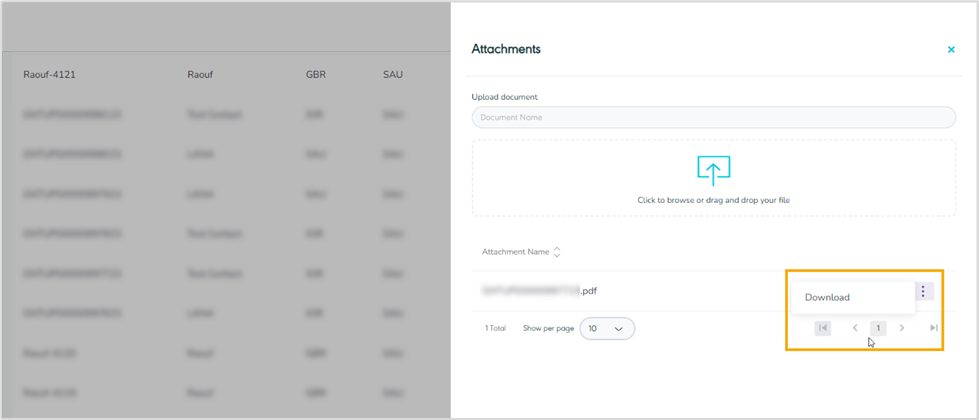
By clicking on Download, the system downloads the attachment file successfully.
1.6 Manage Item
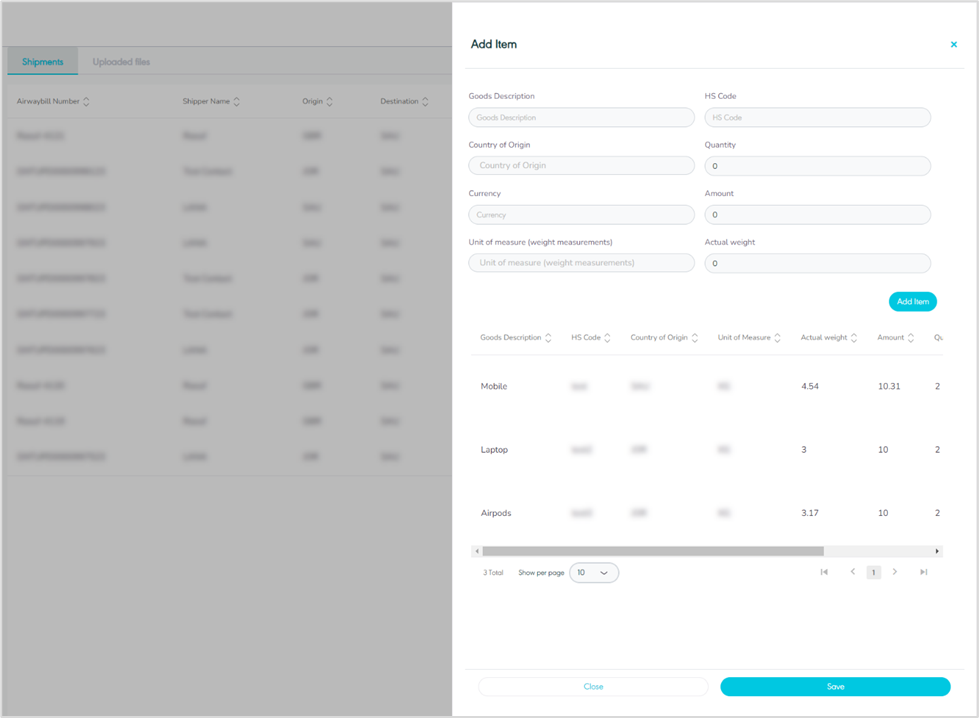
The user can add the item to the shipment by navigating to the ‘Manage Item’ screen from Actions via the Hub Ops Module as follows:
-
Goods Description: this field represents the item’s general description.
-
HS Code: this field represents the stands for Harmonized System Code, and it is an internationally standardized system of names and numbers used to classify traded products.
-
Country of Origin: this field represents the item’s country of origin.
-
Quantity: this field represents the item’s quantity.
-
Currency: this field represents the currency of the item amount.
-
Amount: this field represents the item’s amount.
-
Unit of Measure: : this field represents the unit used to quantify the size of the goods being shipped in kilograms (KG) or pounds (LB).
-
Actual Weight: this field represents the item’s actual weight value.
By clicking on Add item, the added item moves to the items list section.
By clicking on Save, the system adds an added item to the shipment successfully.
-
Rows Per Page: the user can select the number of items to show on each page.
1.7 Return Shipment
The user can return any non-delivered shipment to the origin by clicking on Return Shipment from Actions, by navigating to the ‘Shipment’ screen via the Hub Ops Module.
2. Container Management
The purpose of this feature is to manage the containers and their related settings through the following functionalities.
2.1 View Container
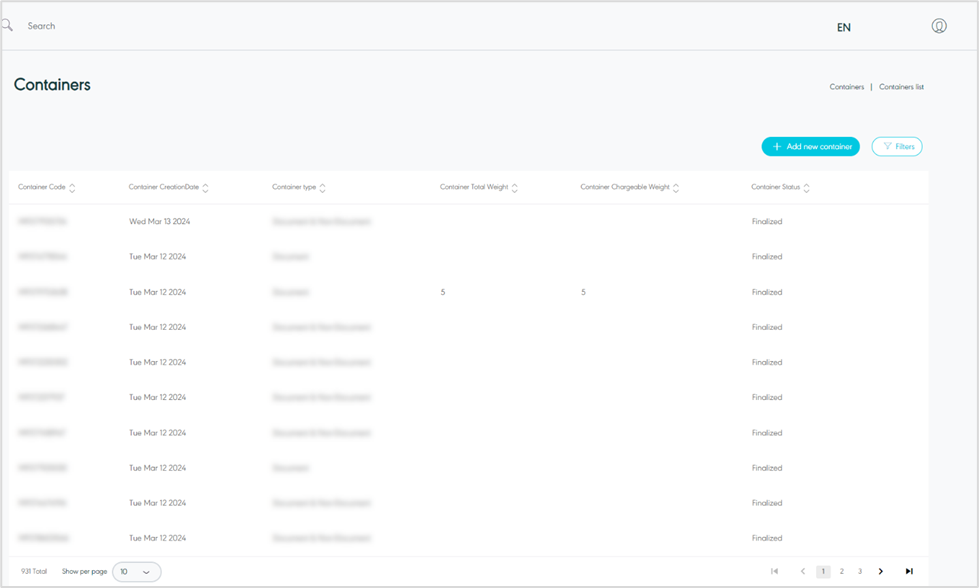
The user can view the defined container (also known as the Manifest) in the system by navigating to the ‘Container’ screen by choosing the Hub Ops Module from the left navigation panel as follows:
-
Add New Container: the user can add a new container by referring to Add New Container section.
-
Filter: the user can search for everything related to containers by filter button.
-
Show per page: the user can select the number of items to show on each page.
-
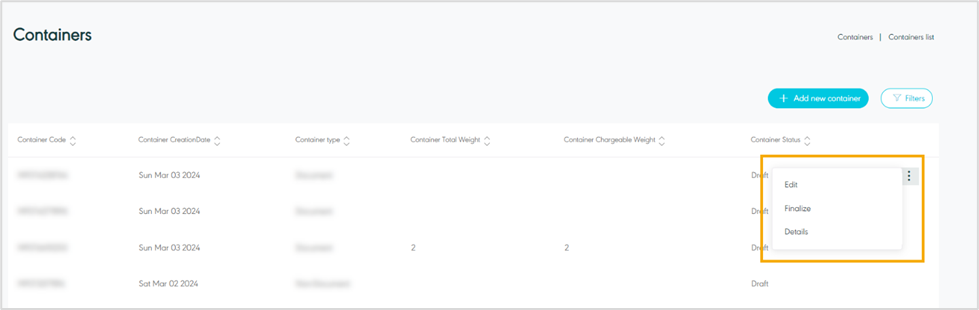
Actions: by clicking on this button the user can view specific container details by referring to View Container Details, edit by referring to edit Container, delete by referring to Delete Container or finalize by referring to Finalize Container as follows:
2.2 View Container Details
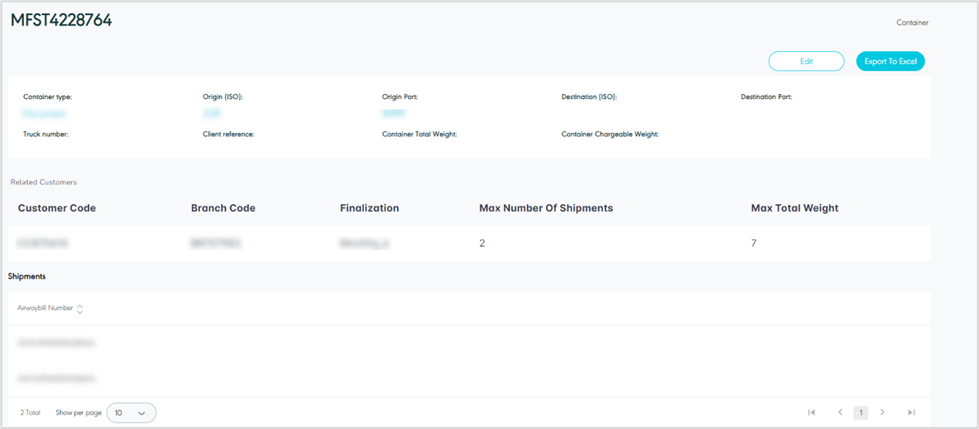
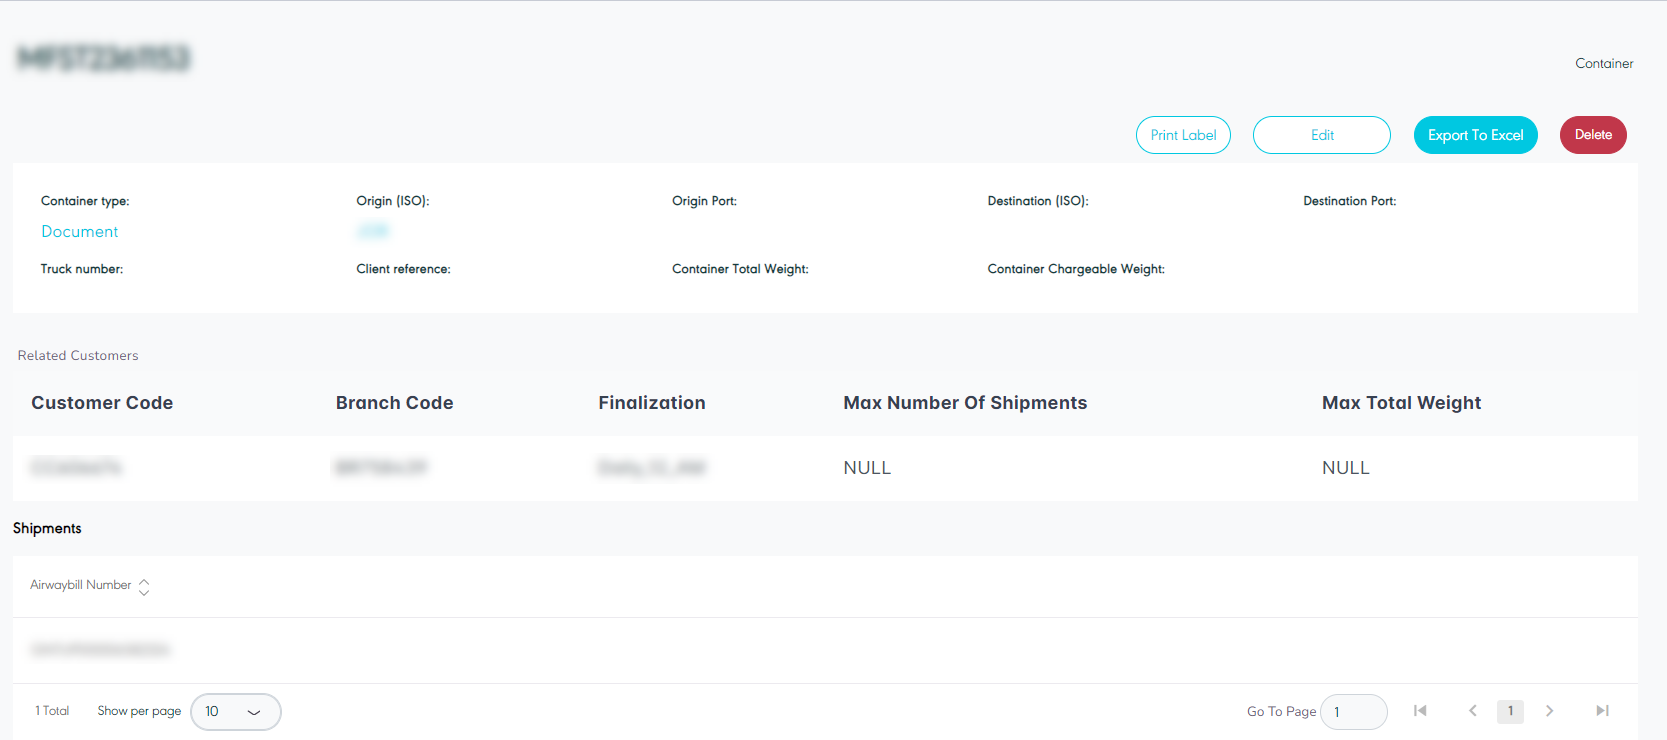
The user can view the container details by navigating to the ‘Container’ screen via the Hub Ops Module and clicking on Details from Actions as follows:
-
Edit: the user can edit the container information by clicking on the Edit button, if the container is finalized the user cannot edit container information.
-
Export to Excel: the user can export an Excel file by selecting export type by Item Level or Shipment Level.
2.3 Add New Container
The user can add a new container by navigating to the ‘Container’ screen via the Hub Ops module and clicking on Add New Container as follows:
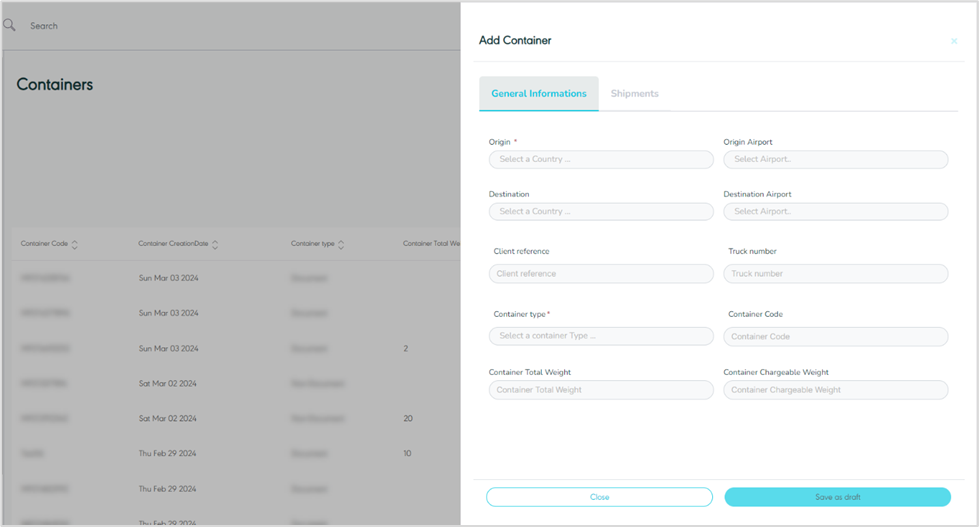
-
Origin: this field represents the container’s origin country.
-
Origin Airport: this field represents the container's origin airport.
-
Destination: this field represents the container’s arrival country.
-
Destination Airport: this field represents the container's destination airport.
-
Client Reference: this field represents the container’s unique number or text added and used by the shipper.
-
Truck Number: this field represents the truck number transporting the container in case of land freight.
-
Container Type: this field represents the container’s type, e.g.: Document, Non-Document, Normal, etc.
-
Container Code: this field represents the container’s external code used for integration purposes.
-
Container Total Weight: this field represents the total weight of all shipments within a container.
-
Container Chargeable Weight: this field represents the weight measurement that is used by the customer to determine the value of the goods.
-
Shipment
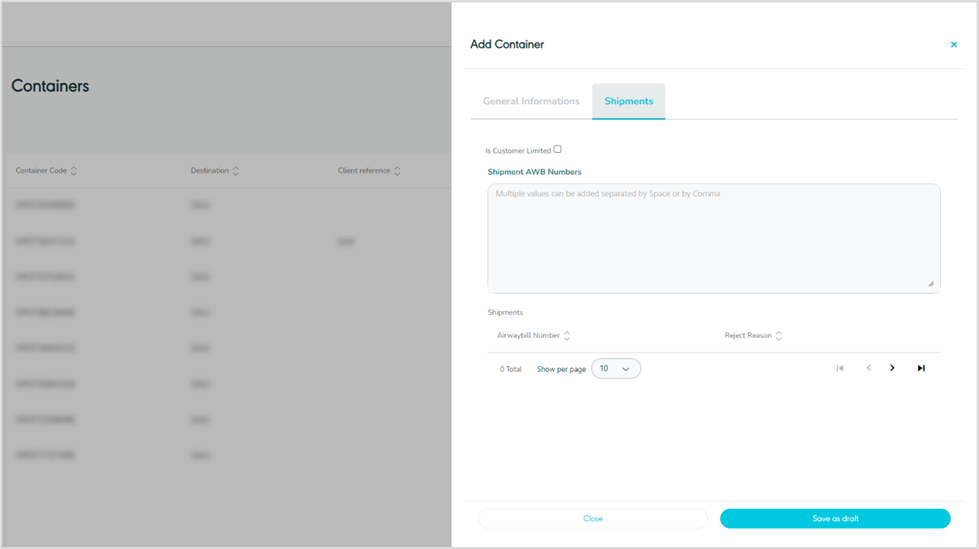
The user can view the shipments added to the container through the Shipments section.
-
Is Customer Limited: when this is enabled, it provides the option to restrict the container to either a single customer or multiple customers. This requires shipments to undergo a validation process to ensure they are associated with one of the linked customers. If not enabled, no validation will be conducted when adding shipments to the containers.
-
Shipment AWB Numbers: this input field permits the user to input all the AWB numbers to be included in the container, with built-in validation to check that the shipment has not already been added to another container.
-
Show per page: the user can select the number of items to show on each page.
By clicking on Save As Draft, the system adds a new container as a draft successfully.
2.4 Edit Container
The user can edit an existing container by clicking on Edit from Actions and navigating to the ‘Container’ screen via the Hub Ops Module as follows:
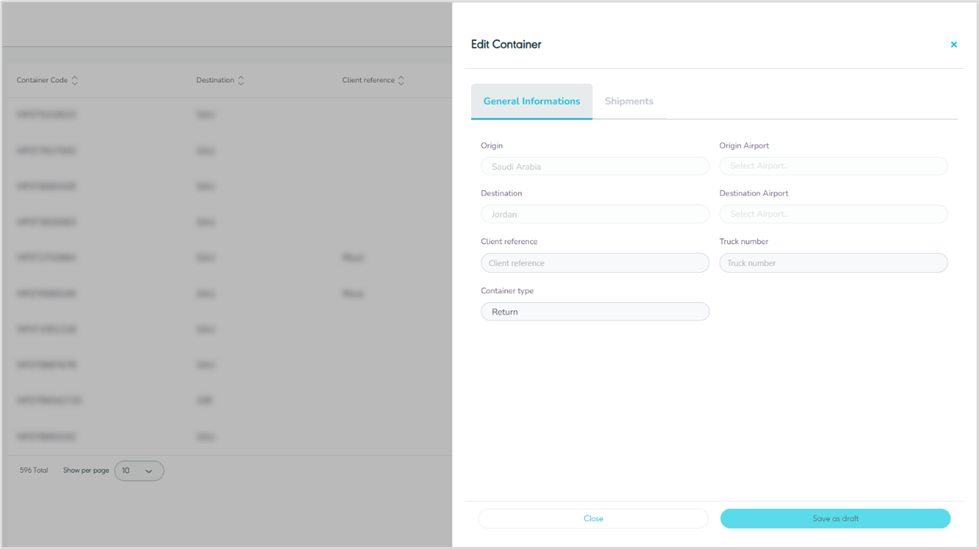
By clicking on Save as draft, the system saves any edit successfully as a draft.
2.5 Delete Container
The user can delete a draft container by navigating to the ‘Container’ screen via the Hub Ops Module and selecting the Details action then select Delete button.
2.6 Finalize Container
The user can confirm the final information of the container by navigating to the ‘Container’ screen via the Hub Ops Module and selecting the Finalize action.
3. Master Airwaybill Management
The purpose of this feature is to manage the master air waybill and their related settings through the following functionalities:
3.1 View Master Airwaybill
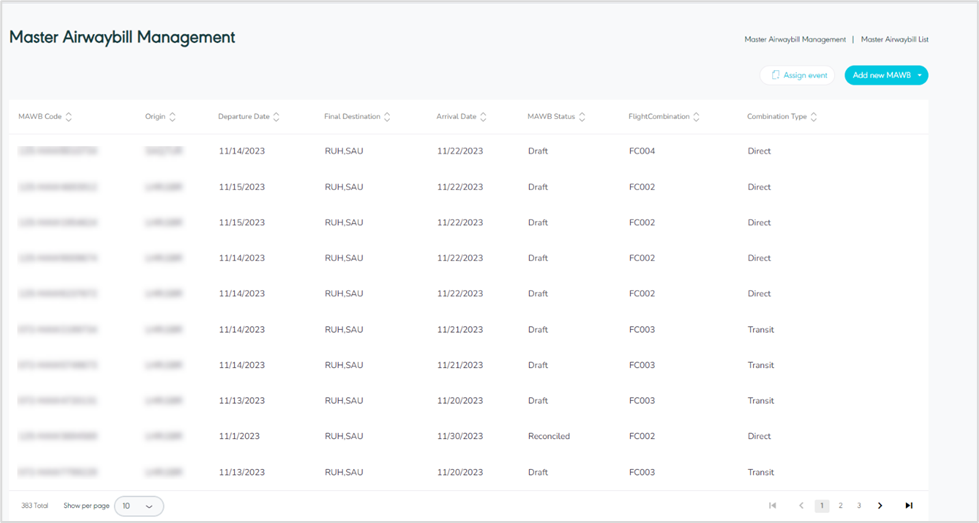
The user can view the defined MAWB in the portal by navigating to the ‘Master Airwaybill’ screen by choosing the Hub Ops Module from the left navigation panel as follows:
-
Assign event: the user can assign events to shipments by referring to the Assign event section.
-
Add new MAWB: the user can add a new container by referring to the Add new MAWB section.
-
Show per page: the user can select the number of items to show on each page.
-
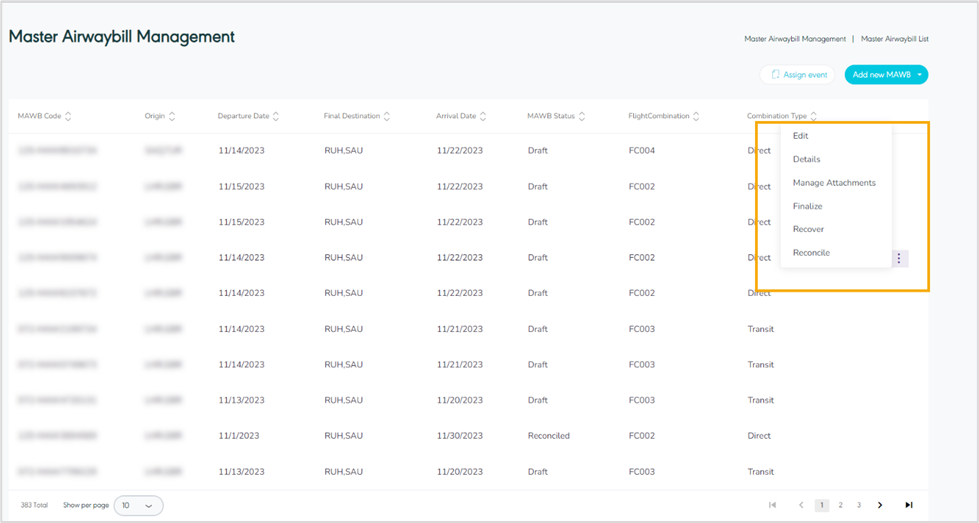
Actions: by clicking on this button the user can view specific MAWB details by referring to View Master Airwaybill Details, edit by referring to Edit Master Airwaybill, manage attachments by referring to Manage Attachment, finalize by referring to Finalize Master Airwaybill, delete by referring to Delete Master Airway bill, or Recover and Reconcile Mawb as follows:
3.2 View Master Airwaybill Details
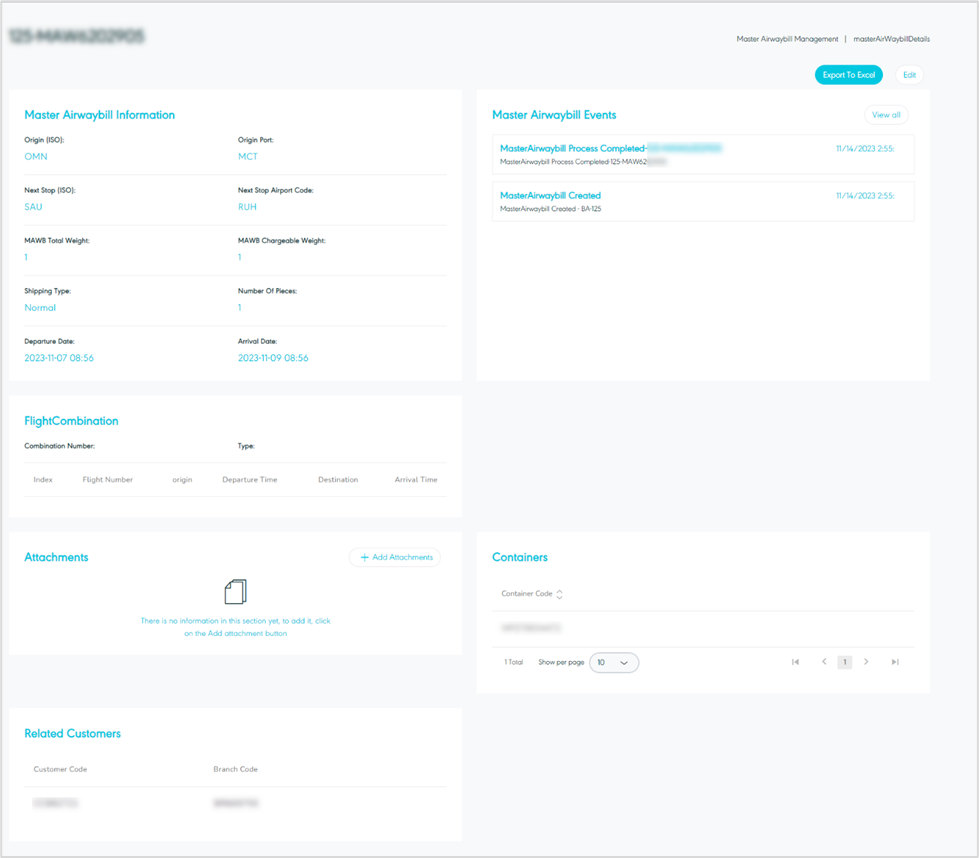
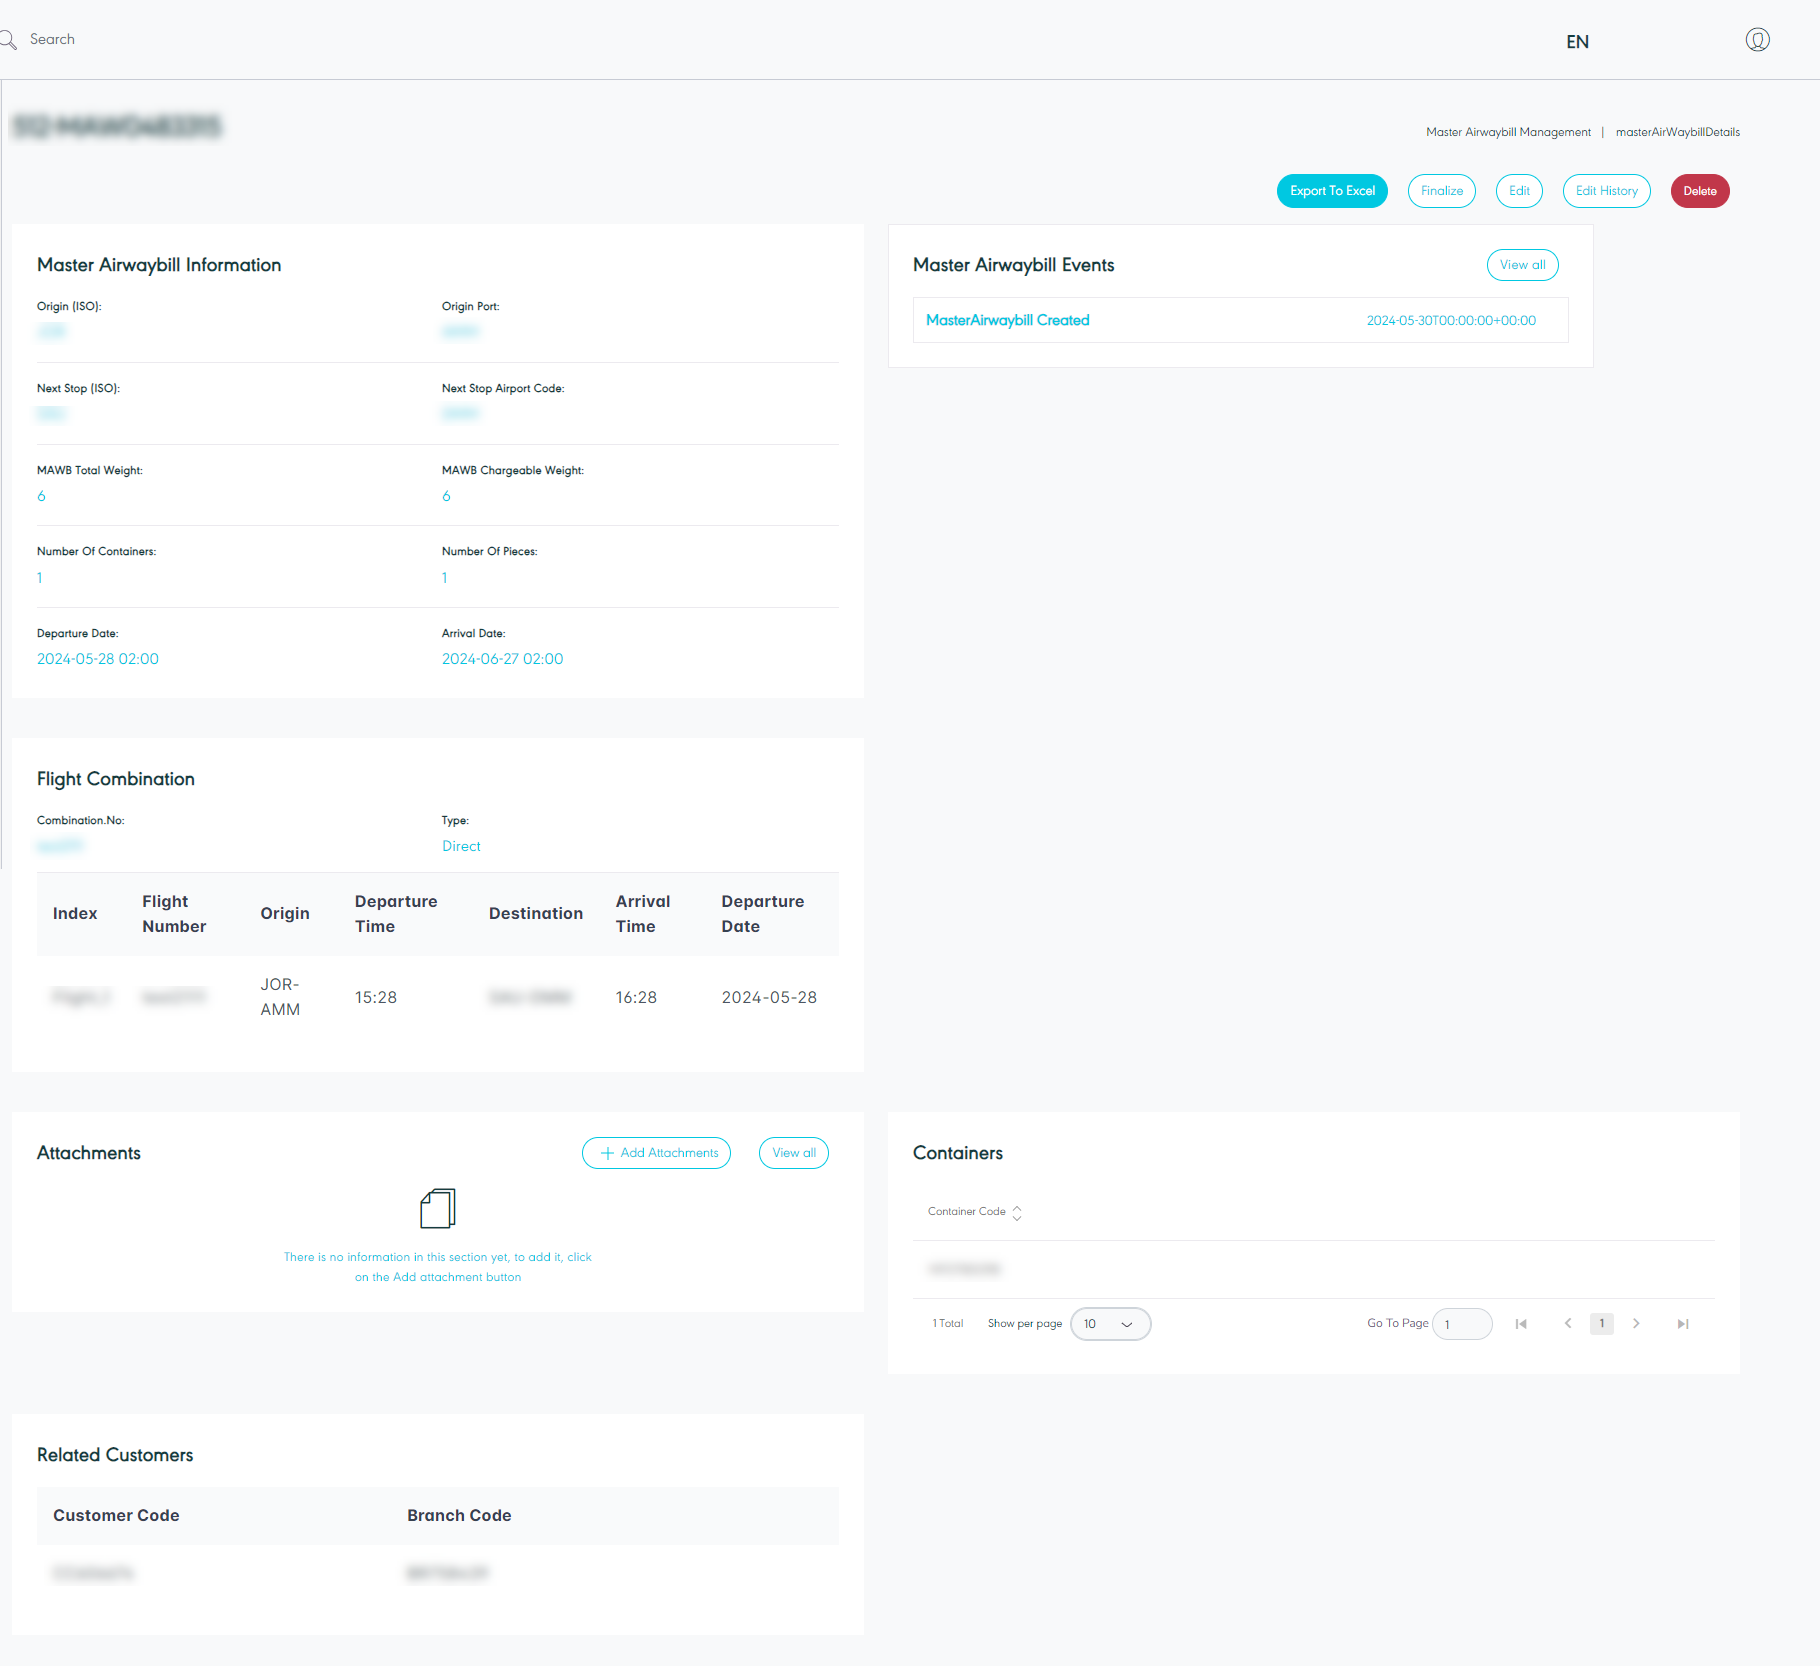
The user can view the MAWB details by navigating to the ‘Master Air waybill’ screen via Hub Ops and clicking on Details from Actions follows:
-
The user can through the MAWB details page show MAWB information and the events assigned on the MAWB, add and view attachments, containers, and related customers.
-
Export To Excel: the user can export an Excel file by selecting export type by Item Level or Shipment Level.
-
Edit: the user can edit the general information and container list by clicking on the Edit button.
-
Show per page: the user can select the number of items to show on each page.
3.3 Add New Master Airwaybill
3.3.1 Add New Master Airwaybill by Container
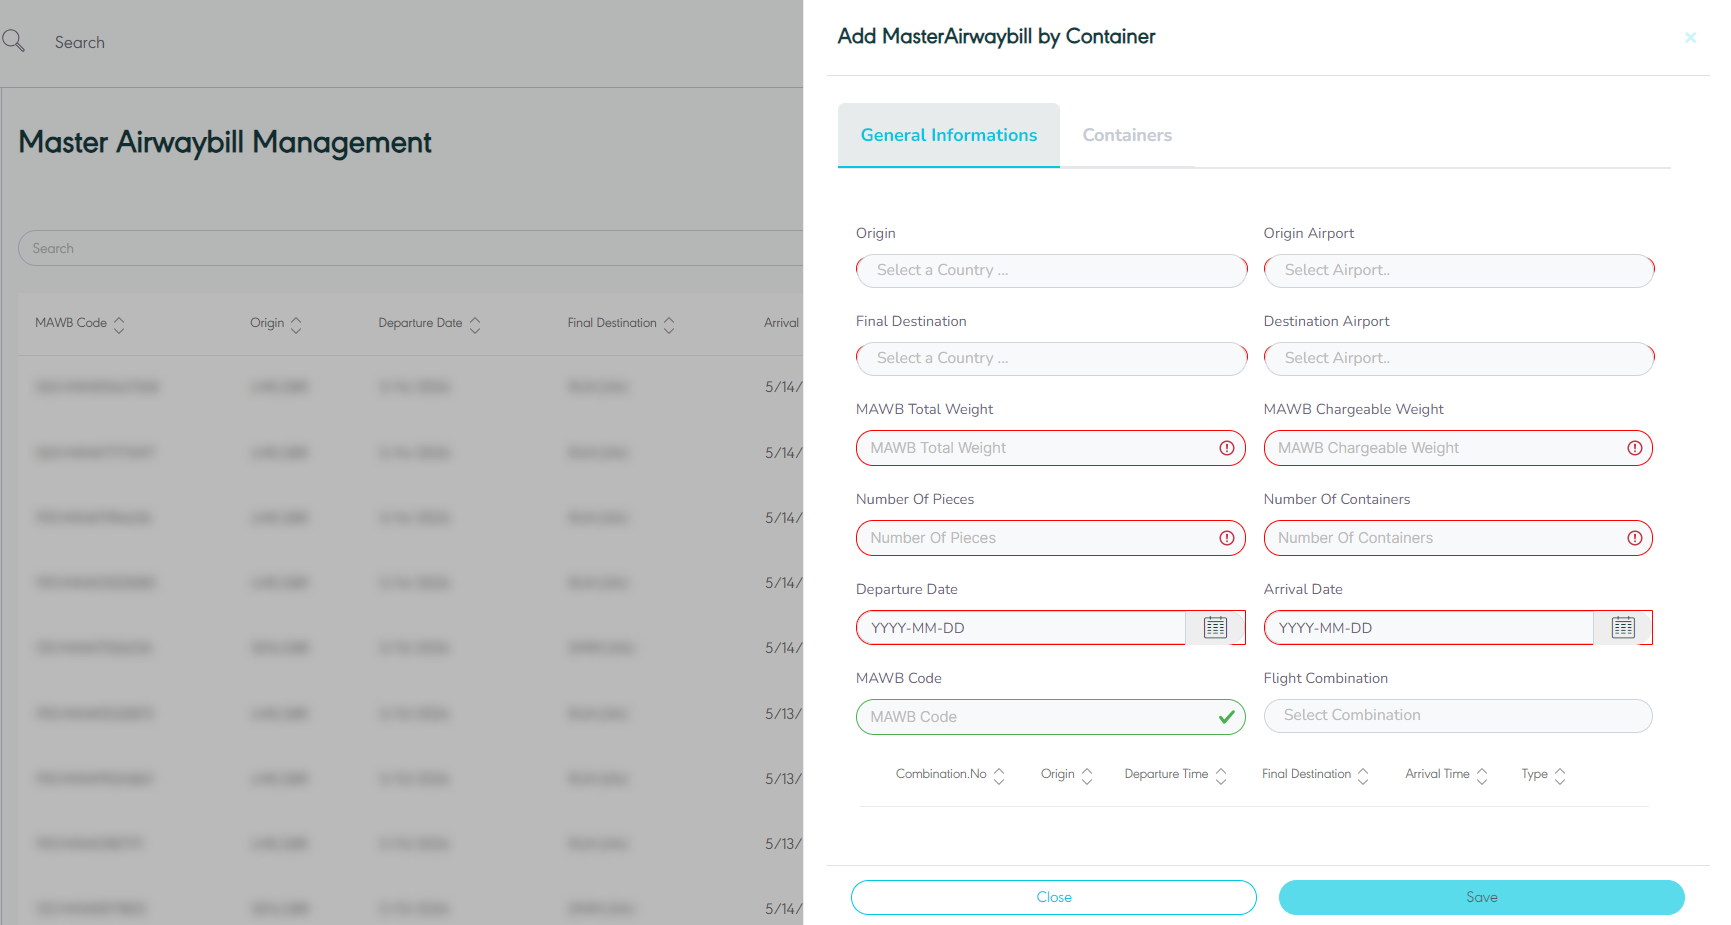
The user can add a new MAWB by container by navigating to the ‘Master Airwaybill’ screen via the Hub Ops Module and clicking on Add New MAWB by Container as follows:
-
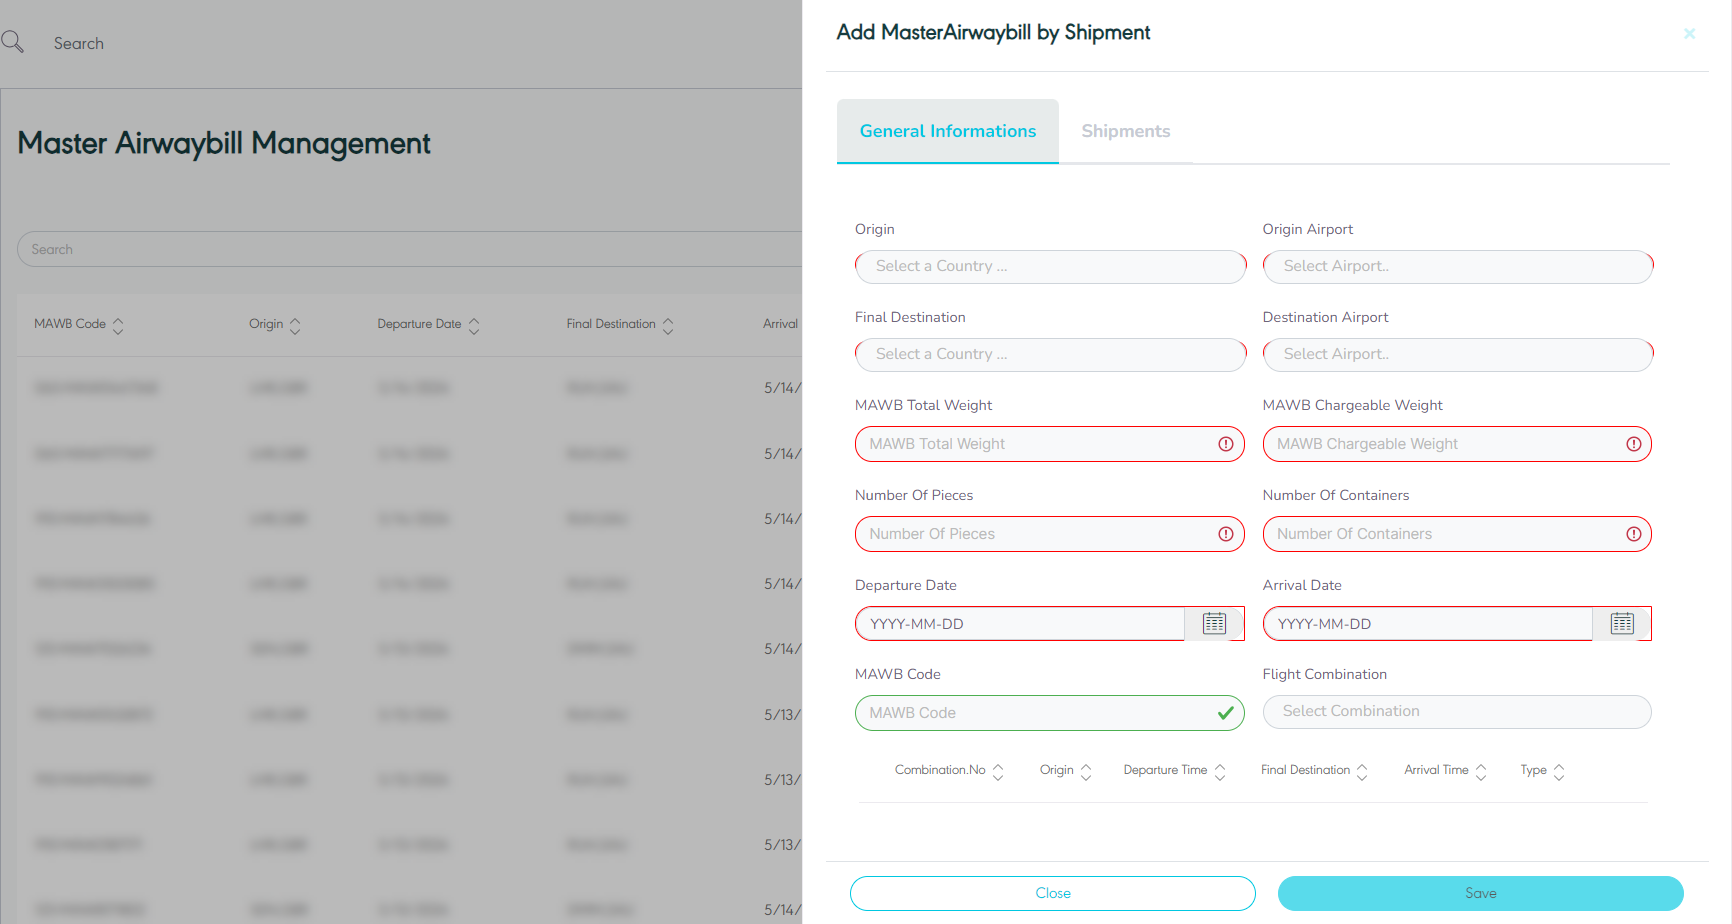
General Information
-
Origin: this field represents the MAWB’s origin country.
-
Origin Airport: this field represents MAWB’s origin airport.
-
Final Destination: this field represents MAWB’s destination country.
-
Destination Airport: this field represents MAWB’s destination airport.
-
MAWB Total Weight: this field represents the total weight of all shipments within a container that is presented in the MAWB.
-
MAWB Chargeable Weight: this field represents the weight measurement that is used by the customer to determine the value of the goods.
-
Number of Pieces: this field represents the number of shipments.
-
Number of Containers: this field Represents the number of containers for the shipment.
-
Departure Date: this field represents the departure date of the MAWB from the origin port.
-
Arrival Date: this field represents the arrival date of the MAWB to the next airport stop.
-
MAWB Code: this field represents the MAWB’s external code used for integration purposes.
-
Flight Combination: this field represents the unique reference of sets of flight using which the user can track the location of MAWB’s.
-
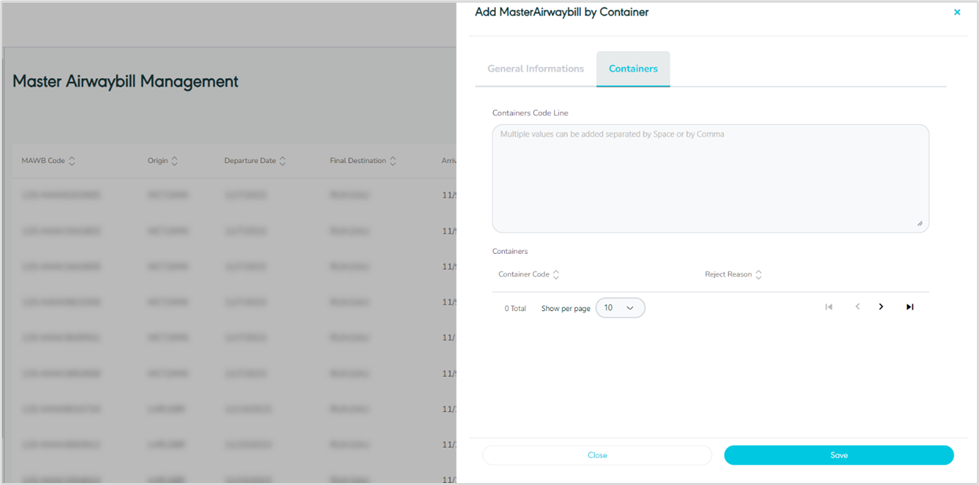
Container
-
Containers Code Line: this is used to add the container numbers within a MAWB as a validation that the container is not present in any other MAWB.
-
Show per page: the user can select the number of items to show on each page.
By clicking on Save, the system adds new MAWB by container information successfully.
3.3.2 Add New MAWB by Shipment
The user can add a new MAWB by Shipment by navigating to the ‘Master Airwaybill’ screen via the Hub Ops Module and clicking on Add New MAWB by Shipments as follows:
-
General Information
-
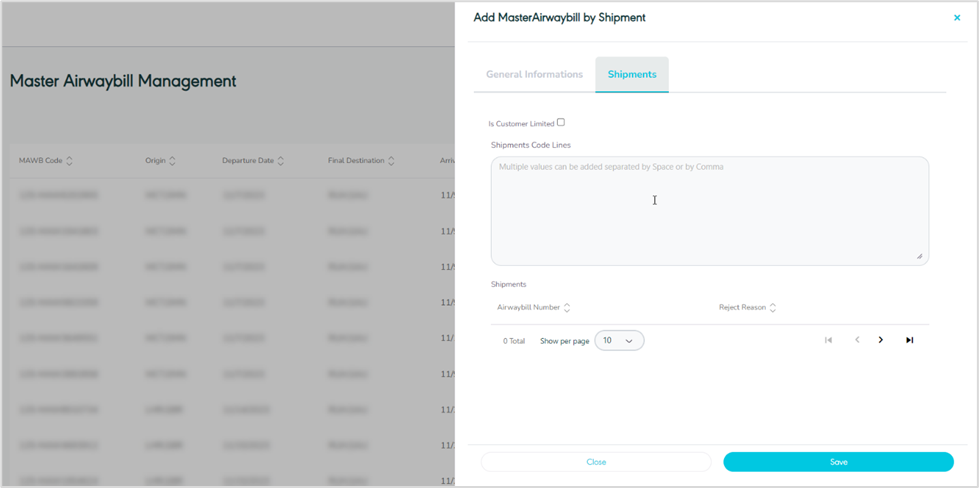
Shipment
-
Is Customer Limited: when this is enabled, it provides the option to restrict the container to either a single customer or multiple customers. This requires shipments to undergo a validation process to ensure they are associated with one of the linked customers. If not enabled, no validation will be conducted when adding shipments to the containers.
-
Shipment Code lines: this input field permits the user to input all the AWB numbers to be included in the container, with built-in validation to check that the shipment has not already been added to another container.
-
Show per page: the user can select the number of items to show on each page.
By clicking on Save, the system adds new MAWB by shipment information successfully.
3.4 Edit Master Airwaybill
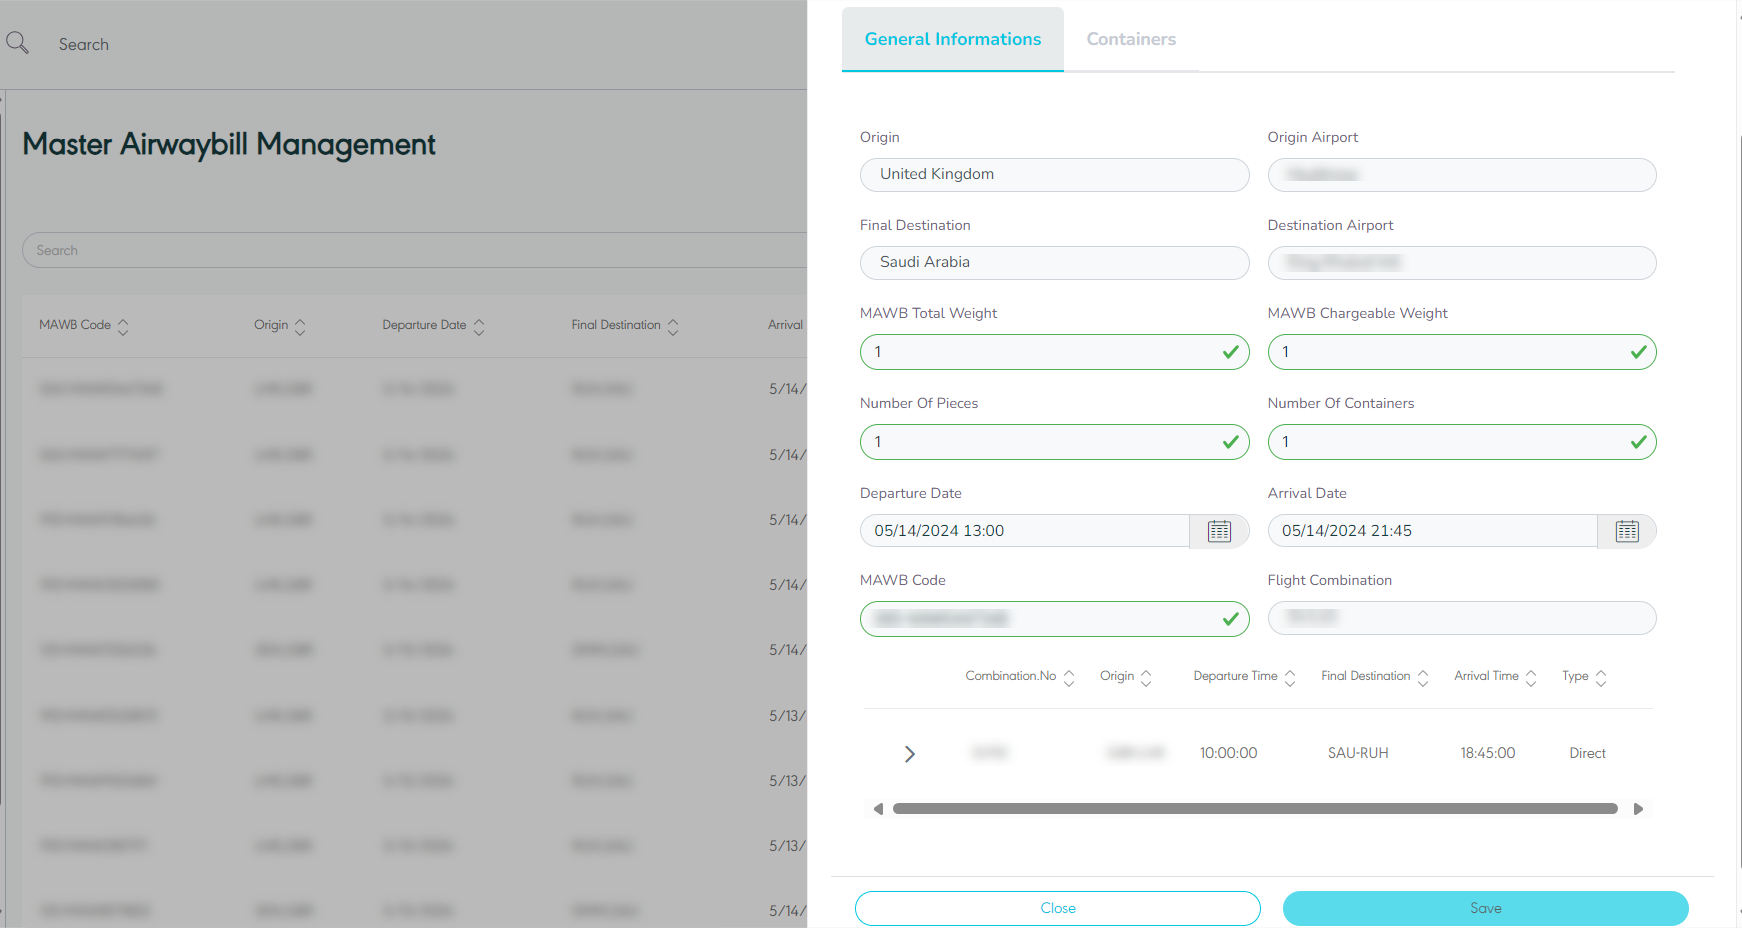
The user can edit an existing MAWB by clicking on Edit from Actions by navigating to the ‘Master Airway bill’ screen via the Hub Ops module as follows:
-
Container
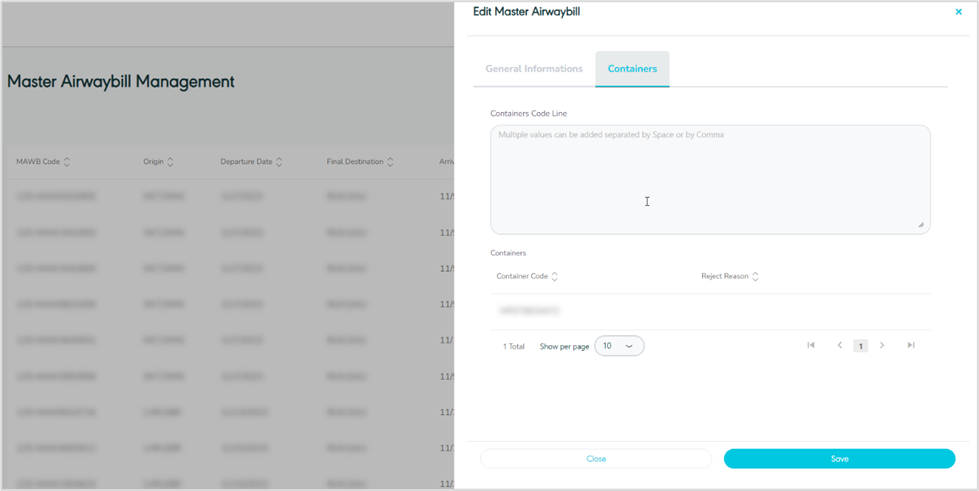
By clicking on Save as draft, the system saves any edit successfully as a draft.
3.5 Manage Attachments
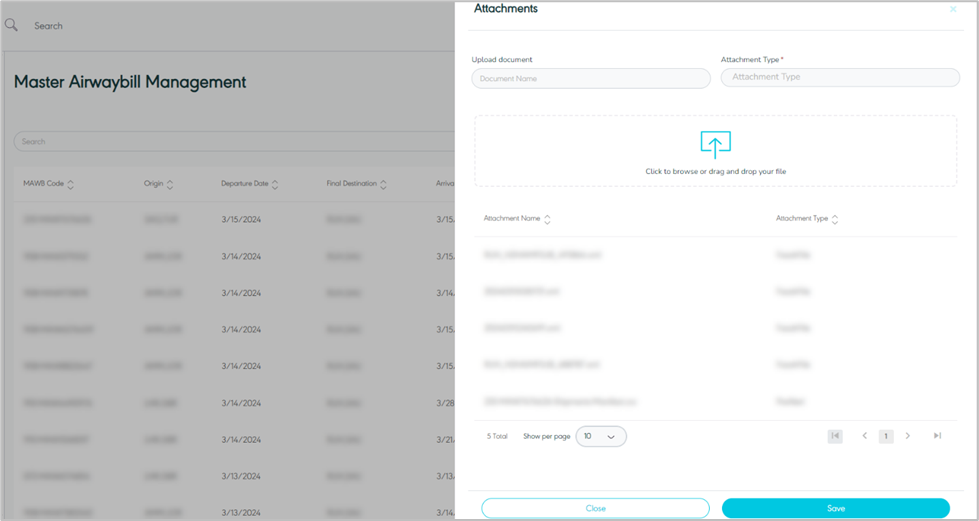
The user can add attachments to the MAWB by navigating to the ‘Manage Attachments’ screen via the Hub Ops module and clicking on Details from Actions as follows:
-
Show per page: the user can select the number of items to show on each page.
By clicking on the Save button, the system will add the selected attachments to the MAWB successfully.
3.6 Delete Master Airway bill
The user can delete a draft master airway bill by navigating to the ‘Master Airway bill’ screen via the Hub Ops Module and selecting the Details action then select Delete button.
3.7 Finalize master Airwaybill
The user can confirm the final information of the MAWB by navigating to the ‘Master Airwaybill’ screen via the Hub Ops module and clicking on Finalize.
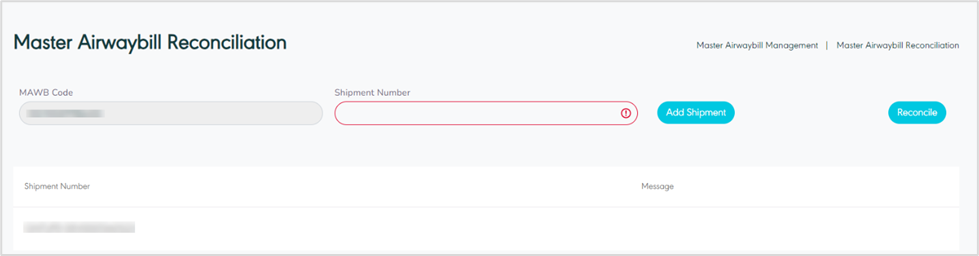
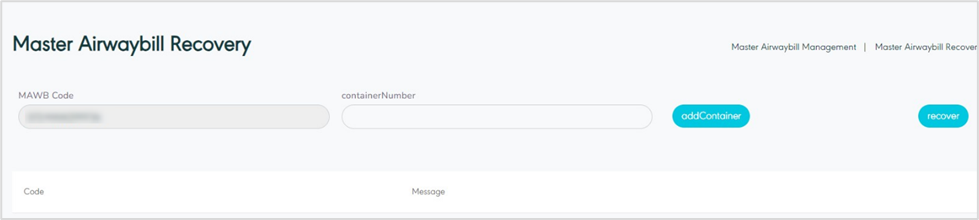
3.8 Recover and Reconcile
The user can recover the master airwaybill as follows:
-
Finalize the MAWB.
-
Click on the option Recover.
-
Scan container – add a container number to MAWB.
The user can reconcile the master airwaybill as follows:
-
After recovering the master airwaybill.
-
Click the option Reconcile.
-
can shipment number – add shipment to MAWB.